> ## Documentation Index
> Fetch the complete documentation index at: https://docs.spott.io/llms.txt
> Use this file to discover all available pages before exploring further.
# Using Views
> Create, save, and manage custom views in Spott to quickly access filtered data for Candidates, Jobs, Companies, Contacts, and Opportunities.
Views save a table configuration: filters, sorting, visible columns, their order, and
widths. You access saved views from the dropdown in the top-right corner of a record
list, which shows **Default View** until you create your own.
## Open a record list
Views are supported on these record tables:
* **Candidates**
* **Jobs**
* **Companies**
* **Contacts**
* **Opportunities**
## Apply filters and sorting
 Use the **Filters** button to narrow down your list (for example by stage, location,
or activity date), adjust sorting, and configure columns via **View Settings**. When
you change something on the current view, a **save / discard** prompt appears at the
top of the table. Changes only stick after you save them.
## Create a new view
1. Click the current view name in the top-right corner (for example **Default View**).
2. From the dropdown, select **+ Create New view**. The new view starts as a copy of
the one you are on.
Use the **Filters** button to narrow down your list (for example by stage, location,
or activity date), adjust sorting, and configure columns via **View Settings**. When
you change something on the current view, a **save / discard** prompt appears at the
top of the table. Changes only stick after you save them.
## Create a new view
1. Click the current view name in the top-right corner (for example **Default View**).
2. From the dropdown, select **+ Create New view**. The new view starts as a copy of
the one you are on.
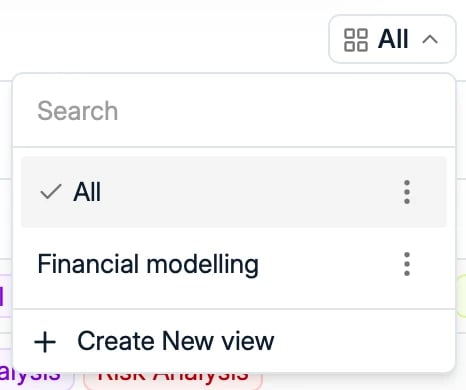 3. Give your view a name, for example *Law*, *Recent Activity*, or *Open Roles in UK*.
Your filters, sorting preferences, and visible columns are all saved in the view.
## Access your saved views
Your custom views appear in the same dropdown. Click a view name to switch instantly
between saved configurations. You can create as many views as you like, each tailored
to a specific workflow or segment.
## Edit or delete existing views
1. Open the dropdown again.
2. Click the three dots next to a saved view to **rename** or **delete** it.
Deleting a view only removes the saved configuration. Your underlying data stays safe.
Views are personal: other users in your workspace create and manage their own views
independently.
3. Give your view a name, for example *Law*, *Recent Activity*, or *Open Roles in UK*.
Your filters, sorting preferences, and visible columns are all saved in the view.
## Access your saved views
Your custom views appear in the same dropdown. Click a view name to switch instantly
between saved configurations. You can create as many views as you like, each tailored
to a specific workflow or segment.
## Edit or delete existing views
1. Open the dropdown again.
2. Click the three dots next to a saved view to **rename** or **delete** it.
Deleting a view only removes the saved configuration. Your underlying data stays safe.
Views are personal: other users in your workspace create and manage their own views
independently.