> ## Documentation Index
> Fetch the complete documentation index at: https://docs.spott.io/llms.txt
> Use this file to discover all available pages before exploring further.
# Placements
> How Spott tracks and manages successful hires, connecting candidates, jobs, and clients into a single placement record.
You can quickly navigate to the Placements page with `G` then `P`. See all
[keyboard shortcuts](/docs/settings/keyboard-shortcuts).
**Placements** in Spott represent the successful outcome of your recruitment process, when a candidate is matched and confirmed for a role.
A placement links together the **job**, the **candidate**, and the **client**, giving you a complete record of the hire. Placements also power reporting and revenue insights, helping you track performance and forecast business growth.
## Create a new placement from an existing candidate
### Step 1. Navigate to an open job
In Spott, go to **Jobs**.
* Find the job you want to place a candidate for
* Click on the job title
### Step 2. Place a candidate
* Click on the candidate’s **professional title**, directly underneath their name.
Clicking their *name* opens the candidate profile instead, so aim for the title on
the line below it.
* Select **Mark placed**
### Step 3. Choose the placement type
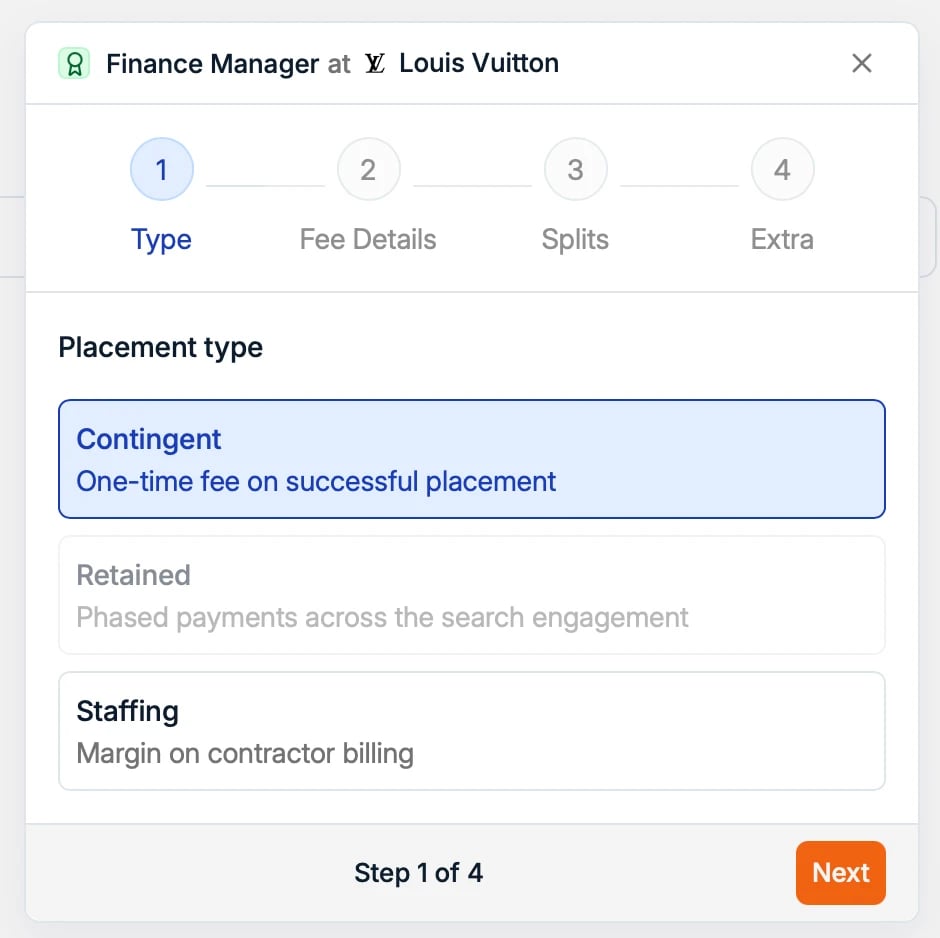 Marking a candidate placed opens a short, guided flow. First pick the **placement type**,
which sets the fee model and the fields you fill in next:
* **Contingent**, a one-time fee on a successful placement (a typical permanent hire).
* **Retained**, phased payments across the search engagement. The fee basis can be a
**percentage of the compensation or a flat fee**, allocated across the payment
milestones of your agreement.
* **Staffing**, a margin on contractor billing, for temp and interim work.
### Step 4. Fill in the details
Marking a candidate placed opens a short, guided flow. First pick the **placement type**,
which sets the fee model and the fields you fill in next:
* **Contingent**, a one-time fee on a successful placement (a typical permanent hire).
* **Retained**, phased payments across the search engagement. The fee basis can be a
**percentage of the compensation or a flat fee**, allocated across the payment
milestones of your agreement.
* **Staffing**, a margin on contractor billing, for temp and interim work.
### Step 4. Fill in the details
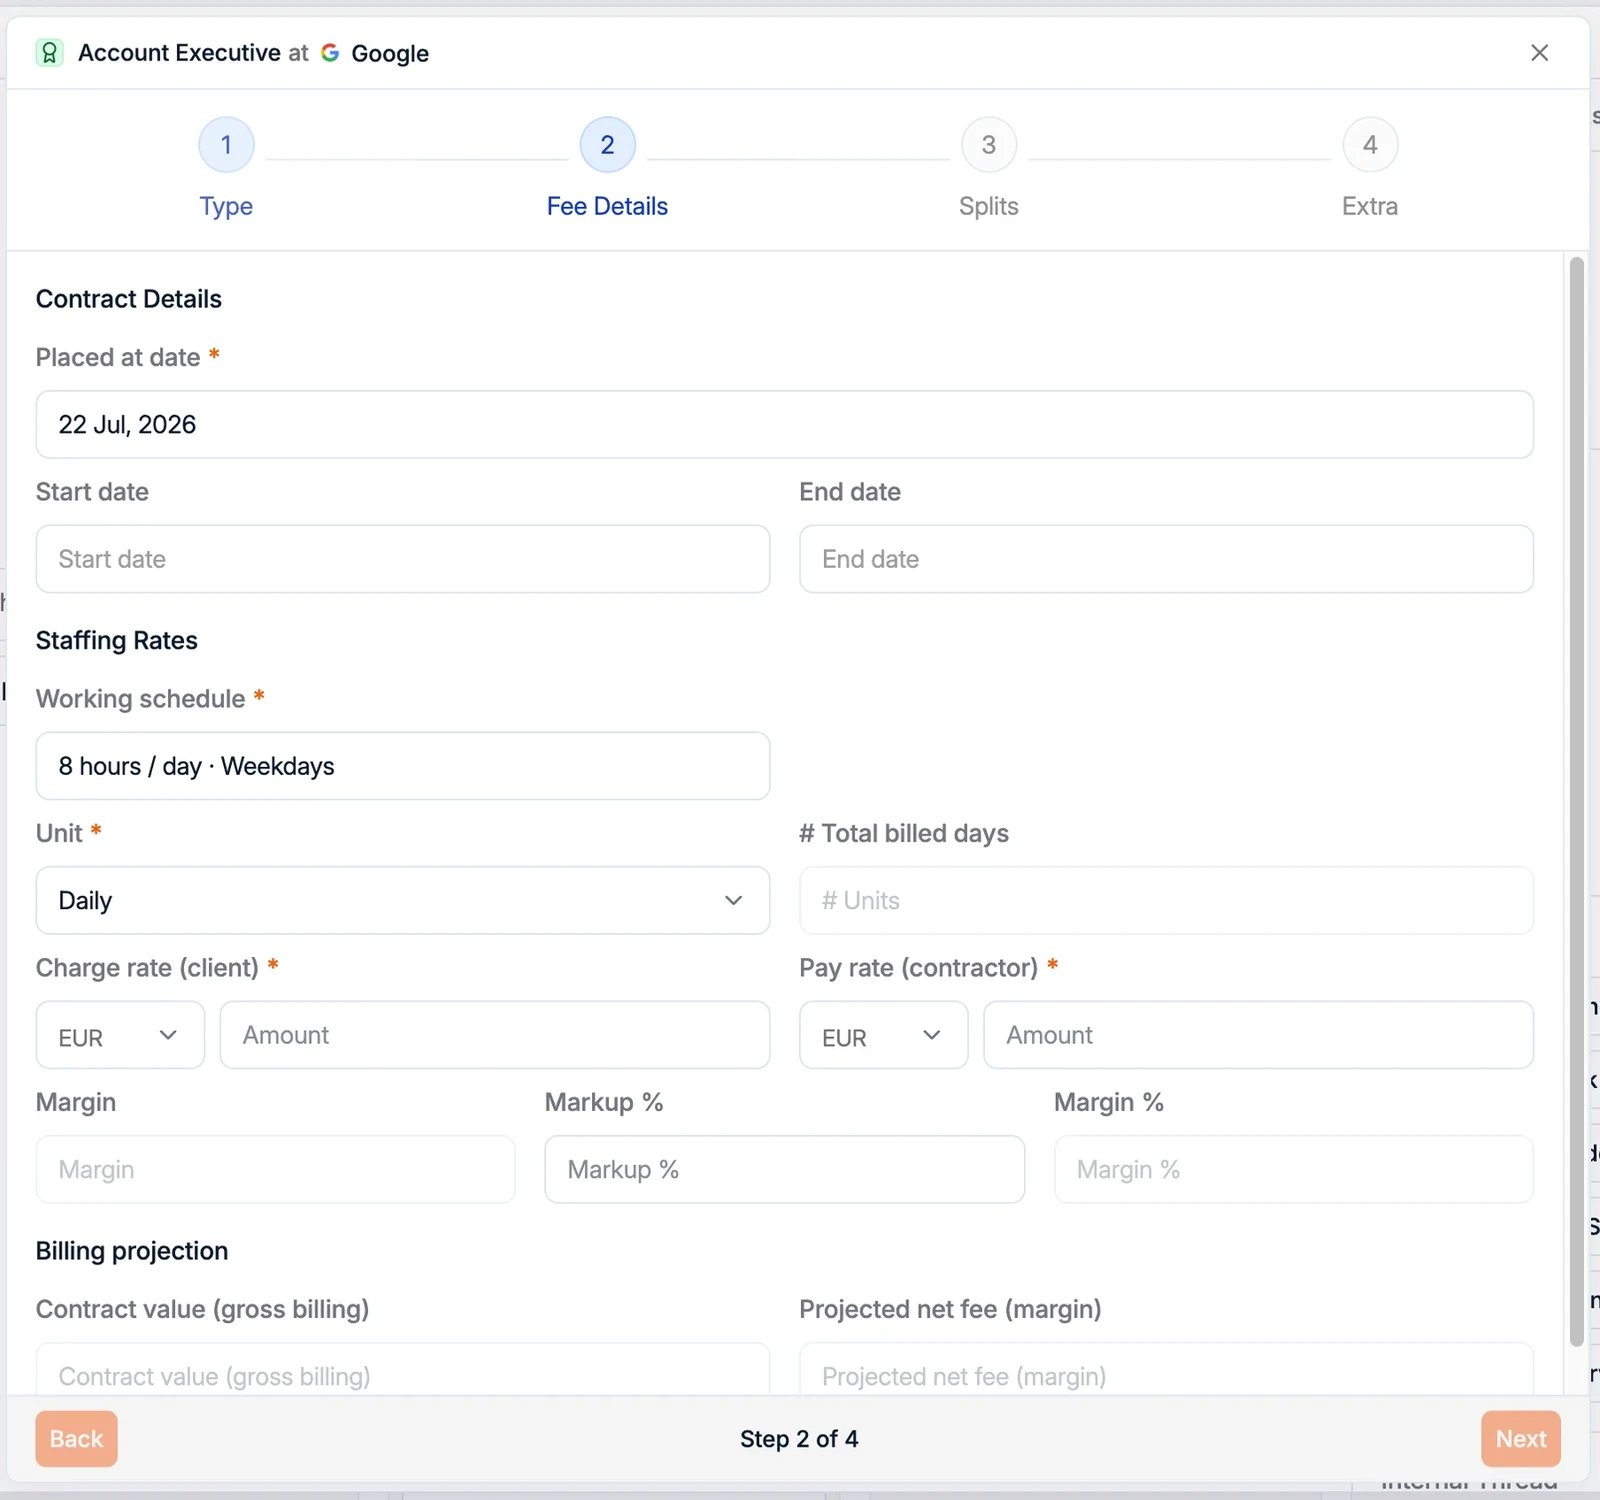 The remaining steps depend on the type you chose:
**Fee Details** always carries the **placed at** date and the **start** and **end**
dates. The fee itself is captured differently per type:
* **Permanent** (Contingent or Retained): a fee on the placement, as a percentage of
the compensation or a flat amount. Setting an end date on a contingent placement
puts the candidate back into the pool of available candidates once the contract
ends.
* **Staffing**: the **working schedule**, the **unit** (daily or hourly), the
**charge rate** billed to the client, and the **pay rate** paid to the contractor.
Spott projects the contract value and the net fee (margin) from those. For interim
placements you can set a **fixed number of days billed** instead of deriving it
from the working schedule.
The remaining steps depend on the type you chose:
**Fee Details** always carries the **placed at** date and the **start** and **end**
dates. The fee itself is captured differently per type:
* **Permanent** (Contingent or Retained): a fee on the placement, as a percentage of
the compensation or a flat amount. Setting an end date on a contingent placement
puts the candidate back into the pool of available candidates once the contract
ends.
* **Staffing**: the **working schedule**, the **unit** (daily or hourly), the
**charge rate** billed to the client, and the **pay rate** paid to the contractor.
Spott projects the contract value and the net fee (margin) from those. For interim
placements you can set a **fixed number of days billed** instead of deriving it
from the working schedule.
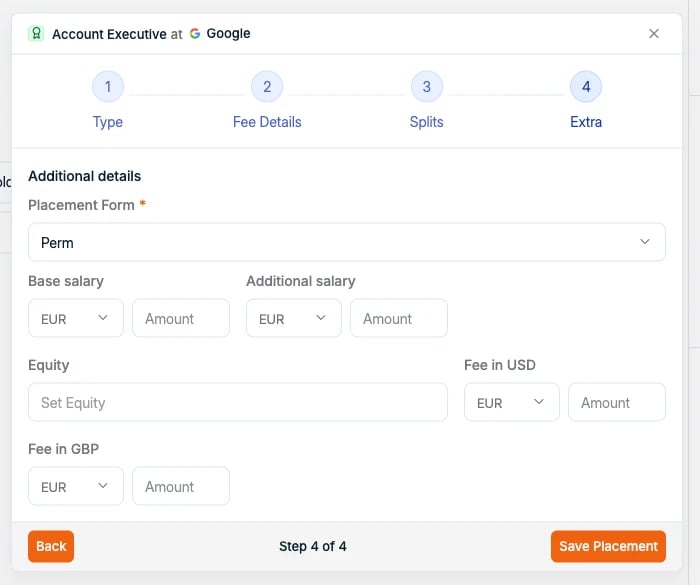
 The other two steps are the same for every type:
* **Splits**: how the fee is divided across users. The total must equal 100%. If the
split was already agreed on the [job](/docs/jobs/job-details), set it there and
the agreement is on record before the placement is made.
* **Extra**: the fields from your placement form, such as base salary, additional
salary, equity, and fees in other currencies. You decide which fields appear here:
placement forms are set up under **Settings → [Templates](/docs/settings/templates)**.
The other two steps are the same for every type:
* **Splits**: how the fee is divided across users. The total must equal 100%. If the
split was already agreed on the [job](/docs/jobs/job-details), set it there and
the agreement is on record before the placement is made.
* **Extra**: the fields from your placement form, such as base salary, additional
salary, equity, and fees in other currencies. You decide which fields appear here:
placement forms are set up under **Settings → [Templates](/docs/settings/templates)**.
 ## Custom placement forms
Create **as many placement forms as you need**. Real placements vary more than the
three types do: a permanent hire with a bonus structure captures different data from
one with equity, and an interim contract with a rate revision captures different data
again. Rather than forcing everything through one form per type, you build a form for
each variation you actually run, under **Settings → Templates**.
The form controls which fields appear in the
**Extra** step and on the placement record, so you can track exactly what each type
needs, for example rate revisions and contract extensions on staffing placements, or
base salary, bonus, and equity on permanent ones. Capturing the right fields keeps your
reporting and billing accurate.
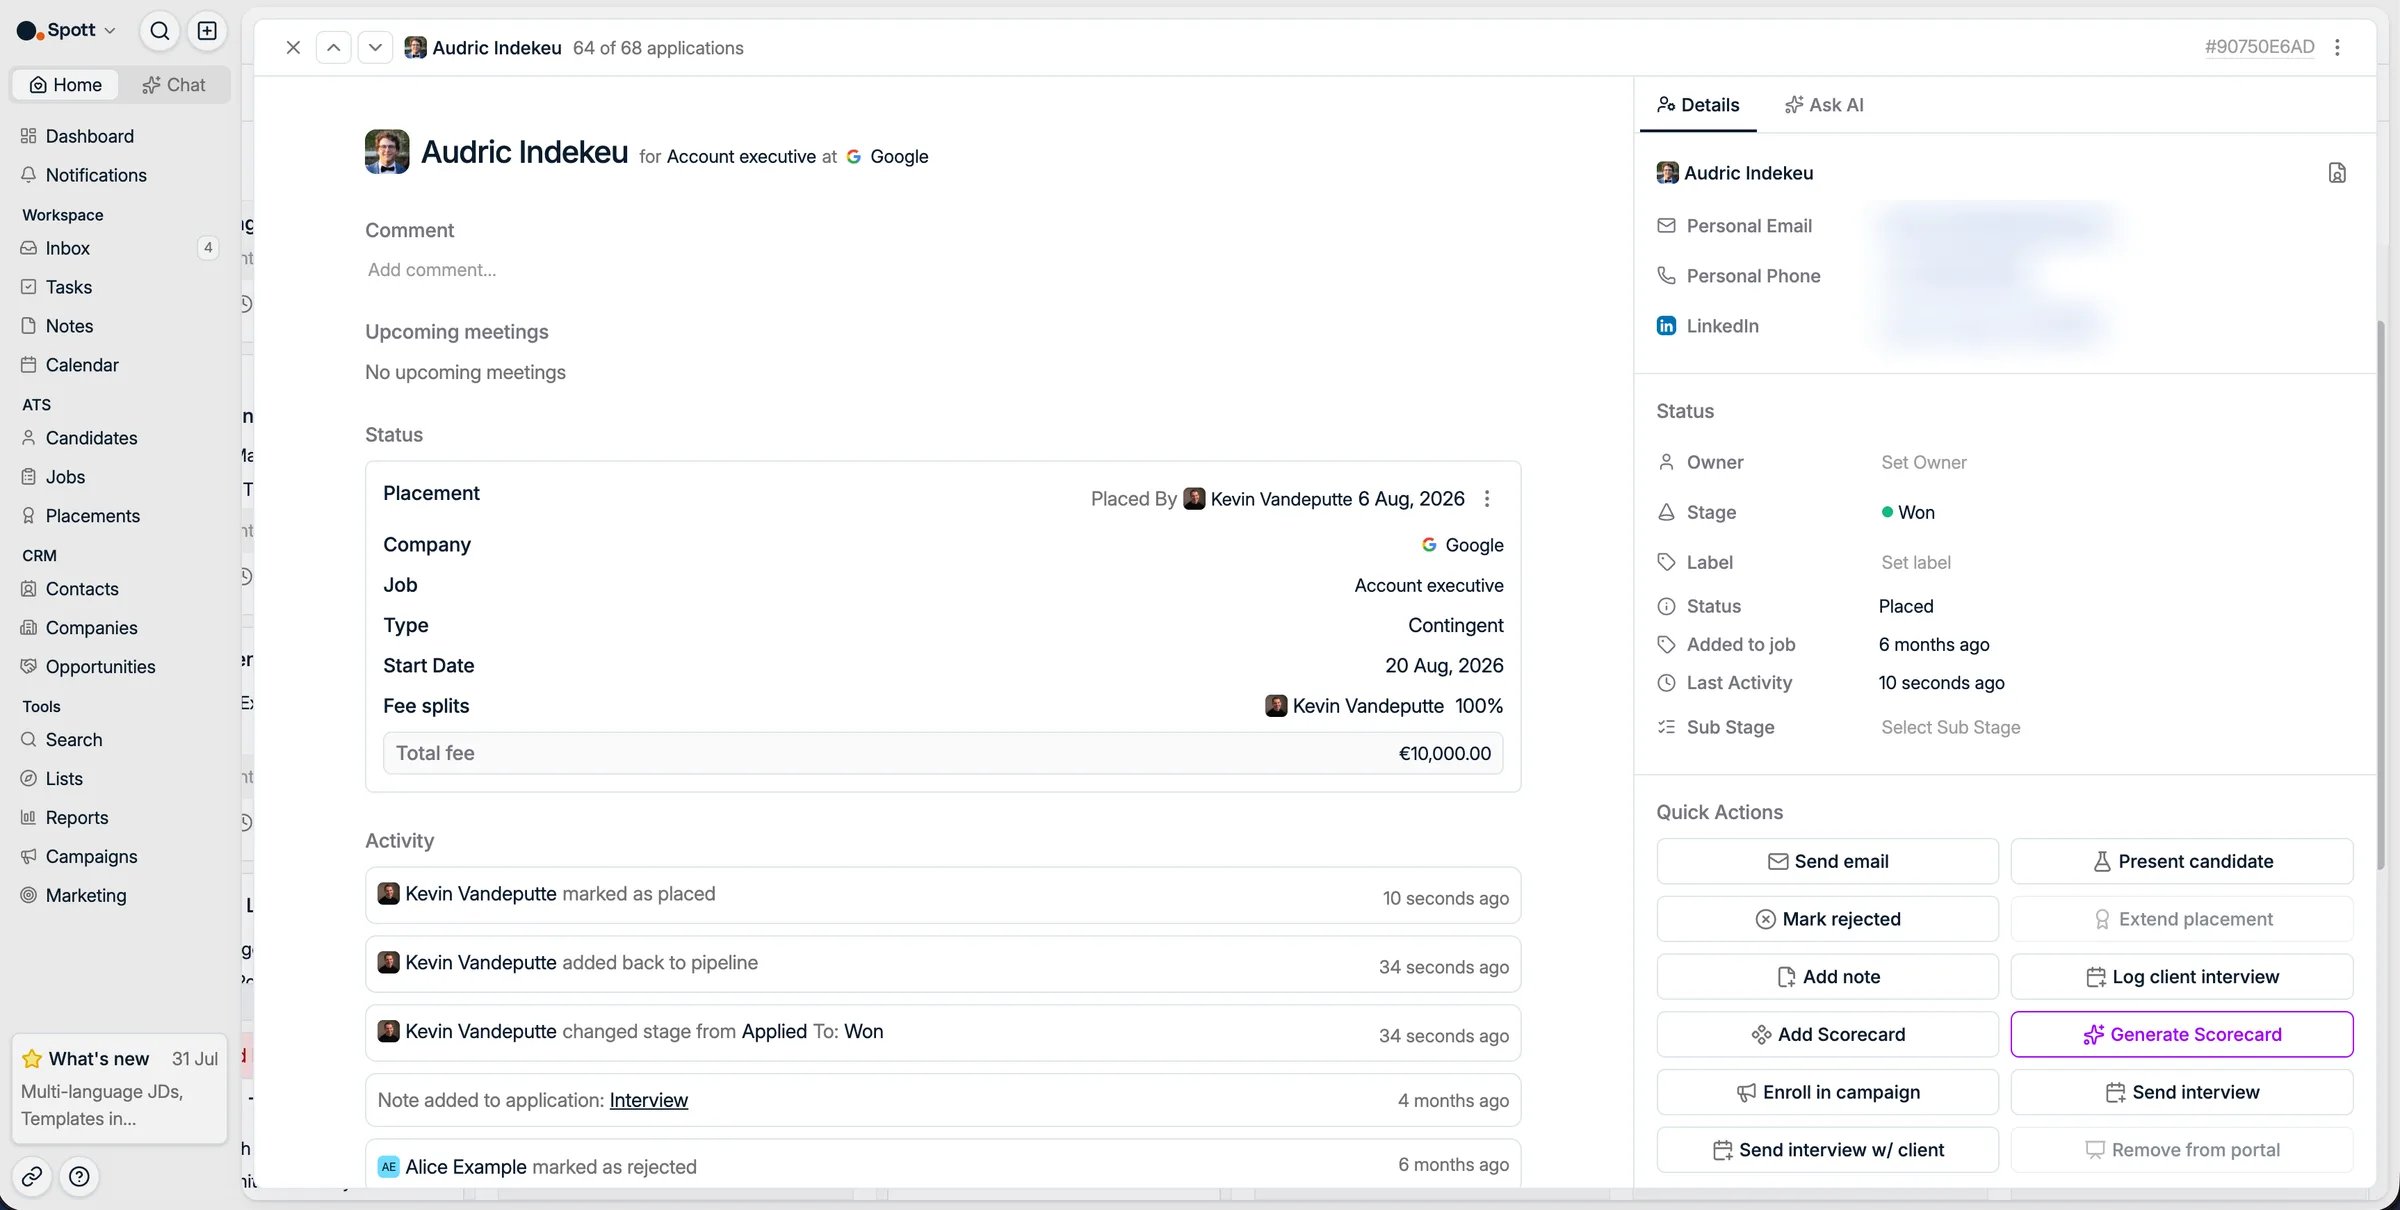
Once the flow is finished, the application carries a **Placement** block with the
company, job, type, start date, fee splits, and total fee, so the outcome is visible
from the candidate's side too.
## Custom placement forms
Create **as many placement forms as you need**. Real placements vary more than the
three types do: a permanent hire with a bonus structure captures different data from
one with equity, and an interim contract with a rate revision captures different data
again. Rather than forcing everything through one form per type, you build a form for
each variation you actually run, under **Settings → Templates**.
The form controls which fields appear in the
**Extra** step and on the placement record, so you can track exactly what each type
needs, for example rate revisions and contract extensions on staffing placements, or
base salary, bonus, and equity on permanent ones. Capturing the right fields keeps your
reporting and billing accurate.
Once the flow is finished, the application carries a **Placement** block with the
company, job, type, start date, fee splits, and total fee, so the outcome is visible
from the candidate's side too.
 ## Turn a contract placement into a permanent one
Contractors get hired. When a contract placement becomes a permanent hire, use
**Convert to contingent placement** in the **Quick Actions** panel of the placement,
rather than recording a second placement: the history stays on one record, and the fee
is captured as a one-time contingent fee instead of a contract extension.
## Turn a contract placement into a permanent one
Contractors get hired. When a contract placement becomes a permanent hire, use
**Convert to contingent placement** in the **Quick Actions** panel of the placement,
rather than recording a second placement: the history stays on one record, and the fee
is captured as a one-time contingent fee instead of a contract extension.
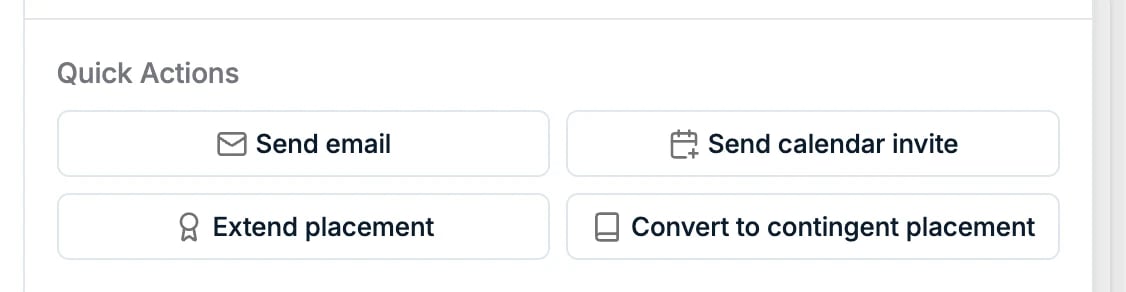 It opens the same four-step flow you know from making a placement. Step 2 switches from
contract rates to a **Contingent fee**: pick the fee basis, flat or a percentage, and
the total. **Extend placement**, right next to it, is the other option: use that one
when the contract runs on rather than converting.
## Placements overview
The **Placements** tab in Spott gives you an overview of all placements in a table format. Each column represents a placement attribute:
* **Company**, the company where the candidate was placed
* **Vacancy**, the role in which the candidate was placed
* **Candidate**, the name of the candidate
* **Placed at**, the date the candidate was placed
* **Placed by**, the person responsible for the placement
* **Start date**, the start date of the contract
* **End date**, the end date of the contract
* **Fee income**, the income generated from the placement
* **Fee details and splits,** You can record both net and gross fees and define how the fee is split across users. The total split must equal 100 percent.
* **Placement form**, which form this placement was captured with
It opens the same four-step flow you know from making a placement. Step 2 switches from
contract rates to a **Contingent fee**: pick the fee basis, flat or a percentage, and
the total. **Extend placement**, right next to it, is the other option: use that one
when the contract runs on rather than converting.
## Placements overview
The **Placements** tab in Spott gives you an overview of all placements in a table format. Each column represents a placement attribute:
* **Company**, the company where the candidate was placed
* **Vacancy**, the role in which the candidate was placed
* **Candidate**, the name of the candidate
* **Placed at**, the date the candidate was placed
* **Placed by**, the person responsible for the placement
* **Start date**, the start date of the contract
* **End date**, the end date of the contract
* **Fee income**, the income generated from the placement
* **Fee details and splits,** You can record both net and gross fees and define how the fee is split across users. The total split must equal 100 percent.
* **Placement form**, which form this placement was captured with
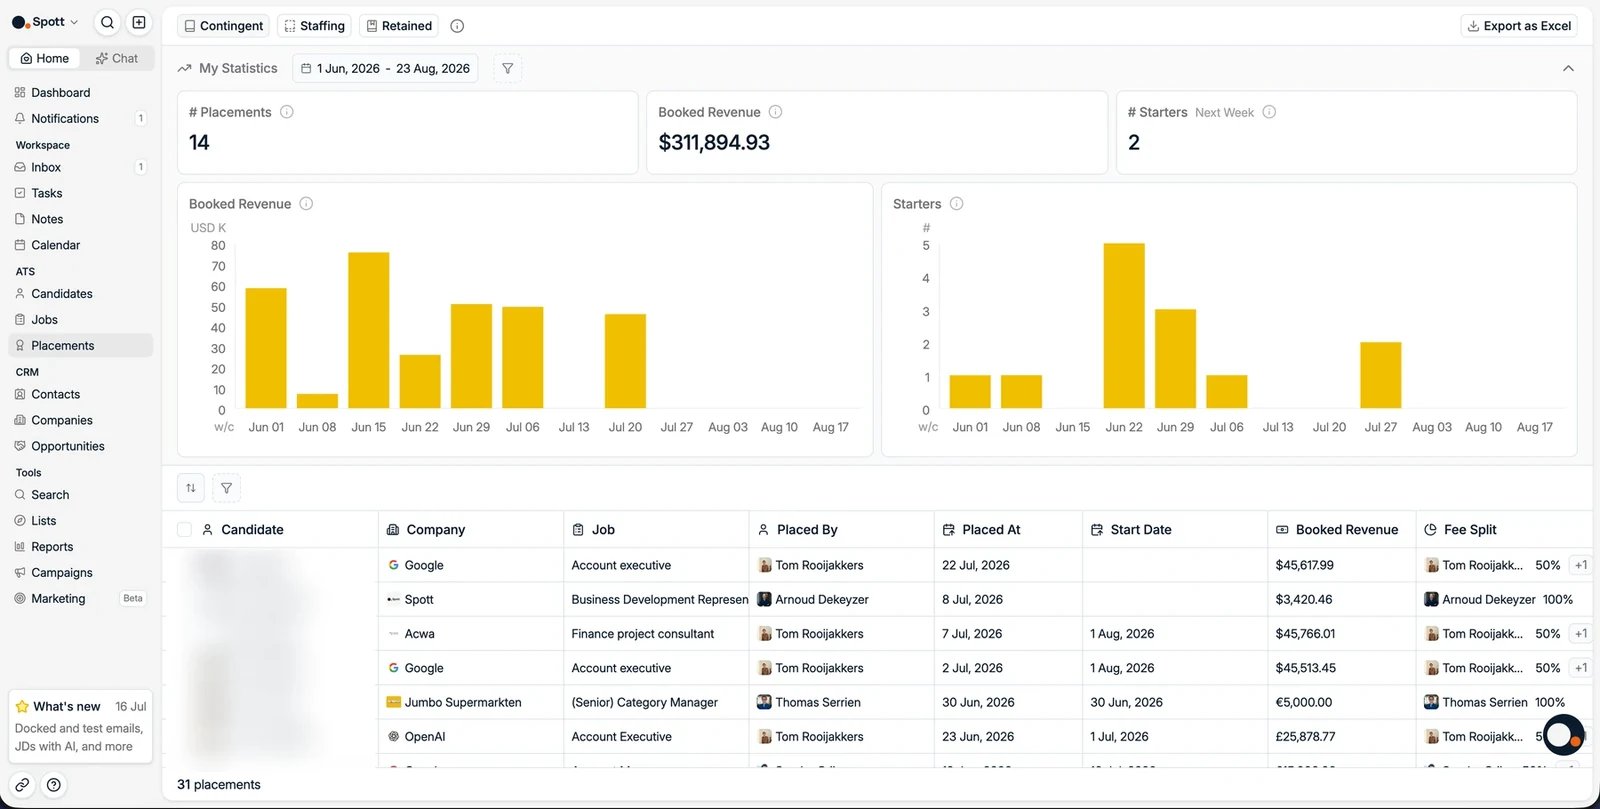 Filter the table to the placements you care about, for example by company, by the user
who placed, or by date, and **export the result to Excel**.
### Fees are shown in both currencies
Placement tables total everything in your **workspace currency** so the numbers add up,
which used to mean a fee agreed in another currency was only ever displayed converted.
Fee columns now show the **amount in the currency the fee was actually agreed in**
alongside the converted figure.
That matters when you are checking a placement against a contract or an invoice. The
converted number is the one your reporting runs on, and it moves with the exchange rate;
the local amount is the one the client agreed to, and it does not. Seeing both means you
can reconcile a placement without working the conversion backwards.
The dashboard above the table works on a **fixed three-month window**, so it is not the
place to look at a longer run. The table itself filters on any date range you like, and a
placement report in [Reports](/docs/get-started/reports) has no window at all.
Where a fee is split across colleagues, the placement still belongs to the user in
**Placed by** for counting purposes. The split percentages divide the booked revenue and
nothing else, so a shared deal shows as one placement for the person who made it.
The user filter includes **deactivated users**, not only active ones. Someone who has
since left still placed the people they placed, and leaving them out quietly understates
last year's numbers. The same applies to the user filters on
[notes](/docs/notes/adding-notes) and [lists](/docs/lists/lists).
The **Staffing dashboard is disconnected from this table**: filtering one does not
filter the other. Set your filters in the place you are reading the numbers.
### Edit or delete a placement
Click the placement in the table to open it, then use the **three dots** next to **Placed
by** and choose:
* **Edit the placement** if details need to be updated. This includes changing the
placement type, for example from Staffing to Permanent, and correcting a fee or a
start date.
* **Delete the placement** if it is no longer relevant
Editing a placement is **admin-only**. Consultants can see a placement and open it, so a
wrong fee looks like something they should be able to correct, but the Edit action needs
admin rights. Where an office has no admin of its own, someone with the role has to make
the change.
A placement's detail page also supports **file attachments**, so you can keep
documents such as the signed agreement on the placement itself.
## Staffing placements
Filter the table to the placements you care about, for example by company, by the user
who placed, or by date, and **export the result to Excel**.
### Fees are shown in both currencies
Placement tables total everything in your **workspace currency** so the numbers add up,
which used to mean a fee agreed in another currency was only ever displayed converted.
Fee columns now show the **amount in the currency the fee was actually agreed in**
alongside the converted figure.
That matters when you are checking a placement against a contract or an invoice. The
converted number is the one your reporting runs on, and it moves with the exchange rate;
the local amount is the one the client agreed to, and it does not. Seeing both means you
can reconcile a placement without working the conversion backwards.
The dashboard above the table works on a **fixed three-month window**, so it is not the
place to look at a longer run. The table itself filters on any date range you like, and a
placement report in [Reports](/docs/get-started/reports) has no window at all.
Where a fee is split across colleagues, the placement still belongs to the user in
**Placed by** for counting purposes. The split percentages divide the booked revenue and
nothing else, so a shared deal shows as one placement for the person who made it.
The user filter includes **deactivated users**, not only active ones. Someone who has
since left still placed the people they placed, and leaving them out quietly understates
last year's numbers. The same applies to the user filters on
[notes](/docs/notes/adding-notes) and [lists](/docs/lists/lists).
The **Staffing dashboard is disconnected from this table**: filtering one does not
filter the other. Set your filters in the place you are reading the numbers.
### Edit or delete a placement
Click the placement in the table to open it, then use the **three dots** next to **Placed
by** and choose:
* **Edit the placement** if details need to be updated. This includes changing the
placement type, for example from Staffing to Permanent, and correcting a fee or a
start date.
* **Delete the placement** if it is no longer relevant
Editing a placement is **admin-only**. Consultants can see a placement and open it, so a
wrong fee looks like something they should be able to correct, but the Edit action needs
admin rights. Where an office has no admin of its own, someone with the role has to make
the change.
A placement's detail page also supports **file attachments**, so you can keep
documents such as the signed agreement on the placement itself.
## Staffing placements
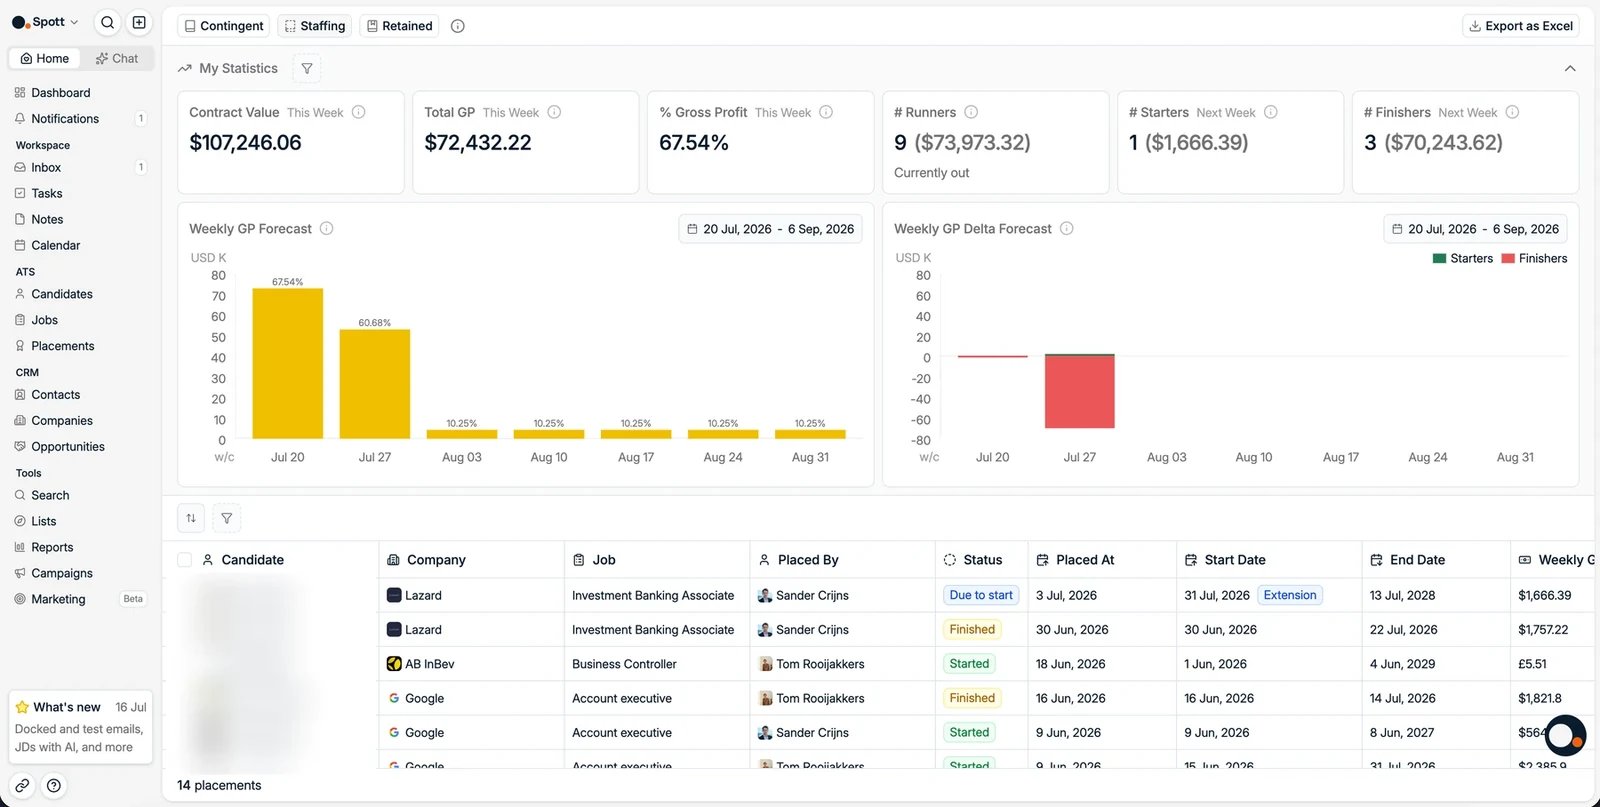 For temp and staffing work, the Placements section also includes a **Staffing**
dashboard with gross profit forecasts, based on the rates, units, and
schedules captured on staffing placements, switchable between **weekly and monthly
KPIs**. You can filter staffing placements by status, for example extensions or
placements due to start or finish.
## Retained placements
Retained work is billed in stages, so it gets its own tab next to **Contingent** and
**Contract**, built around progress rather than a single fee.
For temp and staffing work, the Placements section also includes a **Staffing**
dashboard with gross profit forecasts, based on the rates, units, and
schedules captured on staffing placements, switchable between **weekly and monthly
KPIs**. You can filter staffing placements by status, for example extensions or
placements due to start or finish.
## Retained placements
Retained work is billed in stages, so it gets its own tab next to **Contingent** and
**Contract**, built around progress rather than a single fee.
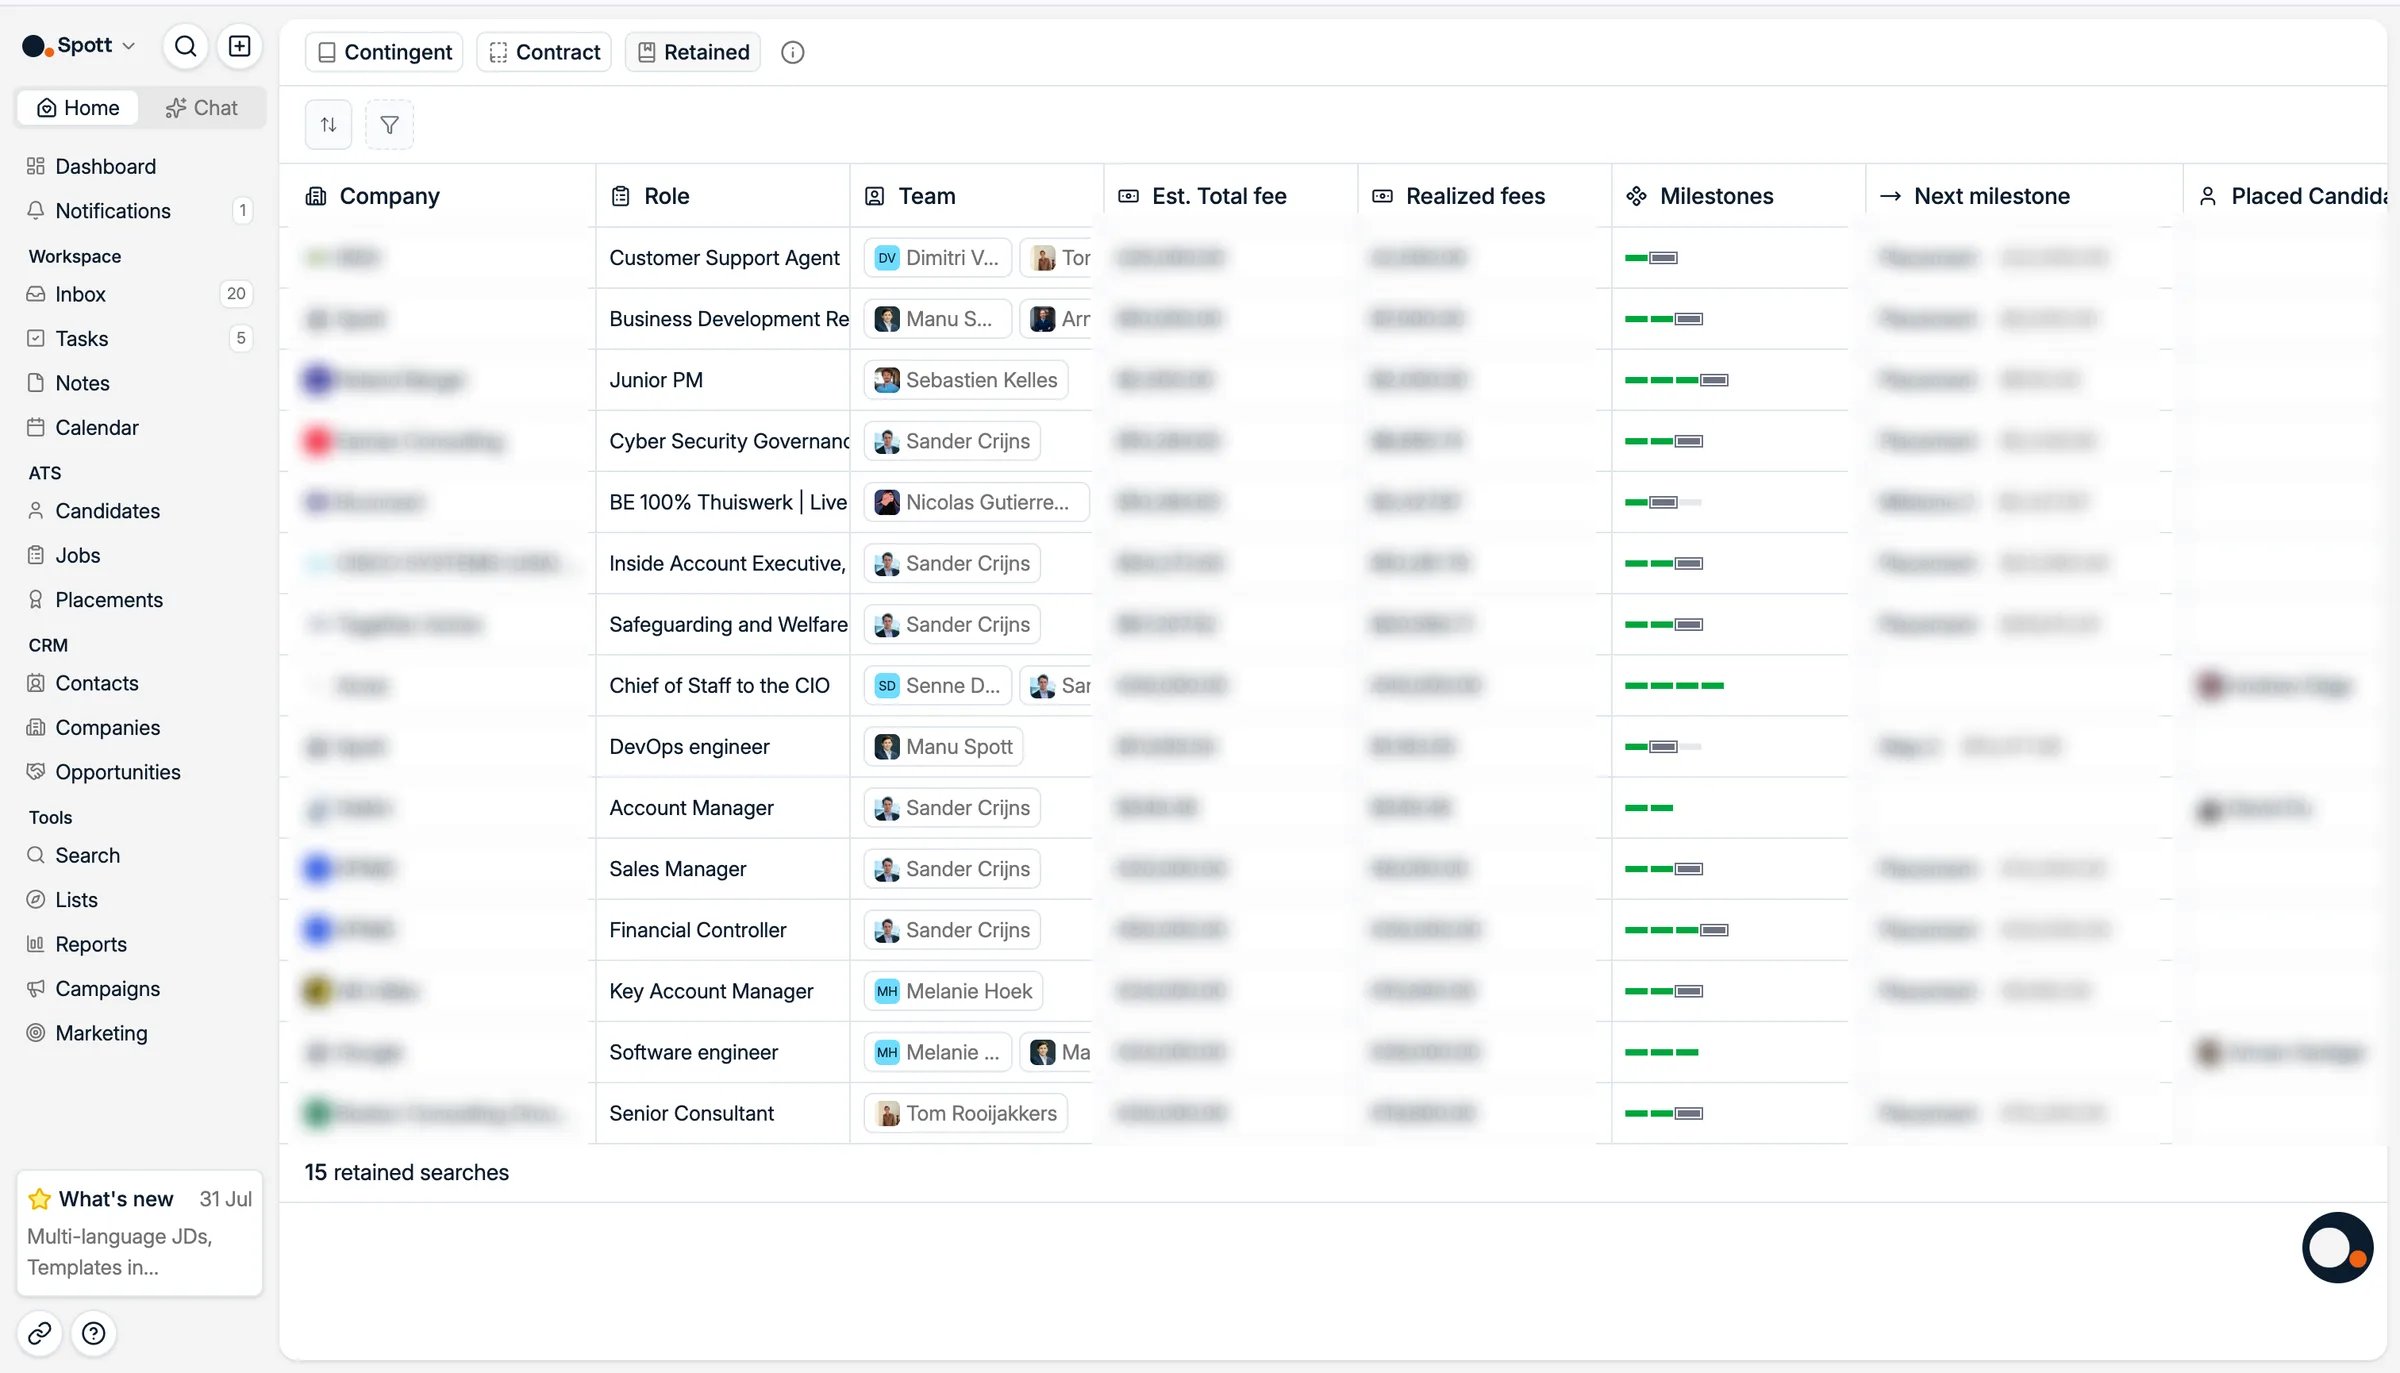 Each row is one retained search:
* **Company** and **Role**, and the **Team** working it
* **Est. Total fee**, what the whole search is worth if it completes
* **Realized fees**, what has been billed so far
* **Milestones**, a progress bar showing how many of the agreed milestones are done
* **Next milestone**, which one is due next and what it is worth, so you can see what
is invoiceable soon
* **Placed Candidate**, once the search is filled
Because the milestones come from the job, set the fee structure on the
[job's Overview tab](/docs/jobs/job-details) before you log the placement.
### Set milestones and book a fee
On the job's **Overview** tab, scroll down the right-hand side and choose the fee
structure. Pick **Retained** and you can add the milestones of your agreement, each
carrying either a percentage or a monetary value.
To book a milestone as revenue, **tick that milestone's checkbox**. This works before
anyone is placed, which is the point of a retainer: the first instalment of a 30,000 fee
can be billed at the start of the search, with no candidate on the job yet.
In the placement dialog, **Retained** stays greyed out until the job carries a retained
fee structure, so set it on the job first.
Placement exports to Excel include the nested form values from your placement forms,
so you can analyze everything in your BI tools. **Custom placement attributes are in the
export too, on a separate sheet** of the workbook, which is where people look for them
and conclude they are missing.
Spott tracks placements, fees, splits, and custom forms. Invoicing itself happens
outside Spott today: export your placements to Excel, or push them to your finance
system **via the [API](/docs/developers/api-overview)** for billing.
**Record and track placements** in the Get Onboarded guide. A guided walkthrough: mark a candidate placed, pick the fee model, and read the staffing and retained tabs.
Each row is one retained search:
* **Company** and **Role**, and the **Team** working it
* **Est. Total fee**, what the whole search is worth if it completes
* **Realized fees**, what has been billed so far
* **Milestones**, a progress bar showing how many of the agreed milestones are done
* **Next milestone**, which one is due next and what it is worth, so you can see what
is invoiceable soon
* **Placed Candidate**, once the search is filled
Because the milestones come from the job, set the fee structure on the
[job's Overview tab](/docs/jobs/job-details) before you log the placement.
### Set milestones and book a fee
On the job's **Overview** tab, scroll down the right-hand side and choose the fee
structure. Pick **Retained** and you can add the milestones of your agreement, each
carrying either a percentage or a monetary value.
To book a milestone as revenue, **tick that milestone's checkbox**. This works before
anyone is placed, which is the point of a retainer: the first instalment of a 30,000 fee
can be billed at the start of the search, with no candidate on the job yet.
In the placement dialog, **Retained** stays greyed out until the job carries a retained
fee structure, so set it on the job first.
Placement exports to Excel include the nested form values from your placement forms,
so you can analyze everything in your BI tools. **Custom placement attributes are in the
export too, on a separate sheet** of the workbook, which is where people look for them
and conclude they are missing.
Spott tracks placements, fees, splits, and custom forms. Invoicing itself happens
outside Spott today: export your placements to Excel, or push them to your finance
system **via the [API](/docs/developers/api-overview)** for billing.
**Record and track placements** in the Get Onboarded guide. A guided walkthrough: mark a candidate placed, pick the fee model, and read the staffing and retained tabs.