> ## Documentation Index
> Fetch the complete documentation index at: https://docs.spott.io/llms.txt
> Use this file to discover all available pages before exploring further.
# Marketing
> Design, send, and track email marketing campaigns directly in Spott, with a drag-and-drop builder and full delivery analytics.
The **Marketing** suite (beta) lets you create and manage email marketing campaigns
inside Spott: design them in an interactive builder, send them to a recipient list,
and track opens, clicks, and unsubscribes.
Marketing campaigns are one-off, designed email sends to a list, such as a
newsletter. For automated multi-step outreach sequences, use
[Campaigns](/docs/outreach/campaigns) instead.
## Enable Marketing
1. An admin enables **Enable Marketing** under **Settings → Features**
(Communication section). Read the setup guide Spott shows before confirming.
2. Configure a **sending domain** under **Settings → Domains** and add the DNS
records shown there. You can only send from sender addresses registered on a
verified domain. See the step-by-step
[sending domain guide](/docs/settings/domains), including DNS troubleshooting.
Once enabled, **Marketing** appears in the sidebar under Tools.
A newly verified domain still needs to build a sending reputation before you send
at volume. Before your first campaign, read the
[email deliverability best practices](/docs/outreach/email-deliverability):
domain warm-up, list hygiene, and content optimization.
## Create a campaign
 On the Marketing page, click **New campaign** and give it a name. You can also use
**Import HTML Template** to start from an existing HTML email.
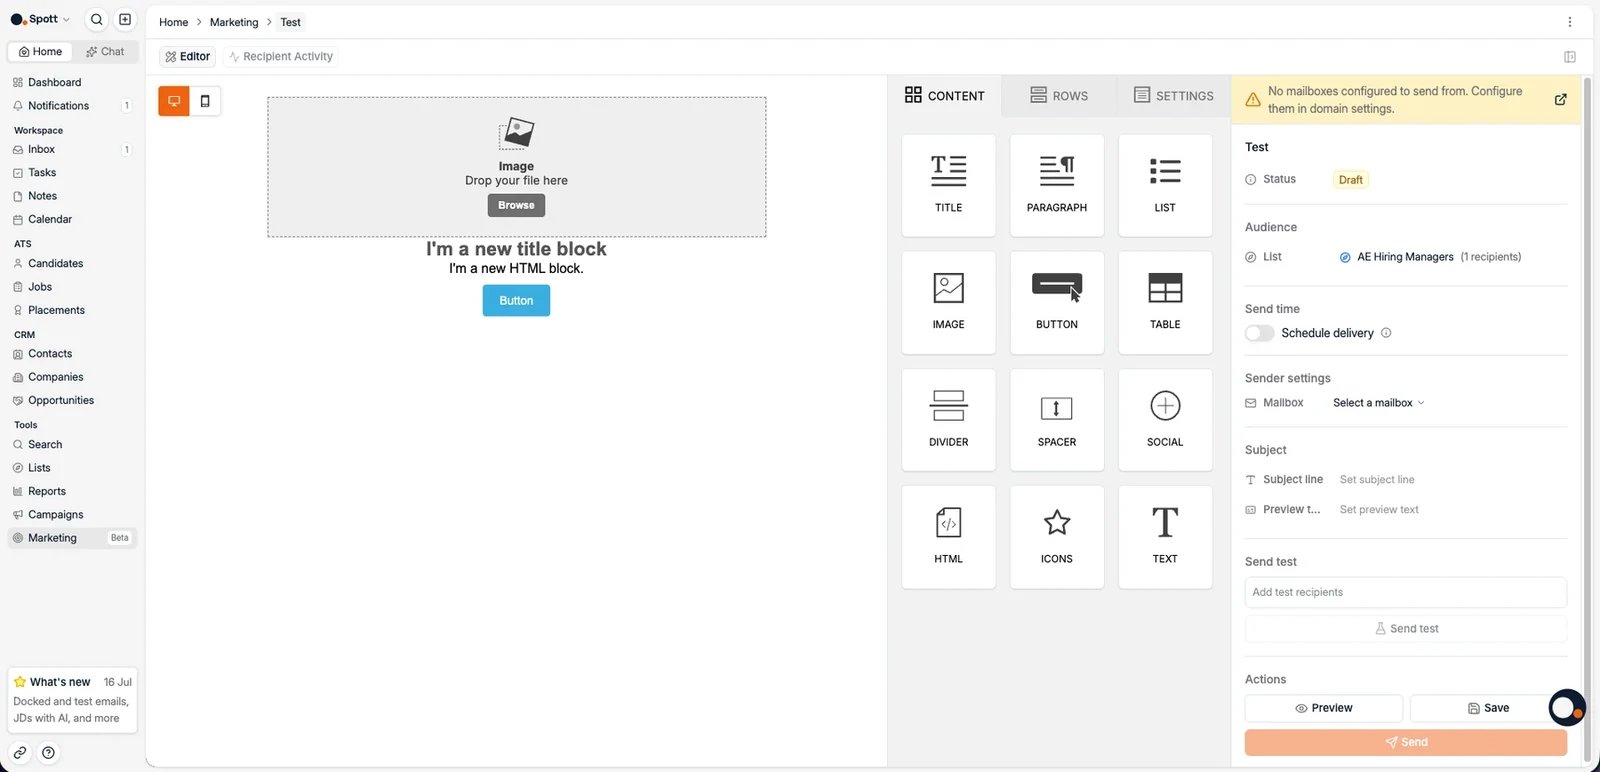
The campaign editor is a split view:
* On the left, the **drag-and-drop email builder**: design the email with rows,
images, buttons, and text blocks. You can save rows to reuse across campaigns.
* On the right, the **campaign details**:
* **Audience**: pick a [List](/docs/lists/lists) of candidates or contacts as
recipients.
* **Send time**: send immediately or **Schedule delivery** for a specific date and
time.
* **Sender settings**: the **mailbox** the campaign is sent from, on your verified
domain.
* **Subject**: the subject line and the preview text.
On the Marketing page, click **New campaign** and give it a name. You can also use
**Import HTML Template** to start from an existing HTML email.
The campaign editor is a split view:
* On the left, the **drag-and-drop email builder**: design the email with rows,
images, buttons, and text blocks. You can save rows to reuse across campaigns.
* On the right, the **campaign details**:
* **Audience**: pick a [List](/docs/lists/lists) of candidates or contacts as
recipients.
* **Send time**: send immediately or **Schedule delivery** for a specific date and
time.
* **Sender settings**: the **mailbox** the campaign is sent from, on your verified
domain.
* **Subject**: the subject line and the preview text.
 Use **Preview** to check the result and **Send test** to send it to yourself before
the real send.
## Sending requirements
Spott blocks the send until the campaign is compliant:
* A **subject line** and an **audience** are set.
* The email contains an **unsubscribe link** (required for GDPR compliance; the
editor shows you how to add one).
* The sending mailbox is on a **verified domain**.
## Track results
The Marketing page shows the tracking numbers per campaign: **total sends**,
**delivery rate**, **open rate**, **click rate**, and the **bounce and unsubscribe
rate**.
After sending, the **Recipient Activity** tab lists every recipient with what
happened: delivered, opened, clicked, bounced, unsubscribed, reported as spam,
skipped, or failed.
## Suppressions
If a person has unsubscribed, had an email permanently bounce, or reported an email
as spam, they are excluded from all future marketing campaigns automatically and
show as **skipped**. Marketing opt-outs are also visible on the candidate's
[Consent subtab](/docs/settings/gdpr-consent).
Use **Preview** to check the result and **Send test** to send it to yourself before
the real send.
## Sending requirements
Spott blocks the send until the campaign is compliant:
* A **subject line** and an **audience** are set.
* The email contains an **unsubscribe link** (required for GDPR compliance; the
editor shows you how to add one).
* The sending mailbox is on a **verified domain**.
## Track results
The Marketing page shows the tracking numbers per campaign: **total sends**,
**delivery rate**, **open rate**, **click rate**, and the **bounce and unsubscribe
rate**.
After sending, the **Recipient Activity** tab lists every recipient with what
happened: delivered, opened, clicked, bounced, unsubscribed, reported as spam,
skipped, or failed.
## Suppressions
If a person has unsubscribed, had an email permanently bounce, or reported an email
as spam, they are excluded from all future marketing campaigns automatically and
show as **skipped**. Marketing opt-outs are also visible on the candidate's
[Consent subtab](/docs/settings/gdpr-consent).