> ## Documentation Index
> Fetch the complete documentation index at: https://docs.spott.io/llms.txt
> Use this file to discover all available pages before exploring further.
# Tasks and notes
> Use tasks as reminders across Spott, and give your team and the AI the context they need through linked notes.
In this section you learn how to create and organise tasks, link follow-ups to the right
records, add manual and automated notes, and use templates to keep meeting summaries useful
and consistent.
1. [Use tasks as reminders across the platform](#1-use-tasks-as-reminders-across-the-platform)
2. [Use notes to give your team and the AI context](#2-use-notes-to-give-your-team-and-the-ai-context)
To open your follow-ups, click **Tasks** in the left-hand navigation bar. To review or
create notes, click **Notes**.
## 1. Use tasks as reminders across the platform
Tasks keep calls, interview preparation, offer chasing, and other follow-ups visible. Link
each task to the records it concerns, so the next step appears wherever your team is
working.
### 1.1 Create and link a task
Open **Tasks** and click **Add task** in the top right corner. Add a title and a due date,
then type `@` followed by a person, company, or job name to link the task to that record.
A linked task appears in the **Tasks** tab of every connected candidate, contact, company,
or job. That keeps the reminder next to the context you need to act on it.
 ### 1.2 Find and manage your tasks
When you open Tasks, Spott applies two filters automatically:
* **Status: Open**, so completed tasks stay out of your active list.
* **Assigned to: you**, so the list starts with the tasks you are responsible for.
These defaults keep you focused on your own active work. Remove a filter by clicking its
chip, or add filters such as assignee, due date range, or status.
### 1.2 Find and manage your tasks
When you open Tasks, Spott applies two filters automatically:
* **Status: Open**, so completed tasks stay out of your active list.
* **Assigned to: you**, so the list starts with the tasks you are responsible for.
These defaults keep you focused on your own active work. Remove a filter by clicking its
chip, or add filters such as assignee, due date range, or status.
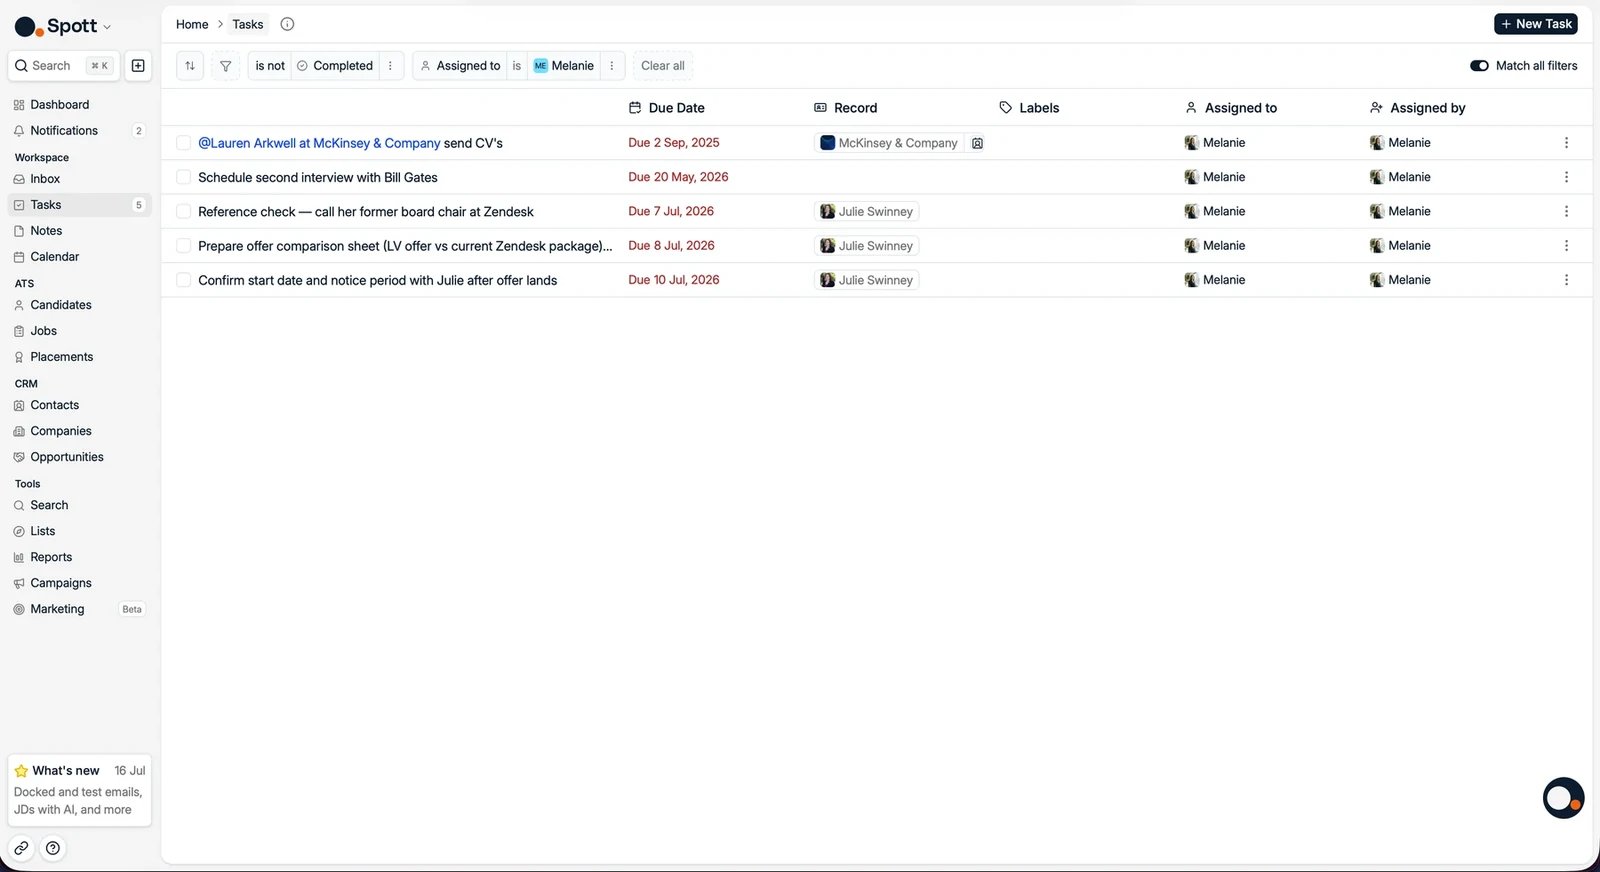 Use the task list to:
* **Work by urgency:** tasks are grouped by due date, with overdue tasks highlighted in red.
* **Find a task:** use the search bar to locate a specific follow-up.
* **Edit a task:** click its title to change its details.
* **Complete a task:** mark it complete when the action is done, and it leaves the default
view.
Tasks are not only created by hand. Campaigns and automations create them for you, for
manual steps such as a phone call or a LinkedIn message. Campaign tasks can be filtered
specifically in your to-do list.
### 1.3 Choose how task notifications reach you
To control task alerts, open **Settings → Notifications** and choose whether assignments,
completions, and mentions reach you in the app, by email, or both.
These preferences are personal, so every user configures their own notifications.
Manual and automated tasks, filters, labels, and linked records.
Choose which task events reach you in the app or by email.
## 2. Use notes to give your team and the AI context
Notes preserve what your team learns from calls and meetings. Once linked to the right
records, they also improve matching, summaries, reports, job descriptions, and Ask AI.
### 2.1 Create, organise, and link a manual note
Open **Notes** and click **Add note**. Write the note in the editor. It saves automatically,
so there is no save button.
Use the side panel to add:
* **Properties:** review who the note belongs to, use **Link meeting** to attach a calendar
event, and choose an activity type such as an online meeting, an inbound call, or a
voicemail.
* **Labels:** categorise the note so your team can filter and report on consistent activity
types.
* **Linked records:** connect the note to one or more candidates, contacts, companies, or
jobs.
At the bottom of a new note, select **Start from template** for a reusable structure, or
**Record note** to capture a voice note of up to five minutes.
Use the **search bar** on the Notes page to find existing notes. It supports Boolean queries
when you need a more precise search.
A linked note stays available from the main Notes list and also appears in each connected
record's **Notes** tab, and on the linked meeting entry.
Spott's AI can only use a note as context after it is linked to a record. An unlinked note
stays in the Notes list but is invisible to matching, summaries, and Ask AI.
### 2.2 Capture meetings and calls automatically
Automated notes are created when the Spott Note Taker joins an online meeting, or when a
connected VoIP integration records a call. Each note carries an AI summary, the full
transcript, and a link to the recording.
To enable the Note Taker:
1. Open **Settings → Accounts** and connect your Google or Microsoft Outlook calendar.
2. Open **Settings → Calls** and switch on **Enable Spott Note Taker**.
3. Accept the terms and conditions.
The Note Taker joins meetings that contain a valid Zoom, Microsoft Teams, or Google Meet
link. It waits in the lobby until it is admitted, then transcribes the conversation, and
usually creates the note two to five minutes after the meeting ends.
Spott links meeting notes to a person using an attendee's email address, and call notes
using their phone number. If it cannot find a match, open the note and use **Link record**
to connect it by hand.
Switching the Note Taker off stops it from being scheduled for new meetings and
unschedules upcoming joins, but existing recordings, transcripts, and summaries stay
available.
### 2.3 Use note and insight templates correctly
Open **Settings → Templates** to manage the structures Spott reuses.
* **Note templates** are reusable layouts for manual notes, such as interview debriefs or
client call summaries. You choose one when starting a note.
* **Insight templates** are the instructions the AI follows when summarising meetings and
calls. Spott picks the template itself by reading each template's description, so you do
not choose one per meeting.
For an insight template, write a description that explains when it should be used. Then
shape the output with sections, instructions, length, and format.
Keep those descriptions distinct from one another, and ask for information your team will
actually reread. Clear boundaries help Spott pick the right template, and focused sections
keep the summaries worth opening.
Changing an insight template affects future notes only. To update an existing automated
note, open its **⋮** menu and select **Resummarize transcript**, then choose the template
and the output language.
Manual notes, automated notes, labels, linking, and resummarising.
Enable it, add it to meetings, and troubleshoot missing notes.
Create note templates and AI insight templates.
What the AI reads, and how linked context improves it.
Use the task list to:
* **Work by urgency:** tasks are grouped by due date, with overdue tasks highlighted in red.
* **Find a task:** use the search bar to locate a specific follow-up.
* **Edit a task:** click its title to change its details.
* **Complete a task:** mark it complete when the action is done, and it leaves the default
view.
Tasks are not only created by hand. Campaigns and automations create them for you, for
manual steps such as a phone call or a LinkedIn message. Campaign tasks can be filtered
specifically in your to-do list.
### 1.3 Choose how task notifications reach you
To control task alerts, open **Settings → Notifications** and choose whether assignments,
completions, and mentions reach you in the app, by email, or both.
These preferences are personal, so every user configures their own notifications.
Manual and automated tasks, filters, labels, and linked records.
Choose which task events reach you in the app or by email.
## 2. Use notes to give your team and the AI context
Notes preserve what your team learns from calls and meetings. Once linked to the right
records, they also improve matching, summaries, reports, job descriptions, and Ask AI.
### 2.1 Create, organise, and link a manual note
Open **Notes** and click **Add note**. Write the note in the editor. It saves automatically,
so there is no save button.
Use the side panel to add:
* **Properties:** review who the note belongs to, use **Link meeting** to attach a calendar
event, and choose an activity type such as an online meeting, an inbound call, or a
voicemail.
* **Labels:** categorise the note so your team can filter and report on consistent activity
types.
* **Linked records:** connect the note to one or more candidates, contacts, companies, or
jobs.
At the bottom of a new note, select **Start from template** for a reusable structure, or
**Record note** to capture a voice note of up to five minutes.
Use the **search bar** on the Notes page to find existing notes. It supports Boolean queries
when you need a more precise search.
A linked note stays available from the main Notes list and also appears in each connected
record's **Notes** tab, and on the linked meeting entry.
Spott's AI can only use a note as context after it is linked to a record. An unlinked note
stays in the Notes list but is invisible to matching, summaries, and Ask AI.
### 2.2 Capture meetings and calls automatically
Automated notes are created when the Spott Note Taker joins an online meeting, or when a
connected VoIP integration records a call. Each note carries an AI summary, the full
transcript, and a link to the recording.
To enable the Note Taker:
1. Open **Settings → Accounts** and connect your Google or Microsoft Outlook calendar.
2. Open **Settings → Calls** and switch on **Enable Spott Note Taker**.
3. Accept the terms and conditions.
The Note Taker joins meetings that contain a valid Zoom, Microsoft Teams, or Google Meet
link. It waits in the lobby until it is admitted, then transcribes the conversation, and
usually creates the note two to five minutes after the meeting ends.
Spott links meeting notes to a person using an attendee's email address, and call notes
using their phone number. If it cannot find a match, open the note and use **Link record**
to connect it by hand.
Switching the Note Taker off stops it from being scheduled for new meetings and
unschedules upcoming joins, but existing recordings, transcripts, and summaries stay
available.
### 2.3 Use note and insight templates correctly
Open **Settings → Templates** to manage the structures Spott reuses.
* **Note templates** are reusable layouts for manual notes, such as interview debriefs or
client call summaries. You choose one when starting a note.
* **Insight templates** are the instructions the AI follows when summarising meetings and
calls. Spott picks the template itself by reading each template's description, so you do
not choose one per meeting.
For an insight template, write a description that explains when it should be used. Then
shape the output with sections, instructions, length, and format.
Keep those descriptions distinct from one another, and ask for information your team will
actually reread. Clear boundaries help Spott pick the right template, and focused sections
keep the summaries worth opening.
Changing an insight template affects future notes only. To update an existing automated
note, open its **⋮** menu and select **Resummarize transcript**, then choose the template
and the output language.
Manual notes, automated notes, labels, linking, and resummarising.
Enable it, add it to meetings, and troubleshoot missing notes.
Create note templates and AI insight templates.
What the AI reads, and how linked context improves it.
## Now your turn
* [ ] Create one **task** that tags a candidate and a job, then find it in the candidate's
**Tasks** tab
* [ ] Let the **Note Taker** join one meeting and read the note it creates
* [ ] Create one **note template**, use it for a meeting or a call, link the note to a
candidate or contact, and find it in their **Notes** tab
Build the reports and insights the dashboard does not answer.