> ## Documentation Index
> Fetch the complete documentation index at: https://docs.spott.io/llms.txt
> Use this file to discover all available pages before exploring further.
# Set up Spott
> Sign in, configure your own account, then set up the workspace settings that apply to everyone.
In this section you learn how to sign in, configure your personal preferences and profile,
connect your email, calendar, messaging and calling, install the extension and mobile app,
and, if you are an admin, set up the workspace settings that apply to your whole
organisation.
1. [Set up your own account](#1-set-up-your-own-account)
2. [Admins: set up the workspace](#2-admins-set-up-the-workspace)
To open **Settings**, click the Spott logo in the top-left corner.
**Section 1 is for everyone. Section 2 is for admins.** Every user works through their
own account setup in section 1. If you are the workspace admin, continue into section 2,
which covers the settings that apply to all users.
What lives under Personal, Workspace and Admin, and where each area is documented.
## 1. Set up your own account
This is the setup every user does for their own account, in the order that makes each step
useful.
 ### 1.1 Sign in for the first time
Visit [app.gospott.com](https://app.gospott.com/) and sign in using your credentials.
If your workspace uses SSO, log in the first time via your invite link and create a
password. From then on you can sign in with Microsoft or Google.
### 1.2 Set your preferences
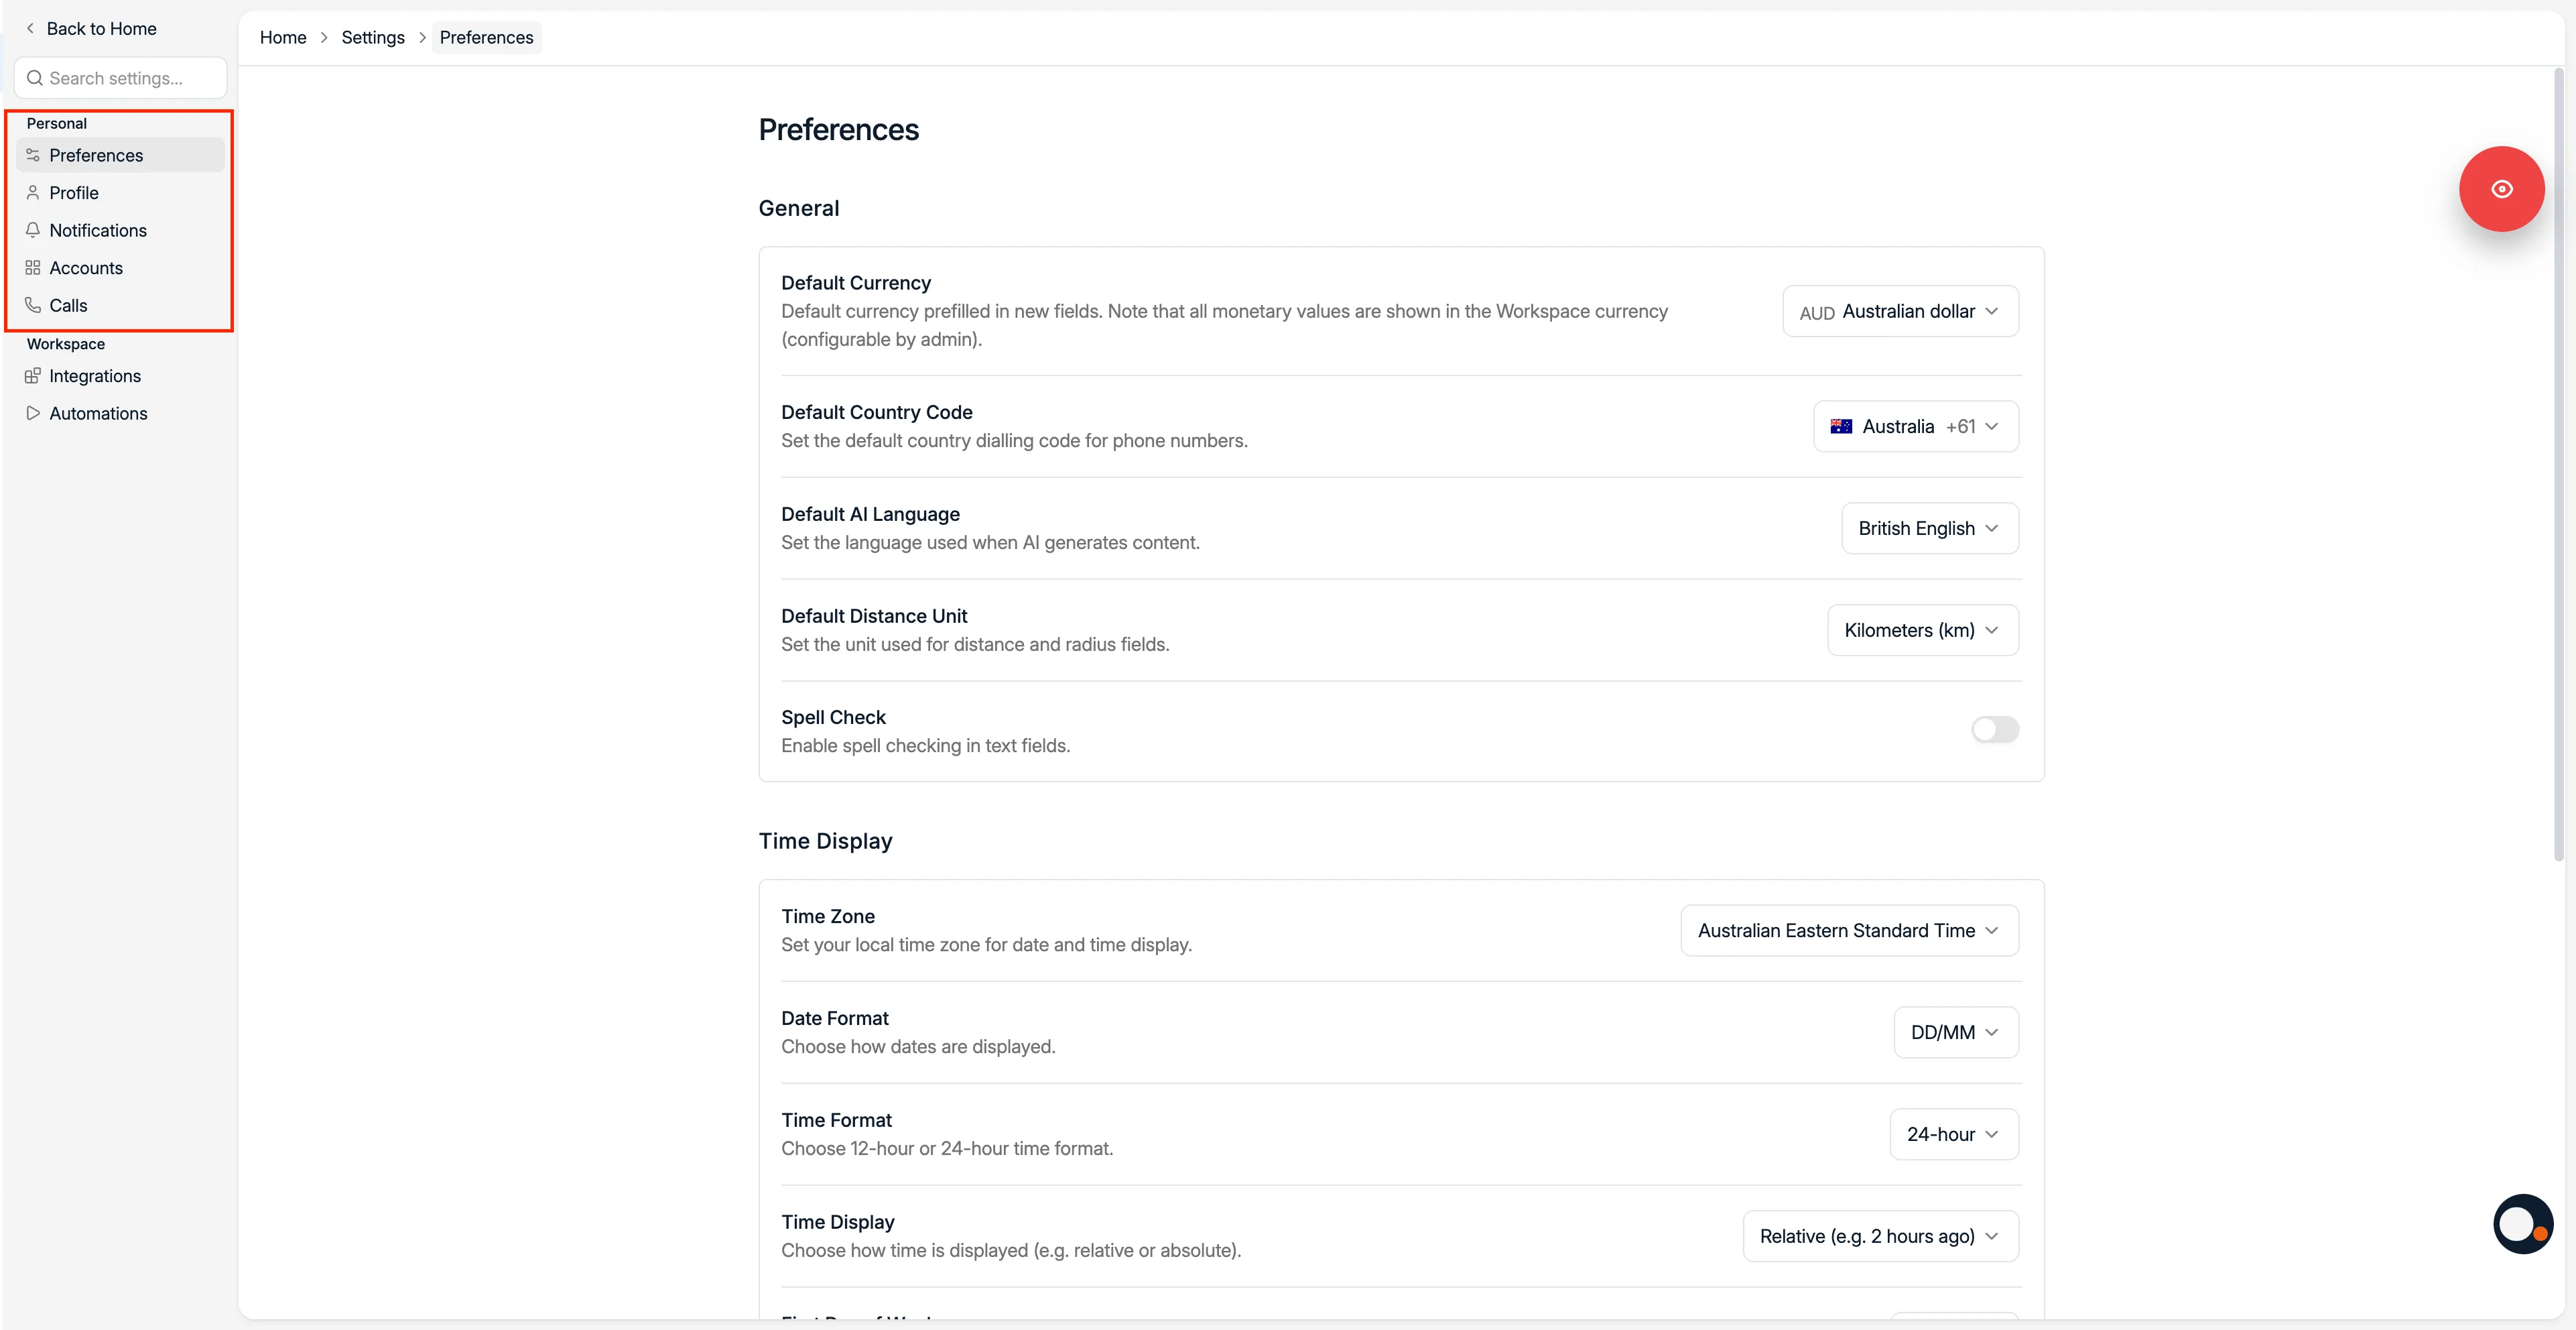
Open **Settings**, select **Preferences**, and set your personal defaults.
* **Default currency**, prefilled when adding new currency fields
* **Default country code**, the default dialling code when adding new phone numbers
* **Default AI language**, the language used for generated AI content
* **Default distance unit**, used for location radius filters
* **Spell check**, toggle on to enable the browser spell check for outgoing messages
* **Time zone**, used for calendar events and timestamps
* **Date format**, controls how dates are displayed
* **Time format**, 12-hour or 24-hour display
* **Time display**, whether timestamps show as relative or absolute
* **First day of the week**, for calendars
* **Display language**, the language of your workspace
* **Interface theme**, light or dark mode
* **Default candidate, contact, and company tab**, the tab you land on when opening a
record
The full reference for personal preferences.
### 1.3 Complete your profile and turn on MFA
Open the **Profile** tab to update how you appear in Spott, and to set your security
options.
* **Profile picture**: upload your own picture
* **Username**: your display name in Spott
* **Initials**: shown as your avatar badge when no profile picture is set
* **Change your password**
* **Multi-factor authentication**: protect your account with an authenticator app. After
setup you are asked for a 6-digit code in addition to your password when signing in.
Password, MFA, and how SSO changes the login flow.
### 1.4 Choose your notifications
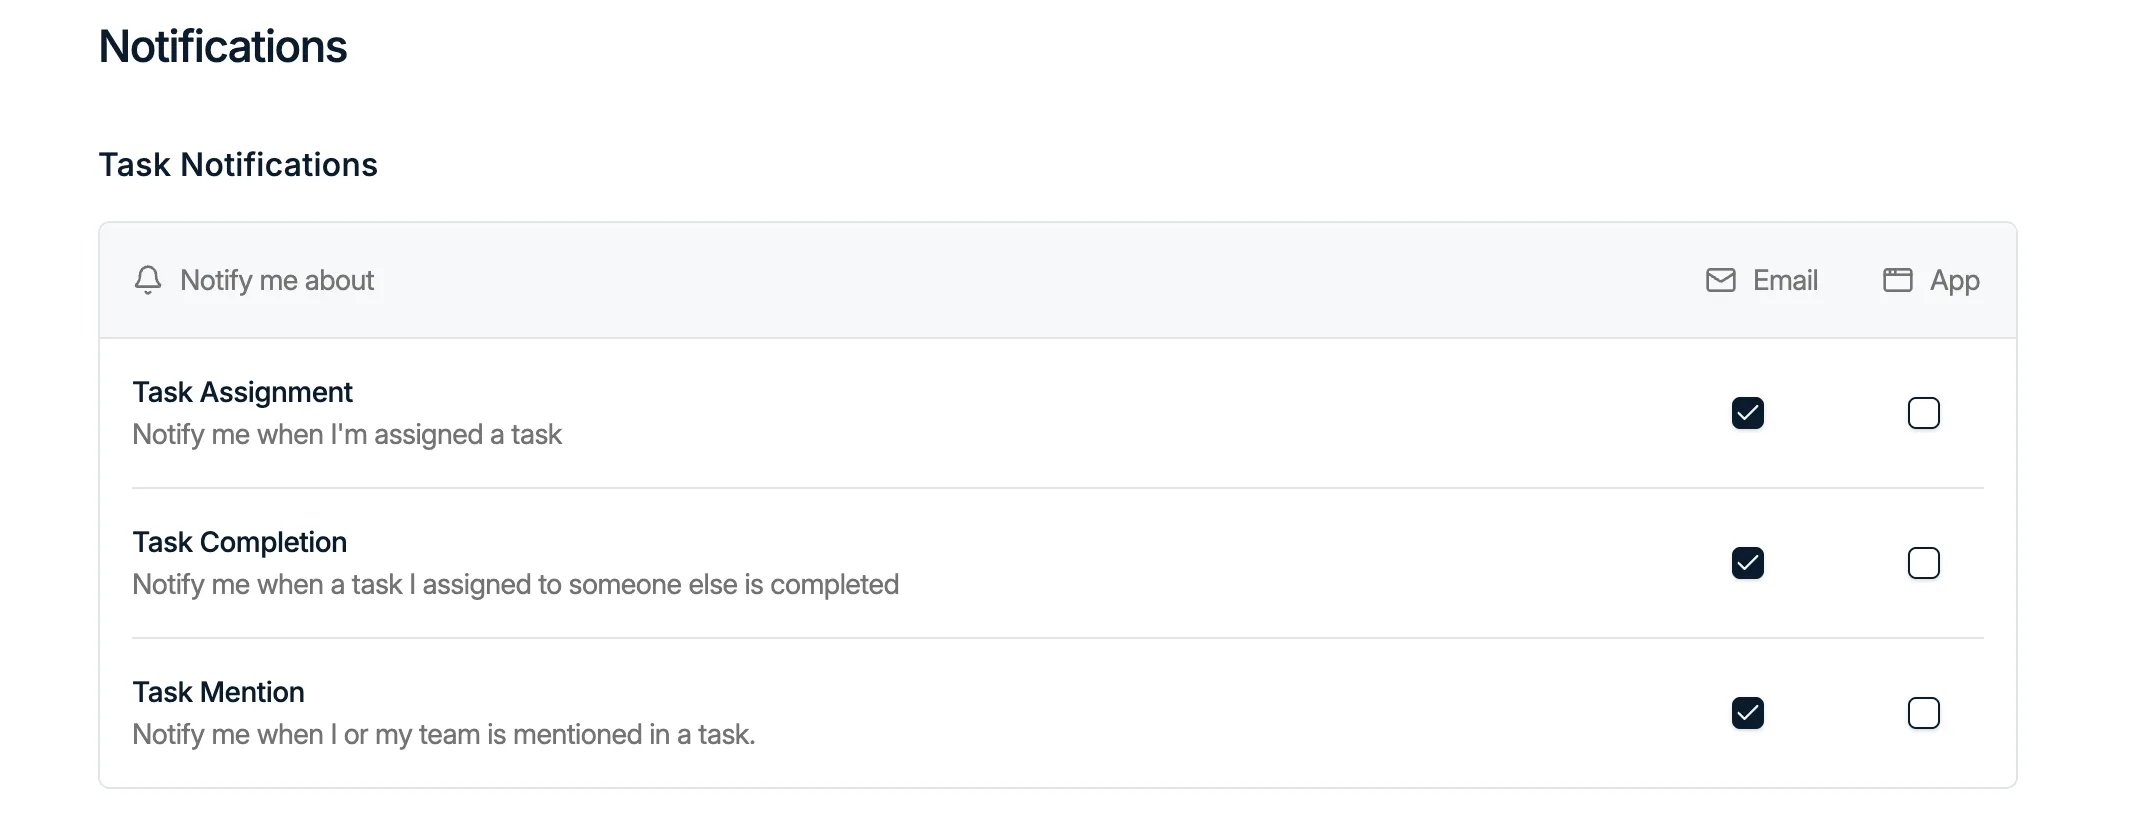
Open the **Notifications** tab to control which events reach you, so you stay informed
without unnecessary noise. For each event type you can be notified in the app, by email,
or both.
* **Task notifications**: task assignments, completions, and mentions
* **Note notifications**: when someone pings you on a note
* **Job notifications**: applications, comments, status changes, and new jobs
* **Candidate notifications**: when candidate information is updated
### 1.1 Sign in for the first time
Visit [app.gospott.com](https://app.gospott.com/) and sign in using your credentials.
If your workspace uses SSO, log in the first time via your invite link and create a
password. From then on you can sign in with Microsoft or Google.
### 1.2 Set your preferences
Open **Settings**, select **Preferences**, and set your personal defaults.
* **Default currency**, prefilled when adding new currency fields
* **Default country code**, the default dialling code when adding new phone numbers
* **Default AI language**, the language used for generated AI content
* **Default distance unit**, used for location radius filters
* **Spell check**, toggle on to enable the browser spell check for outgoing messages
* **Time zone**, used for calendar events and timestamps
* **Date format**, controls how dates are displayed
* **Time format**, 12-hour or 24-hour display
* **Time display**, whether timestamps show as relative or absolute
* **First day of the week**, for calendars
* **Display language**, the language of your workspace
* **Interface theme**, light or dark mode
* **Default candidate, contact, and company tab**, the tab you land on when opening a
record
The full reference for personal preferences.
### 1.3 Complete your profile and turn on MFA
Open the **Profile** tab to update how you appear in Spott, and to set your security
options.
* **Profile picture**: upload your own picture
* **Username**: your display name in Spott
* **Initials**: shown as your avatar badge when no profile picture is set
* **Change your password**
* **Multi-factor authentication**: protect your account with an authenticator app. After
setup you are asked for a 6-digit code in addition to your password when signing in.
Password, MFA, and how SSO changes the login flow.
### 1.4 Choose your notifications
Open the **Notifications** tab to control which events reach you, so you stay informed
without unnecessary noise. For each event type you can be notified in the app, by email,
or both.
* **Task notifications**: task assignments, completions, and mentions
* **Note notifications**: when someone pings you on a note
* **Job notifications**: applications, comments, status changes, and new jobs
* **Candidate notifications**: when candidate information is updated
 Every event type and channel.
### 1.5 Connect your email and calendar
Open the **Accounts** tab and connect your Google or Outlook account so your mail and
meetings flow into Spott.
**Up to two addresses per user.** You can connect two email addresses to your account,
using **Connect a second Microsoft account** or **Connect a second Google account** on
the Accounts page. The same address cannot be connected twice, and it cannot be
connected through both Google and Microsoft at the same time.
The first mailbox and calendar sync can take up to 12 hours. New messages keep arriving
while Spott imports the older history, so an incomplete history during this period does
not mean the connection failed.
Then set the three things that make your mailbox usable:
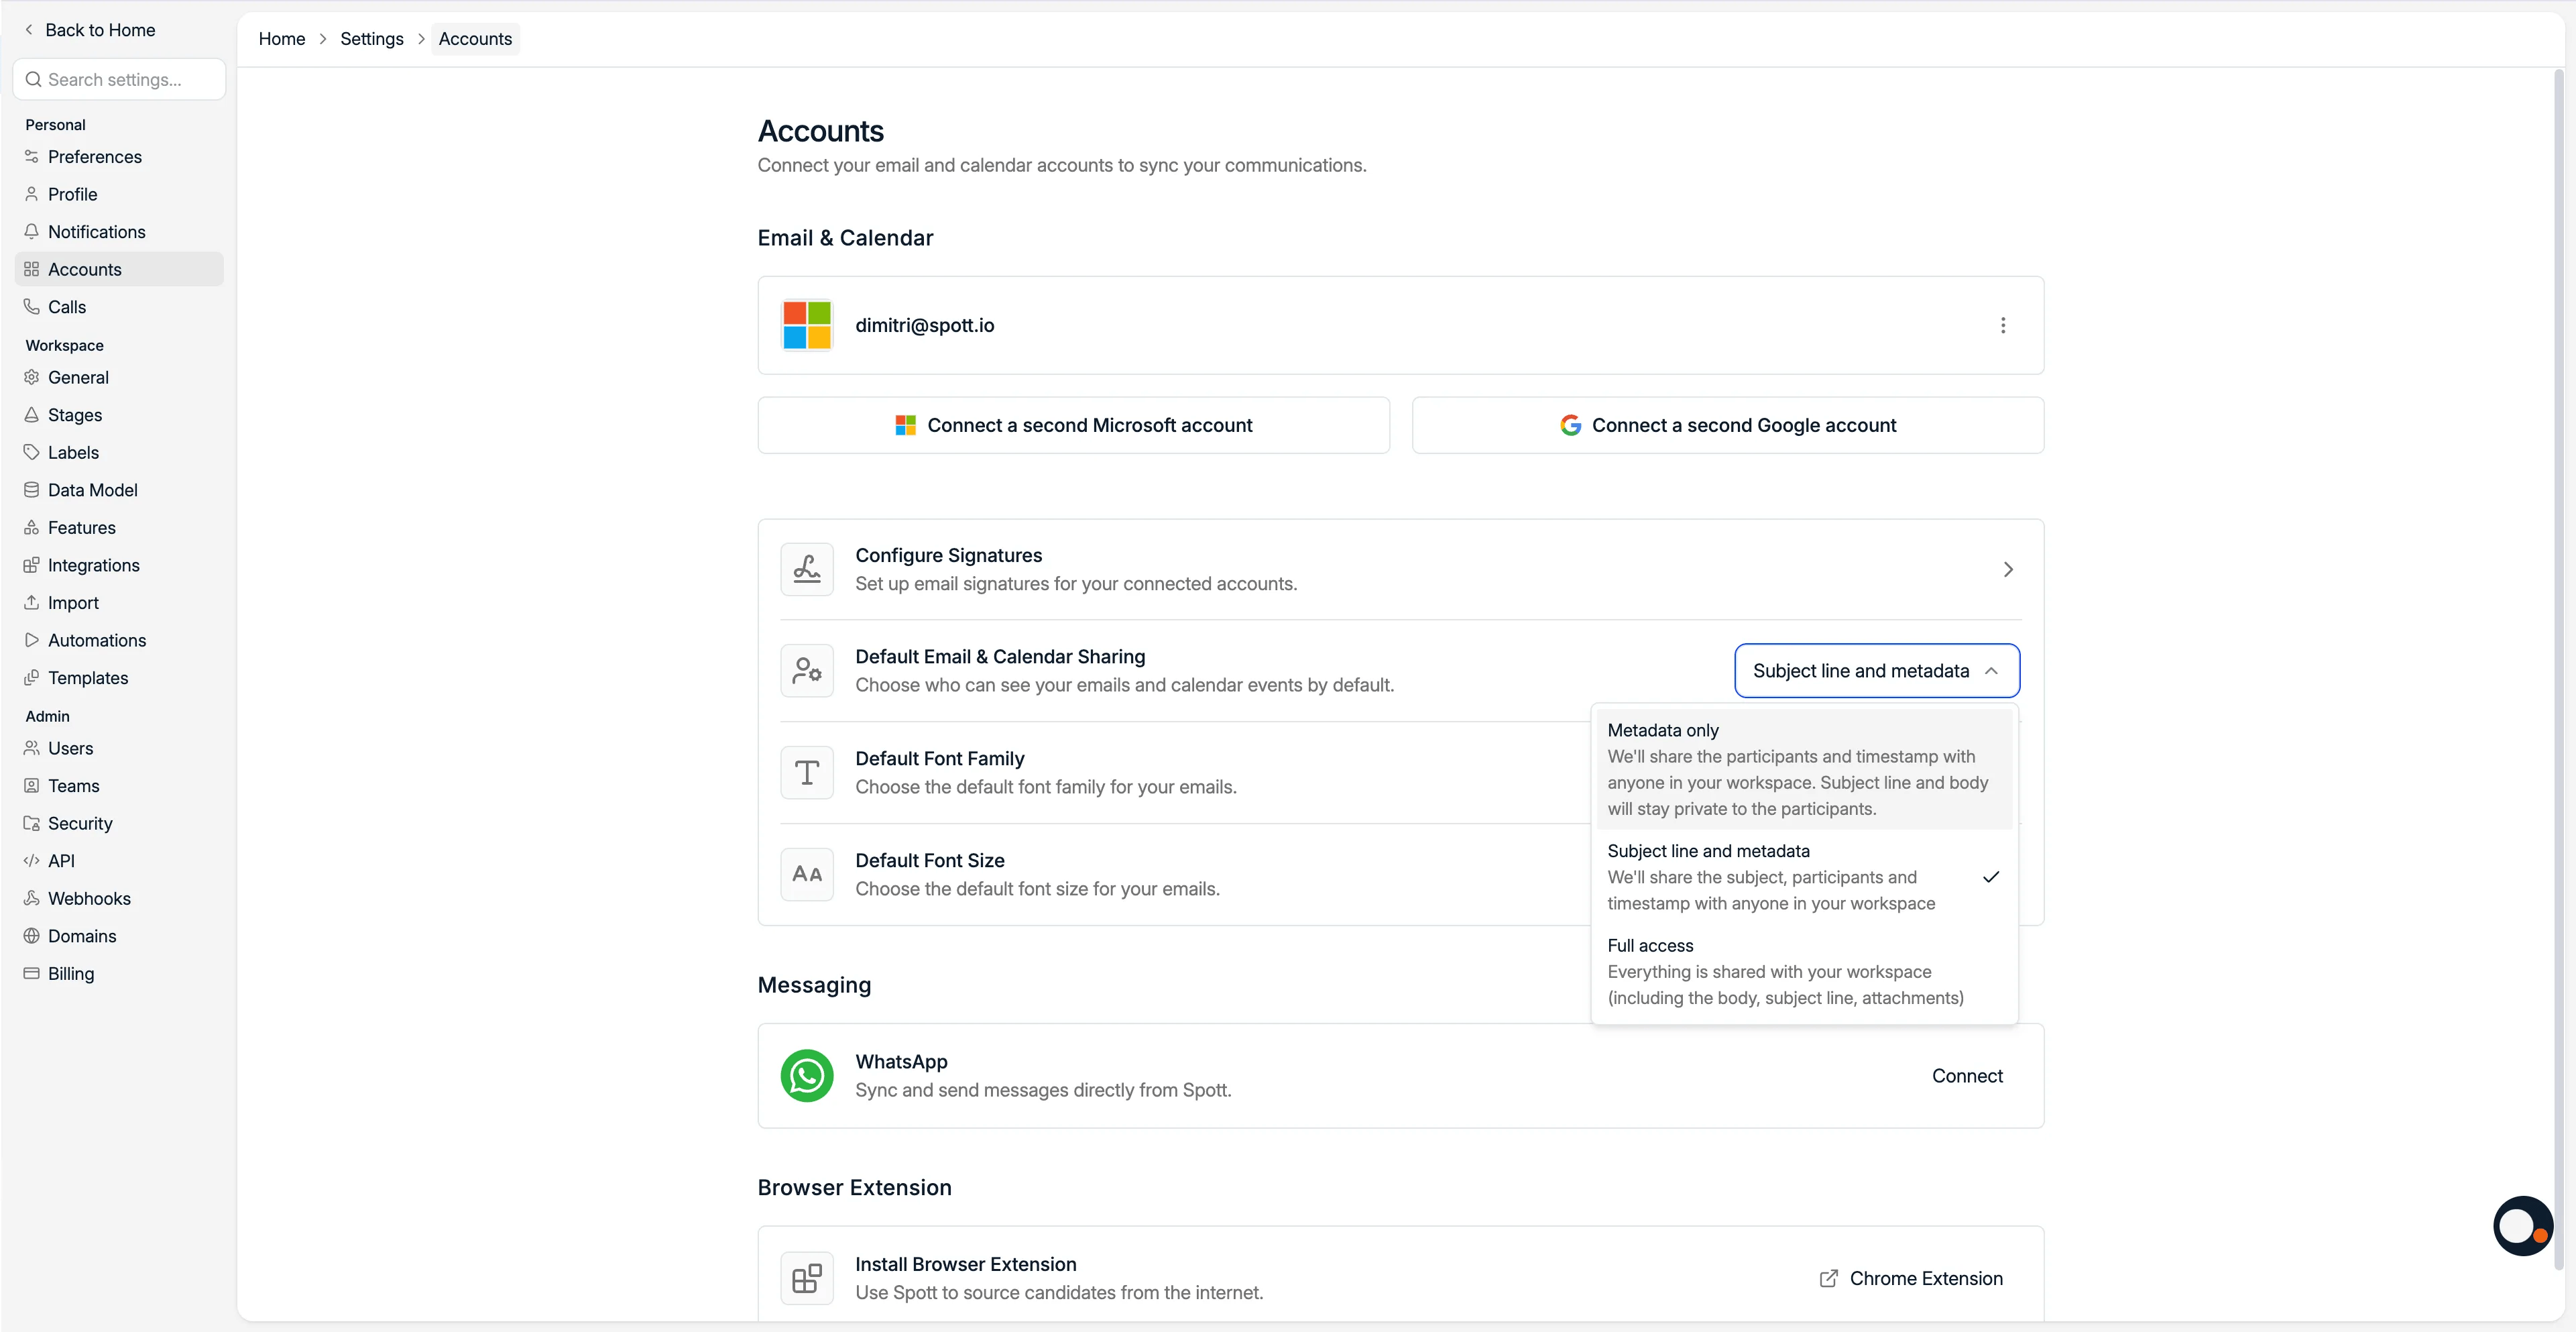
* **Your sharing level.** Choose how much colleagues see of your email:
* **Metadata only**: colleagues see who sent the email and when. Everything else stays
private.
* **Subject line and metadata**: subject, participants, and timestamp are shared. The
body stays private.
* **Full access**: everything is shared with your workspace, including body and
attachments.
This is a personal setting, so each user makes the change for their own mailbox.
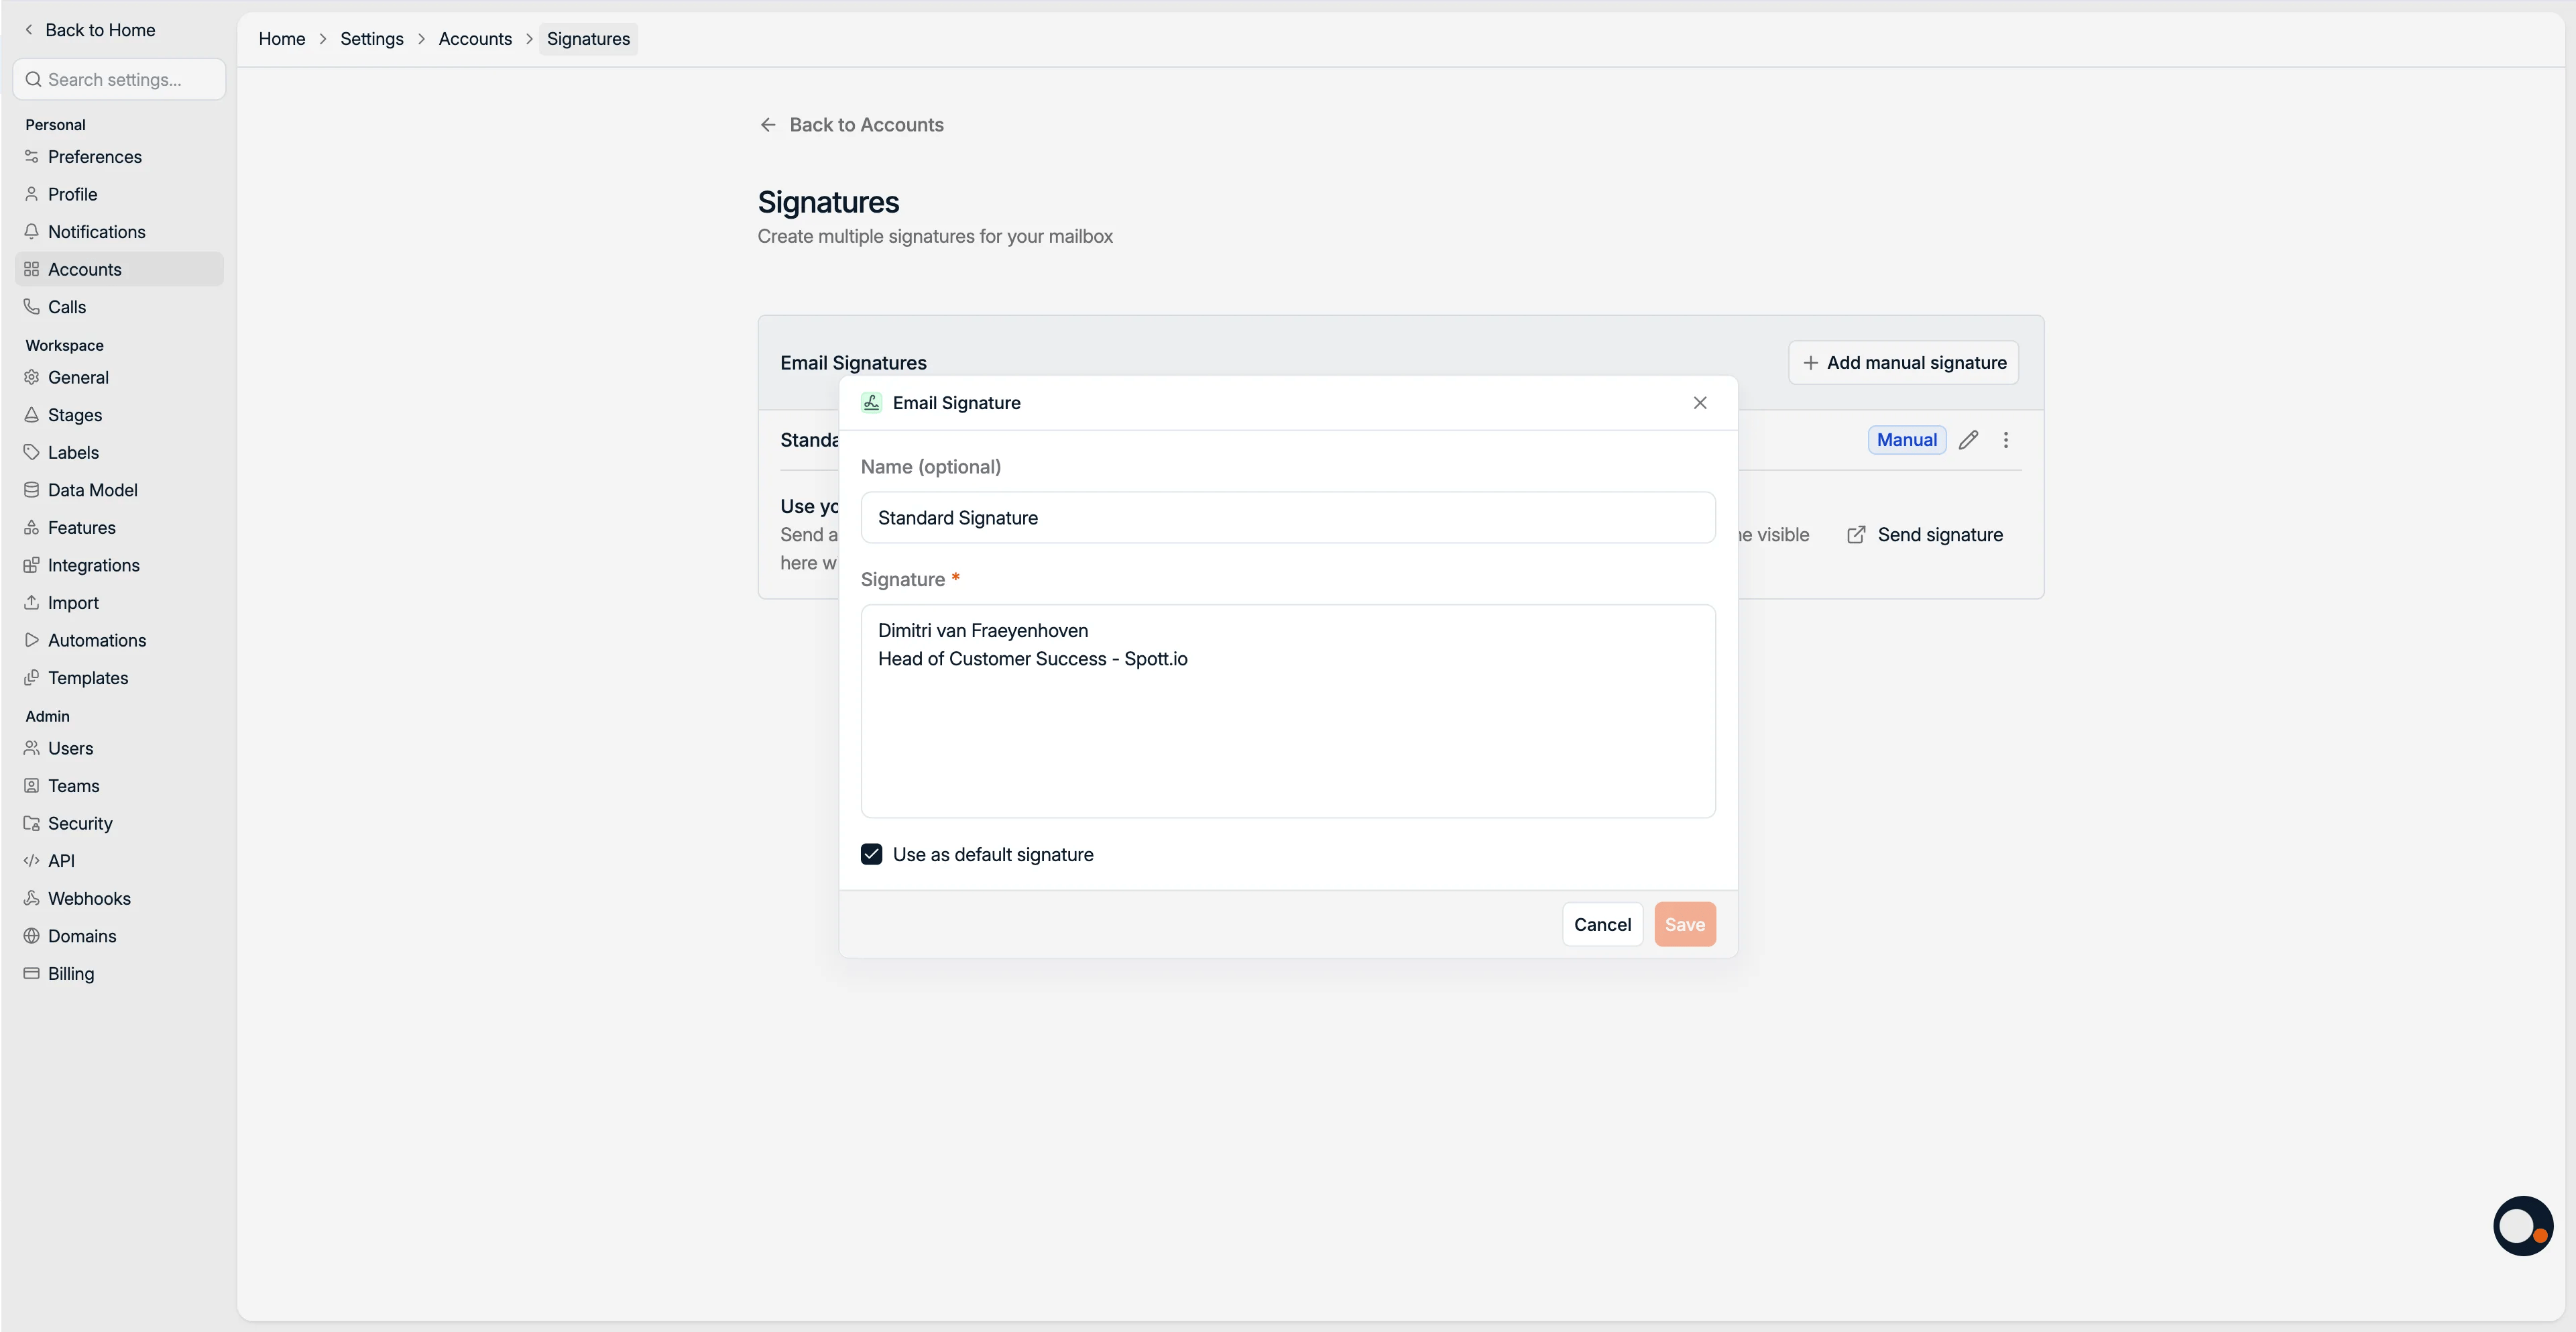
* **Your signature**, in one click. Add one or more signatures by sending a blank email to
[signatures@spott.io](mailto:signatures@spott.io). It appears here within two minutes.
Tick the checkbox to pick the default.
* **Your default font family and size** for outgoing email.
Every event type and channel.
### 1.5 Connect your email and calendar
Open the **Accounts** tab and connect your Google or Outlook account so your mail and
meetings flow into Spott.
**Up to two addresses per user.** You can connect two email addresses to your account,
using **Connect a second Microsoft account** or **Connect a second Google account** on
the Accounts page. The same address cannot be connected twice, and it cannot be
connected through both Google and Microsoft at the same time.
The first mailbox and calendar sync can take up to 12 hours. New messages keep arriving
while Spott imports the older history, so an incomplete history during this period does
not mean the connection failed.
Then set the three things that make your mailbox usable:
* **Your sharing level.** Choose how much colleagues see of your email:
* **Metadata only**: colleagues see who sent the email and when. Everything else stays
private.
* **Subject line and metadata**: subject, participants, and timestamp are shared. The
body stays private.
* **Full access**: everything is shared with your workspace, including body and
attachments.
This is a personal setting, so each user makes the change for their own mailbox.
* **Your signature**, in one click. Add one or more signatures by sending a blank email to
[signatures@spott.io](mailto:signatures@spott.io). It appears here within two minutes.
Tick the checkbox to pick the default.
* **Your default font family and size** for outgoing email.
 Every account type you can connect, and what each one syncs.
What the Outlook email and calendar sync covers.
What the Gmail and Google Calendar sync covers.
### 1.6 Connect WhatsApp and your calling number
**WhatsApp.** Connect WhatsApp for a two-way sync of your messages between Spott and your
mobile. The card shows the connection status, for example Connected or Not connected.
Every account type you can connect, and what each one syncs.
What the Outlook email and calendar sync covers.
What the Gmail and Google Calendar sync covers.
### 1.6 Connect WhatsApp and your calling number
**WhatsApp.** Connect WhatsApp for a two-way sync of your messages between Spott and your
mobile. The card shows the connection status, for example Connected or Not connected.
 **Data sharing for messages**
* **WhatsApp**: only you see your messages with contacts and candidates, and you do not
see those sent by your colleagues.
* **Email**: you choose full or restricted access for colleagues. Restricted means they
see only the subject line and metadata.
**Your calling number.** If your workspace has a telephony integration, open the **Calls**
tab and select the number you call from. Once it is set you get click-to-call from any
record, plus call recording, automatic transcription, and AI insights on every connected
call.
A number that is SMS-capable also lets you text candidates and contacts from Spott.
Which numbers qualify depends on your VoIP provider.
Click-to-call, recording, transcription, and AI insights.
Send and receive texts from the numbers on your VoIP account.
How the two-way sync works and what stays private.
Every telephony provider Spott connects to, and how to set each one up.
### 1.7 Install the browser extension and the mobile app
**The browser extension** imports candidates, contacts, and companies from LinkedIn, Sales
Navigator, or Recruiter, and imports job postings from a live vacancy page.
**Data sharing for messages**
* **WhatsApp**: only you see your messages with contacts and candidates, and you do not
see those sent by your colleagues.
* **Email**: you choose full or restricted access for colleagues. Restricted means they
see only the subject line and metadata.
**Your calling number.** If your workspace has a telephony integration, open the **Calls**
tab and select the number you call from. Once it is set you get click-to-call from any
record, plus call recording, automatic transcription, and AI insights on every connected
call.
A number that is SMS-capable also lets you text candidates and contacts from Spott.
Which numbers qualify depends on your VoIP provider.
Click-to-call, recording, transcription, and AI insights.
Send and receive texts from the numbers on your VoIP account.
How the two-way sync works and what stays private.
Every telephony provider Spott connects to, and how to set each one up.
### 1.7 Install the browser extension and the mobile app
**The browser extension** imports candidates, contacts, and companies from LinkedIn, Sales
Navigator, or Recruiter, and imports job postings from a live vacancy page.
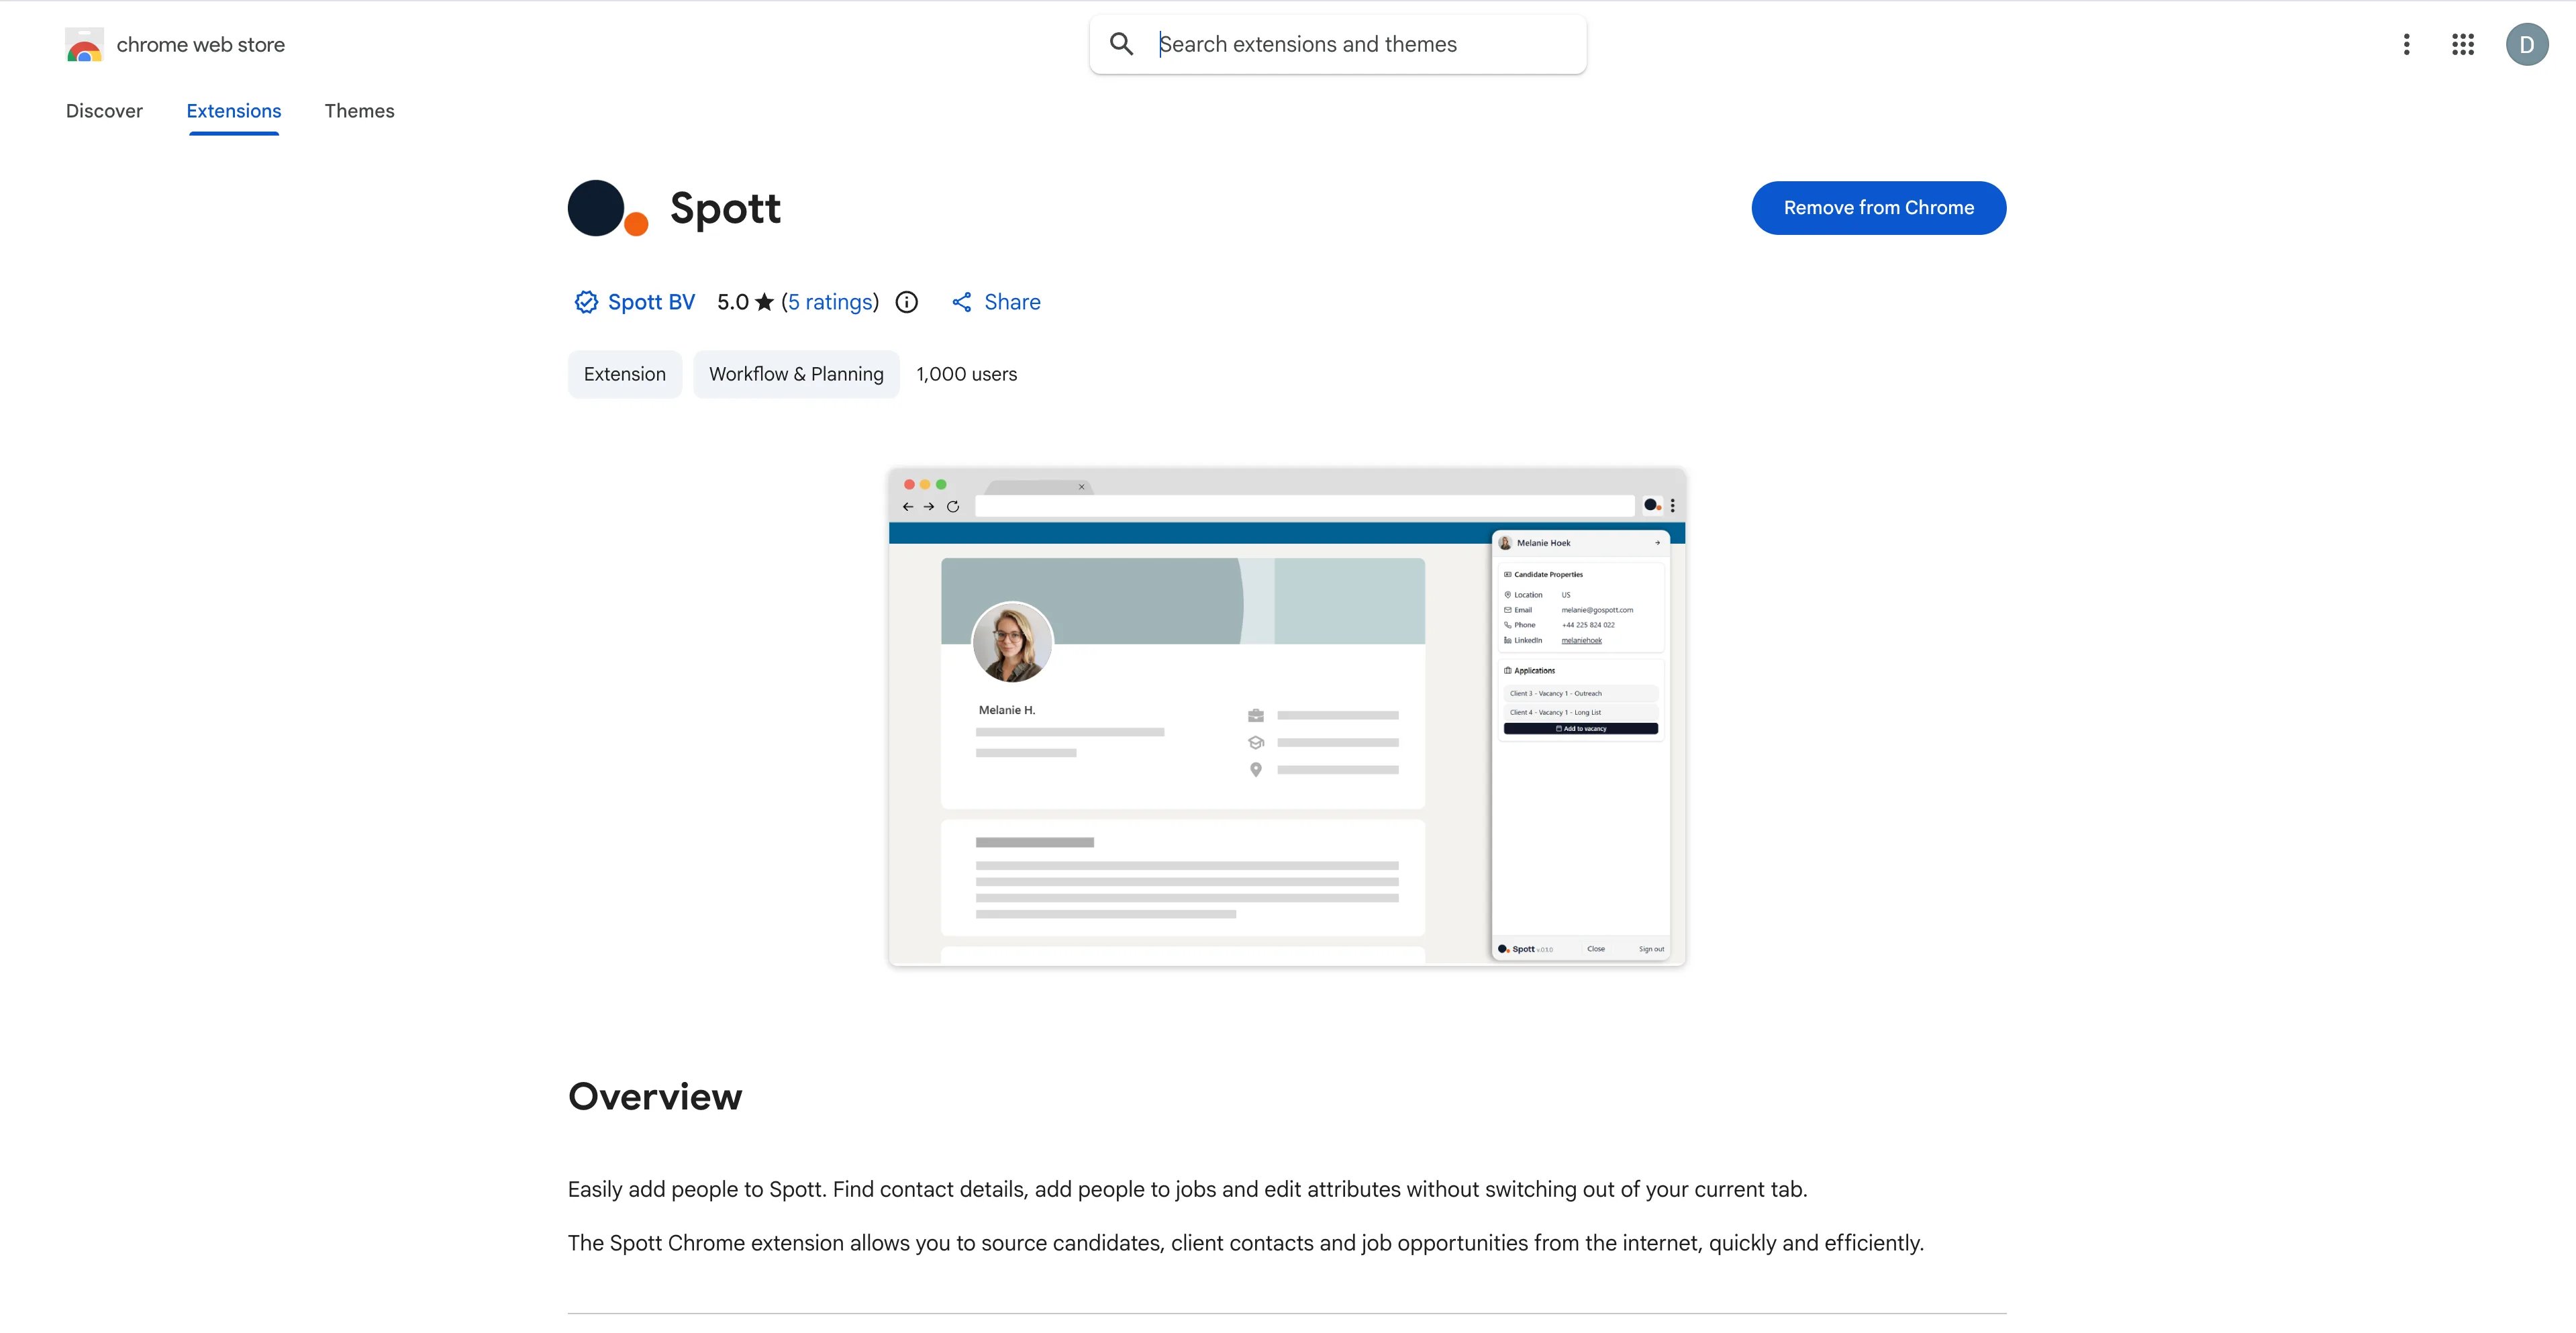 The extension only works on Google Chrome and Microsoft Edge.
**The mobile app**, for iOS and Android, lets you:
* Access candidate and contact information
* Record in-person meetings and manage notes
When recording in-person meetings, do not leave the Spott app and do not let your screen
go black.
Install, connect, and troubleshoot the extension.
### 1.8 Set up the Note Taker and your scheduling links
**The Note Taker.** By default it automatically joins the lobby of all online meetings
from your connected calendar, to record and transcribe the conversation. If you switch
this to **Do not join by default**, the bot has to be scheduled meeting by meeting from
the calendar.
Set your **fallback language for transcription**, used when Spott has low confidence in
the detected language.
Other participants can trigger the Note Taker. Even if you have it switched off, the bot
may still join a meeting when another invited participant has automatic joining enabled.
**Your scheduling links.** Create scheduling links so candidates and contacts can book
meetings directly in your calendar. Each link has its own availability, meeting types, and
booking rules.
The extension only works on Google Chrome and Microsoft Edge.
**The mobile app**, for iOS and Android, lets you:
* Access candidate and contact information
* Record in-person meetings and manage notes
When recording in-person meetings, do not leave the Spott app and do not let your screen
go black.
Install, connect, and troubleshoot the extension.
### 1.8 Set up the Note Taker and your scheduling links
**The Note Taker.** By default it automatically joins the lobby of all online meetings
from your connected calendar, to record and transcribe the conversation. If you switch
this to **Do not join by default**, the bot has to be scheduled meeting by meeting from
the calendar.
Set your **fallback language for transcription**, used when Spott has low confidence in
the detected language.
Other participants can trigger the Note Taker. Even if you have it switched off, the bot
may still join a meeting when another invited participant has automatic joining enabled.
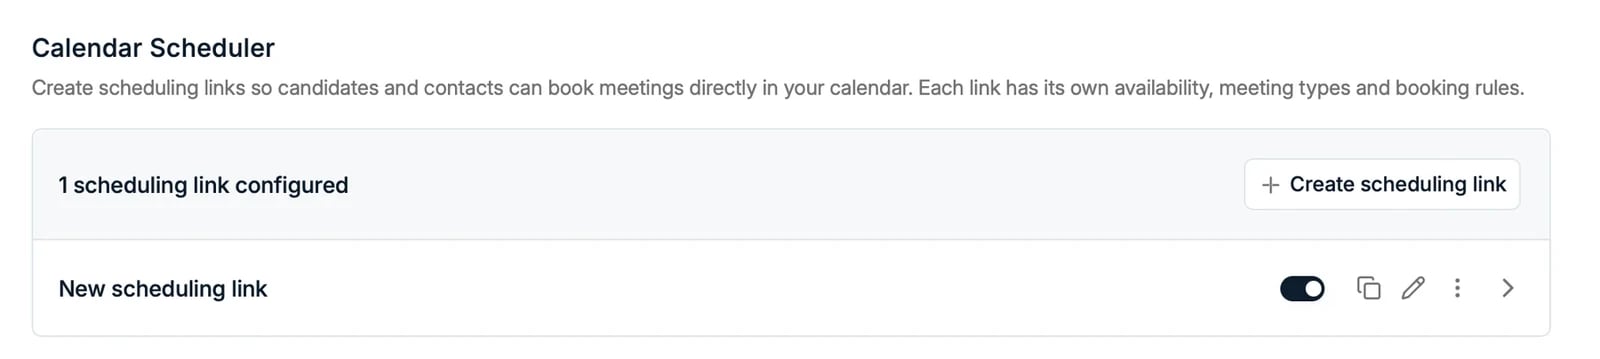
**Your scheduling links.** Create scheduling links so candidates and contacts can book
meetings directly in your calendar. Each link has its own availability, meeting types, and
booking rules.
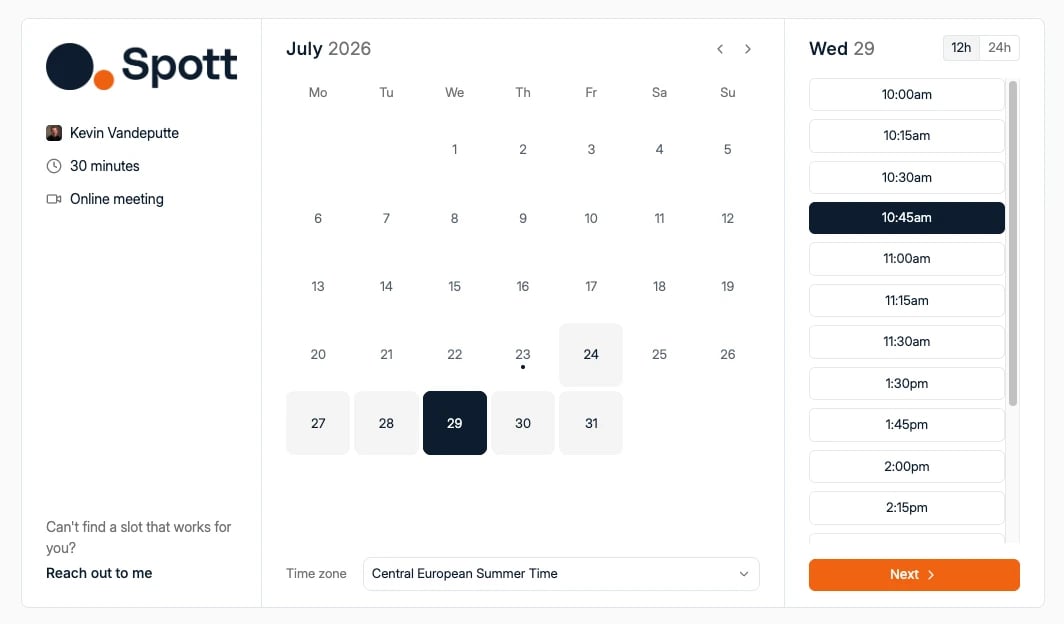
 This is what contacts see when you share a scheduling link. The page is branded with your
logo and colours.
This is what contacts see when you share a scheduling link. The page is branded with your
logo and colours.
 How it joins, what it produces, and how to remove it from a meeting.
Availability, meeting types, and sharing links from an email.
### 1.9 Learn the keyboard shortcuts
Spott has shortcuts for jumping between pages and creating records without touching the
mouse. The two worth learning on day one are **global search** (`⌘K` or `Ctrl+K`), which
finds any record in the workspace by name, email address, phone number, or record ID, and
the shortcuts for creating a candidate, contact, company, or job.
Every shortcut for navigating and creating records.
Find any record by name, email address, phone number, or record ID.
## 2. Admins: set up the workspace
Workspace settings define how Spott behaves for your entire organisation. Updates here
apply to all users and shape both internal workflows and public-facing experiences.
If you do not see these tabs in the settings sidebar, your role does not have access to
workspace settings. See **2.10 Control access**.
### 2.1 Set your branding and public pages
Open **General** to control your organisation's core setup, including its name, branding,
public URLs, social links, and privacy policy. These settings drive everything a candidate
or client sees: your careers page, your booking pages, and your public forms.
**Customise the consent disclaimer**
By default Spott provides a [consent](/docs/settings/gdpr-consent) disclaimer shown at
the bottom of all public forms. If you would rather use your own privacy agreement text,
paste it into this section of the settings.
Logo, favicon, accent colour, and the public-facing text.
### 2.2 Customise your pipeline stages
Open **Stages** to customise the pipeline stages candidates move through in your jobs and
speculative presentations.
The **Job stages** list is the pipeline candidates follow in a job, for example
Application, Long list, Short list, Outreach, Interview, Presentation, and Offer.
* Drag stages by the handle to reorder them.
* Click **Add stage** to create a new one, and use the row menu (the three dots) to rename
or recolour it.
* Add **stage labels** where a stage needs sub-categories your team can report on.
Two markers tell Spott how to measure your pipeline:
* **CV sent**: the stage at which a CV counts as sent to the client. This drives the "CV
sent" reporting metric.
* **First interview**: the stage at which a first interview counts as completed.
The **Speculative presentation stages** define a separate pipeline for speculative
candidate presentations, managed the same way as job stages.
Beyond the recruiting workflow, you also set up:
* **Company stages**, for managing company relationships
* **Job statuses**, for tracking job progress
* **Opportunity statuses**, for your opportunity pipeline
Get the two markers right before your team starts working. Every "CV sent" and "First
interview" number in reporting is derived from them.
Every stage list, plus sub-stages and closing-rate percentages.
### 2.3 Create your labels
Open **Labels** to create the labels that categorise and report on notes, tasks,
rejections, and emails across your workspace.
How it joins, what it produces, and how to remove it from a meeting.
Availability, meeting types, and sharing links from an email.
### 1.9 Learn the keyboard shortcuts
Spott has shortcuts for jumping between pages and creating records without touching the
mouse. The two worth learning on day one are **global search** (`⌘K` or `Ctrl+K`), which
finds any record in the workspace by name, email address, phone number, or record ID, and
the shortcuts for creating a candidate, contact, company, or job.
Every shortcut for navigating and creating records.
Find any record by name, email address, phone number, or record ID.
## 2. Admins: set up the workspace
Workspace settings define how Spott behaves for your entire organisation. Updates here
apply to all users and shape both internal workflows and public-facing experiences.
If you do not see these tabs in the settings sidebar, your role does not have access to
workspace settings. See **2.10 Control access**.
### 2.1 Set your branding and public pages
Open **General** to control your organisation's core setup, including its name, branding,
public URLs, social links, and privacy policy. These settings drive everything a candidate
or client sees: your careers page, your booking pages, and your public forms.
**Customise the consent disclaimer**
By default Spott provides a [consent](/docs/settings/gdpr-consent) disclaimer shown at
the bottom of all public forms. If you would rather use your own privacy agreement text,
paste it into this section of the settings.
Logo, favicon, accent colour, and the public-facing text.
### 2.2 Customise your pipeline stages
Open **Stages** to customise the pipeline stages candidates move through in your jobs and
speculative presentations.
The **Job stages** list is the pipeline candidates follow in a job, for example
Application, Long list, Short list, Outreach, Interview, Presentation, and Offer.
* Drag stages by the handle to reorder them.
* Click **Add stage** to create a new one, and use the row menu (the three dots) to rename
or recolour it.
* Add **stage labels** where a stage needs sub-categories your team can report on.
Two markers tell Spott how to measure your pipeline:
* **CV sent**: the stage at which a CV counts as sent to the client. This drives the "CV
sent" reporting metric.
* **First interview**: the stage at which a first interview counts as completed.
The **Speculative presentation stages** define a separate pipeline for speculative
candidate presentations, managed the same way as job stages.
Beyond the recruiting workflow, you also set up:
* **Company stages**, for managing company relationships
* **Job statuses**, for tracking job progress
* **Opportunity statuses**, for your opportunity pipeline
Get the two markers right before your team starts working. Every "CV sent" and "First
interview" number in reporting is derived from them.
Every stage list, plus sub-stages and closing-rate percentages.
### 2.3 Create your labels
Open **Labels** to create the labels that categorise and report on notes, tasks,
rejections, and emails across your workspace.
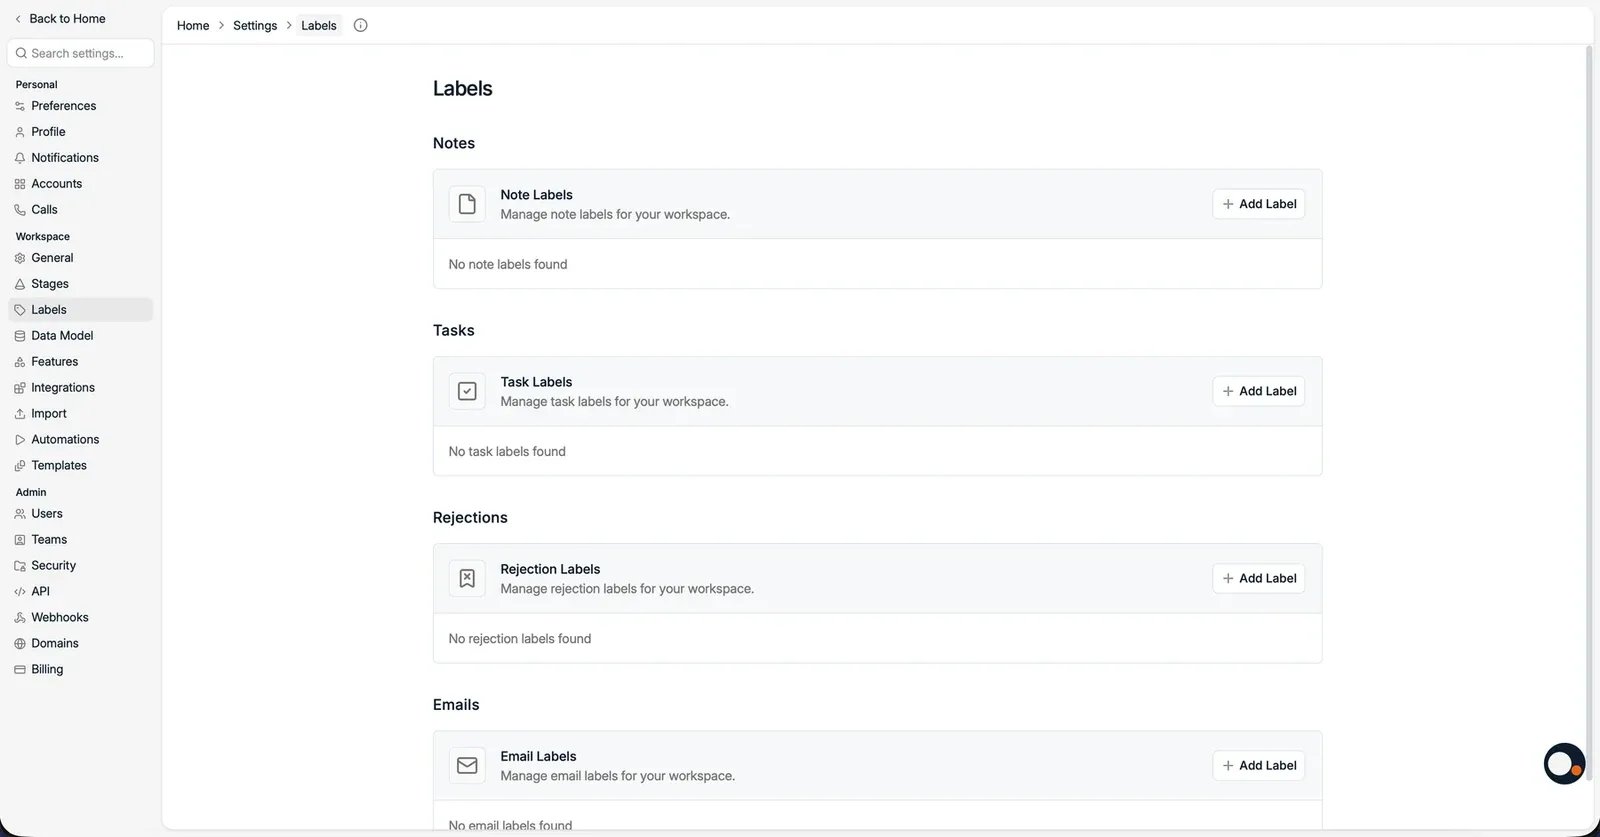 Spott groups labels by where they are used:
* **Note labels**: categorise notes, for example Follow up or Candidate interview.
* **Task labels**: categorise tasks so they surface in the right context.
* **Rejection labels**: standardise the reasons applications are rejected.
* **Email labels**: organise emails in the inbox, for example Submission or Offer.
Click **Add label** in a section to create one, give it a name and colour, and it becomes
available on the matching records.
How labels feed filtering and reporting.
### 2.4 Build out your data model
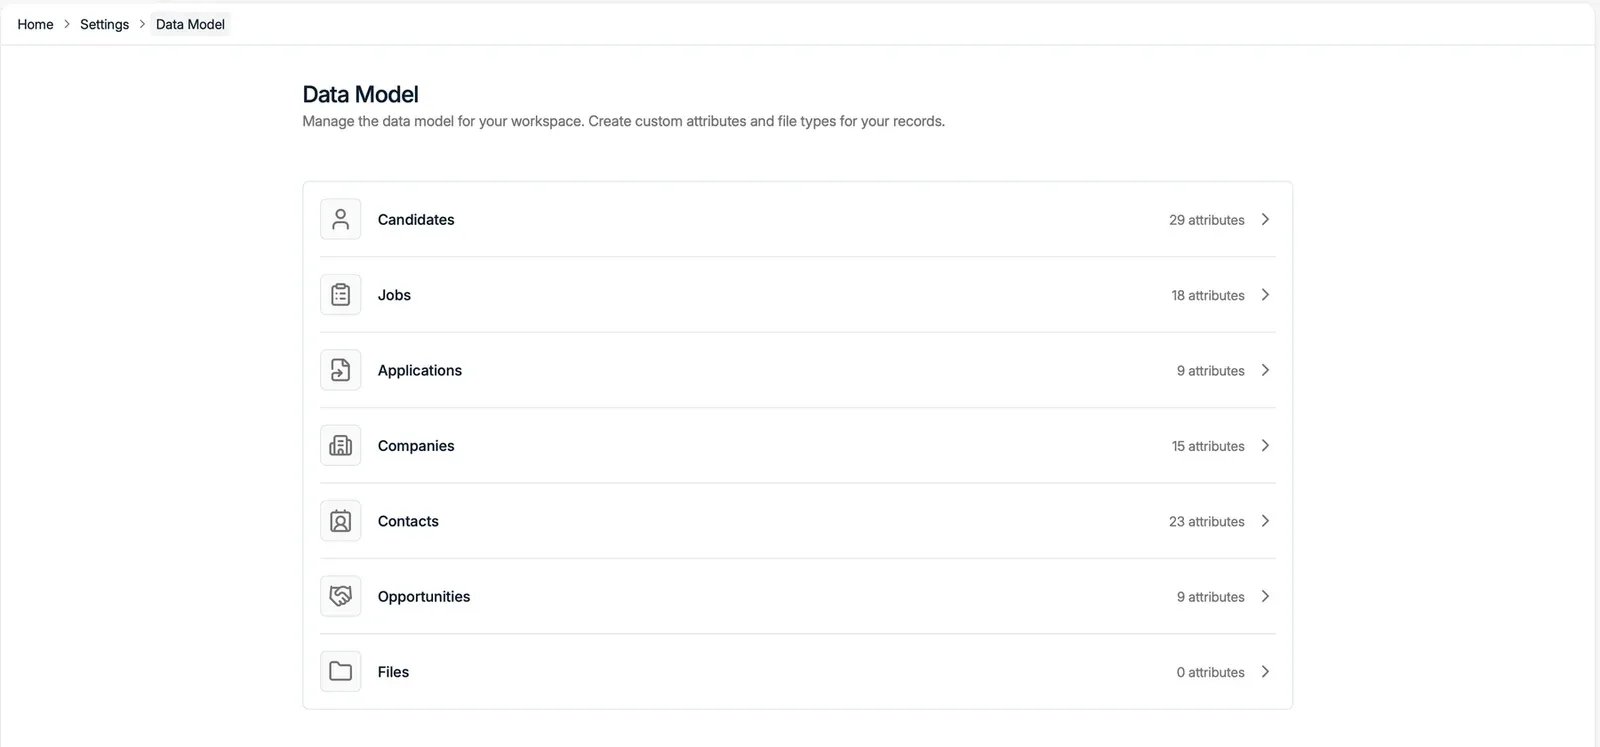
Open **Data model** to see every record type with the number of attributes it has:
Candidates, Jobs, Applications, Companies, Contacts, Opportunities, and Files. Click a
record type to manage its attributes.
Spott groups labels by where they are used:
* **Note labels**: categorise notes, for example Follow up or Candidate interview.
* **Task labels**: categorise tasks so they surface in the right context.
* **Rejection labels**: standardise the reasons applications are rejected.
* **Email labels**: organise emails in the inbox, for example Submission or Offer.
Click **Add label** in a section to create one, give it a name and colour, and it becomes
available on the matching records.
How labels feed filtering and reporting.
### 2.4 Build out your data model
Open **Data model** to see every record type with the number of attributes it has:
Candidates, Jobs, Applications, Companies, Contacts, Opportunities, and Files. Click a
record type to manage its attributes.
 **Create the custom attributes your business runs on.** Anything you want to track,
filter, search, or report on that Spott does not have a standard field for becomes a
custom attribute here: notice periods, certifications, sector specialisms, contract
preferences.
An attribute's type is fixed once it is created. Decide whether something is text, a
number, a date, or a select list before you create it.
**Starred attributes**
Starred attributes appear by default on records, while unstarred ones stay available
under **Show all values**. Drag attributes to set the order they appear in.
**Let AI fill the columns you don't want to type.** AI-filled columns populate a custom
attribute automatically from the candidate's profile and CV, so a field like "years of
management experience" fills itself as records come in.
An AI-filled column generates on new and updated records. Existing records need a
refresh before the column fills in.
**Set your consent purposes.** Each record type also carries the consent purposes you
track, which is where GDPR and any other framework you work under gets configured.
Recruiters then record consent on the candidate record itself.
Attribute types, and why a type is fixed once created.
Create attributes for Jobs, Candidates, Companies, and Contacts.
When they generate, and how to refresh them.
Consent purposes and marketing opt-outs, for GDPR and beyond.
### 2.5 Turn on the features your team needs
Open **Features** to enable or disable workspace-wide functionality such as enrichment,
auto-updating profiles, the unified inbox, and outreach campaigns.
Two of these deserve a decision rather than a default:
* **Contact enrichment** finds missing email addresses and phone numbers. It is the main
consumer of credits, so turn it on knowing what it spends.
* **Auto-updating profiles** re-checks LinkedIn on a schedule and refreshes candidate
profiles that have changed. You control how often it runs, which controls what it costs.
Two Note Taker settings are workspace-wide even though they sit on the **Calls** tab:
**video recording**, which stops meeting videos being stored when disabled, and **Note
Taker appearance**, the bot's name and background image. Both apply to everyone in your
organisation.
What each feature switch turns on.
Update frequency, and controlling credit usage.
What enrichment finds, and what each lookup costs.
Save and share the filtered views your team works from.
### 2.6 Upload your templates and forms
Open **Templates** to manage everything Spott reuses across the product, so your team
stays consistent.
**Create the custom attributes your business runs on.** Anything you want to track,
filter, search, or report on that Spott does not have a standard field for becomes a
custom attribute here: notice periods, certifications, sector specialisms, contract
preferences.
An attribute's type is fixed once it is created. Decide whether something is text, a
number, a date, or a select list before you create it.
**Starred attributes**
Starred attributes appear by default on records, while unstarred ones stay available
under **Show all values**. Drag attributes to set the order they appear in.
**Let AI fill the columns you don't want to type.** AI-filled columns populate a custom
attribute automatically from the candidate's profile and CV, so a field like "years of
management experience" fills itself as records come in.
An AI-filled column generates on new and updated records. Existing records need a
refresh before the column fills in.
**Set your consent purposes.** Each record type also carries the consent purposes you
track, which is where GDPR and any other framework you work under gets configured.
Recruiters then record consent on the candidate record itself.
Attribute types, and why a type is fixed once created.
Create attributes for Jobs, Candidates, Companies, and Contacts.
When they generate, and how to refresh them.
Consent purposes and marketing opt-outs, for GDPR and beyond.
### 2.5 Turn on the features your team needs
Open **Features** to enable or disable workspace-wide functionality such as enrichment,
auto-updating profiles, the unified inbox, and outreach campaigns.
Two of these deserve a decision rather than a default:
* **Contact enrichment** finds missing email addresses and phone numbers. It is the main
consumer of credits, so turn it on knowing what it spends.
* **Auto-updating profiles** re-checks LinkedIn on a schedule and refreshes candidate
profiles that have changed. You control how often it runs, which controls what it costs.
Two Note Taker settings are workspace-wide even though they sit on the **Calls** tab:
**video recording**, which stops meeting videos being stored when disabled, and **Note
Taker appearance**, the bot's name and background image. Both apply to everyone in your
organisation.
What each feature switch turns on.
Update frequency, and controlling credit usage.
What enrichment finds, and what each lookup costs.
Save and share the filtered views your team works from.
### 2.6 Upload your templates and forms
Open **Templates** to manage everything Spott reuses across the product, so your team
stays consistent.
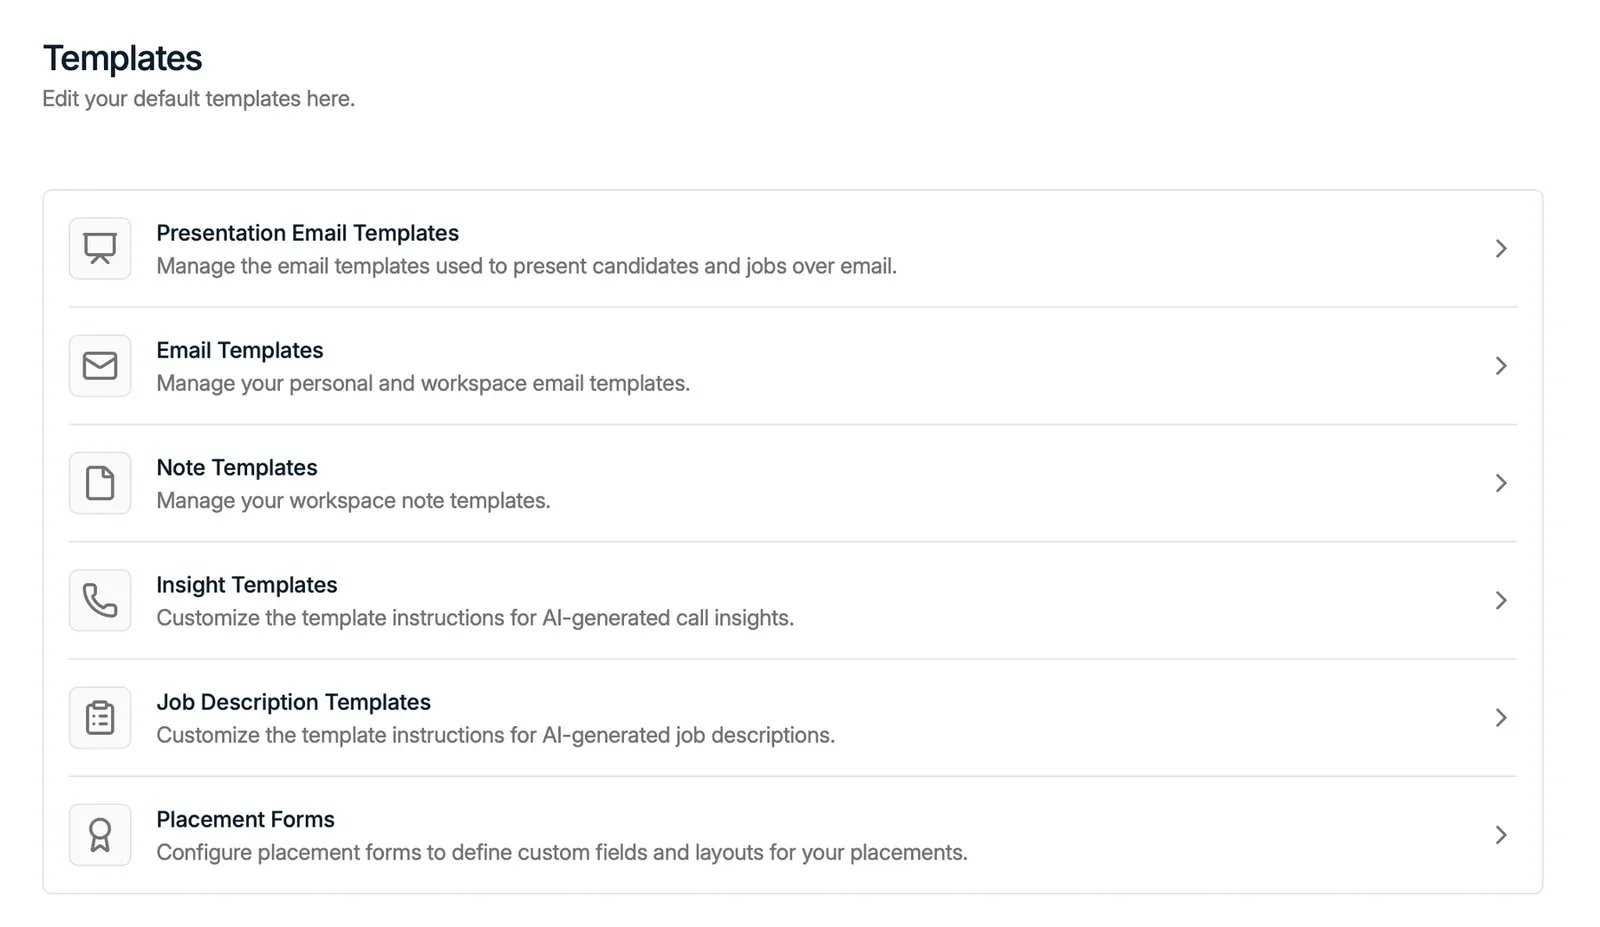 There are six template types:
* **Presentation email templates**: the prompt used to present candidates and jobs.
* **Email templates**: your personal and workspace [email templates](/docs/inbox/message-templates).
* **Note templates**: reusable note structures for your workspace.
* **Insight templates**: the instructions the AI uses to generate call insights. See
[Spott Note Taker](/docs/notes/note-taker).
* **Job description templates**: the instructions the AI uses to generate job
descriptions.
* **Placement forms**: the custom fields and layout used when logging a
[placement](/docs/placements/placements).
Open any category to view, edit, or create templates within it.
**Your branded CV and report templates live here too.** Upload your agency's Word
templates so that **Generate CV**, candidate reports, and shortlists come out in your
own house style. Until a Word template is uploaded, there is nothing for Spott to format
into.
Every template type, and how Spott picks one.
Formatted CVs, candidate reports, and shortlists in your own template.
### 2.7 Verify your sending domain
Open **Verified domains** and verify the domain you send from, by adding the DNS records
Spott gives you. Then register the sender addresses your team will send from.
Marketing campaigns and emails sent from automations do not go out until your sending
domain is verified. Do this early, because DNS changes can take time to propagate.
Add DNS records, troubleshoot verification, and register senders.
Warm up your domain, keep your list clean, and reach the inbox.
### 2.8 Connect your integrations
Open **Integrations** to connect Spott to the external tools your team uses: calling
providers, email and calendar, sourcing tools, and job board distributors. All native
integrations live under this tab.
Email, calendar, telephony, messaging, job boards, and data providers.
### 2.9 Set up automations
Open **Automations** to trigger actions automatically on events in Spott: open dialogs at
the right moment, send emails, update fields, and more. The run log shows you what fired
and when.
Triggers, actions, enabling them, and the run log.
### 2.10 Control access
Spott offers Role-Based Access Control (RBAC), which improves security by assigning
permissions to roles so users only access what their job needs. The main restrictions
cover workspace settings, and delete, merge, and export operations.
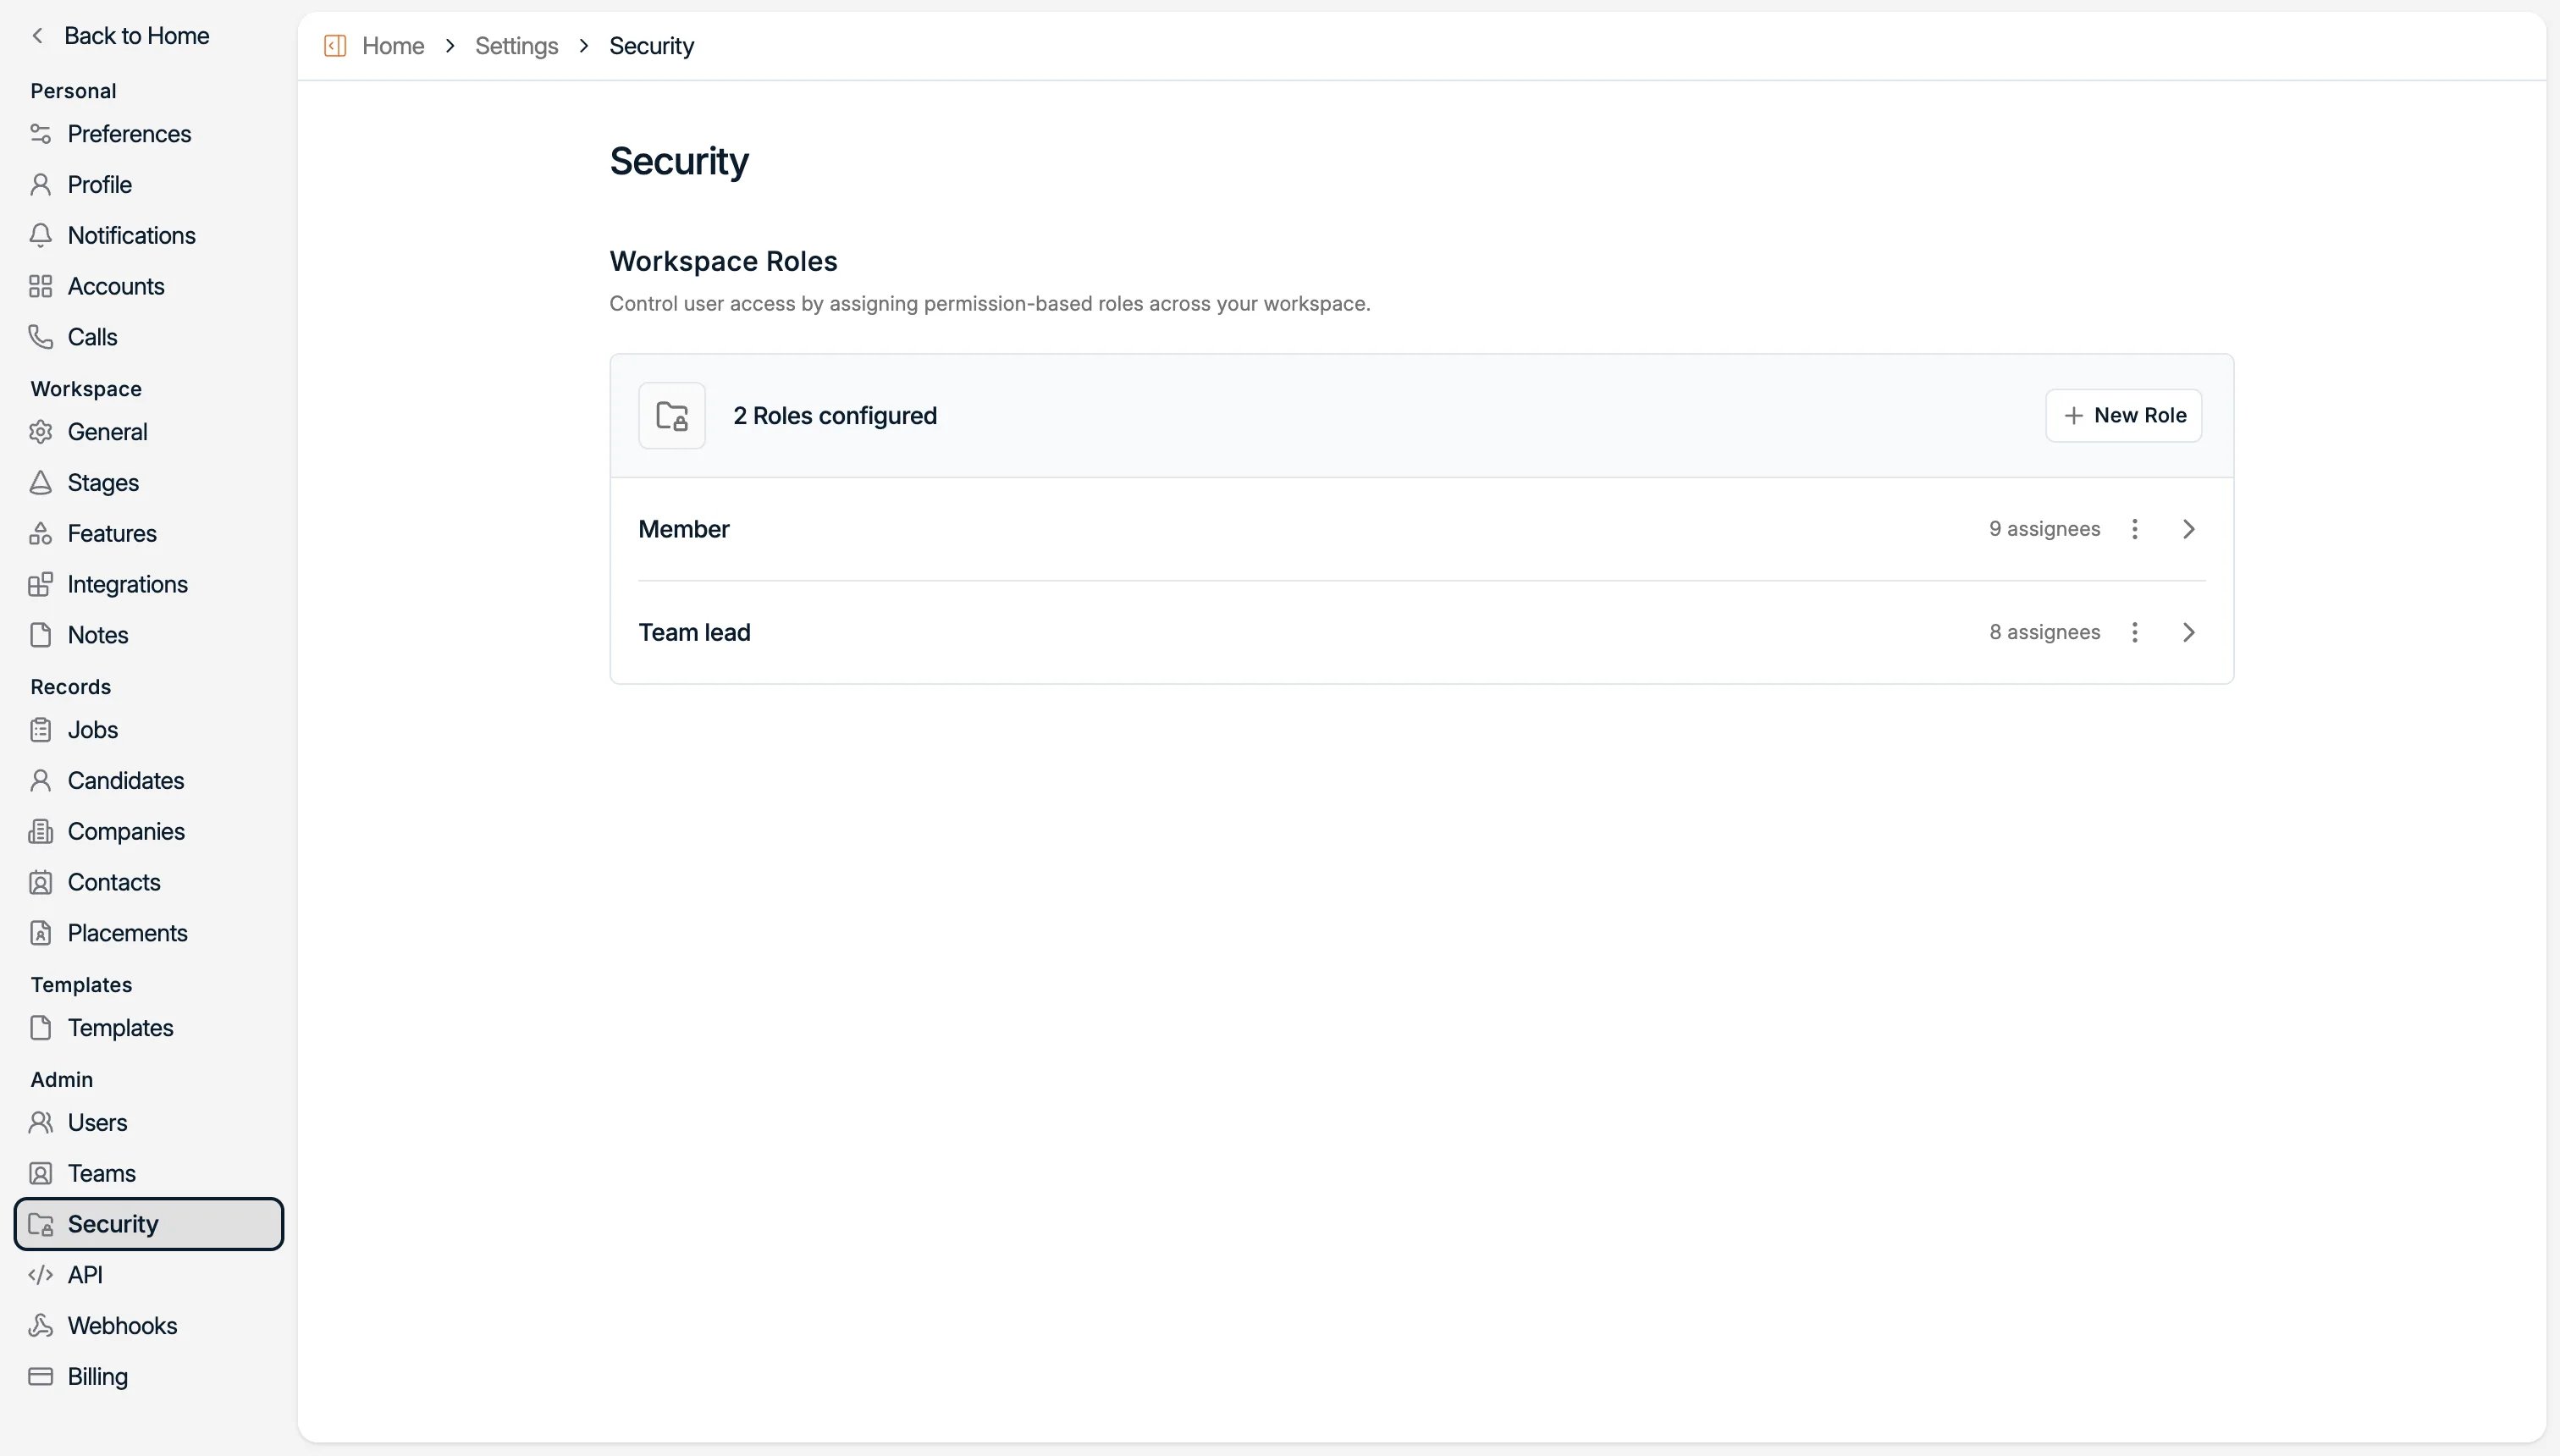
**Create your roles.** Under the **Security** tab you can create new roles.
There are six template types:
* **Presentation email templates**: the prompt used to present candidates and jobs.
* **Email templates**: your personal and workspace [email templates](/docs/inbox/message-templates).
* **Note templates**: reusable note structures for your workspace.
* **Insight templates**: the instructions the AI uses to generate call insights. See
[Spott Note Taker](/docs/notes/note-taker).
* **Job description templates**: the instructions the AI uses to generate job
descriptions.
* **Placement forms**: the custom fields and layout used when logging a
[placement](/docs/placements/placements).
Open any category to view, edit, or create templates within it.
**Your branded CV and report templates live here too.** Upload your agency's Word
templates so that **Generate CV**, candidate reports, and shortlists come out in your
own house style. Until a Word template is uploaded, there is nothing for Spott to format
into.
Every template type, and how Spott picks one.
Formatted CVs, candidate reports, and shortlists in your own template.
### 2.7 Verify your sending domain
Open **Verified domains** and verify the domain you send from, by adding the DNS records
Spott gives you. Then register the sender addresses your team will send from.
Marketing campaigns and emails sent from automations do not go out until your sending
domain is verified. Do this early, because DNS changes can take time to propagate.
Add DNS records, troubleshoot verification, and register senders.
Warm up your domain, keep your list clean, and reach the inbox.
### 2.8 Connect your integrations
Open **Integrations** to connect Spott to the external tools your team uses: calling
providers, email and calendar, sourcing tools, and job board distributors. All native
integrations live under this tab.
Email, calendar, telephony, messaging, job boards, and data providers.
### 2.9 Set up automations
Open **Automations** to trigger actions automatically on events in Spott: open dialogs at
the right moment, send emails, update fields, and more. The run log shows you what fired
and when.
Triggers, actions, enabling them, and the run log.
### 2.10 Control access
Spott offers Role-Based Access Control (RBAC), which improves security by assigning
permissions to roles so users only access what their job needs. The main restrictions
cover workspace settings, and delete, merge, and export operations.
**Create your roles.** Under the **Security** tab you can create new roles.
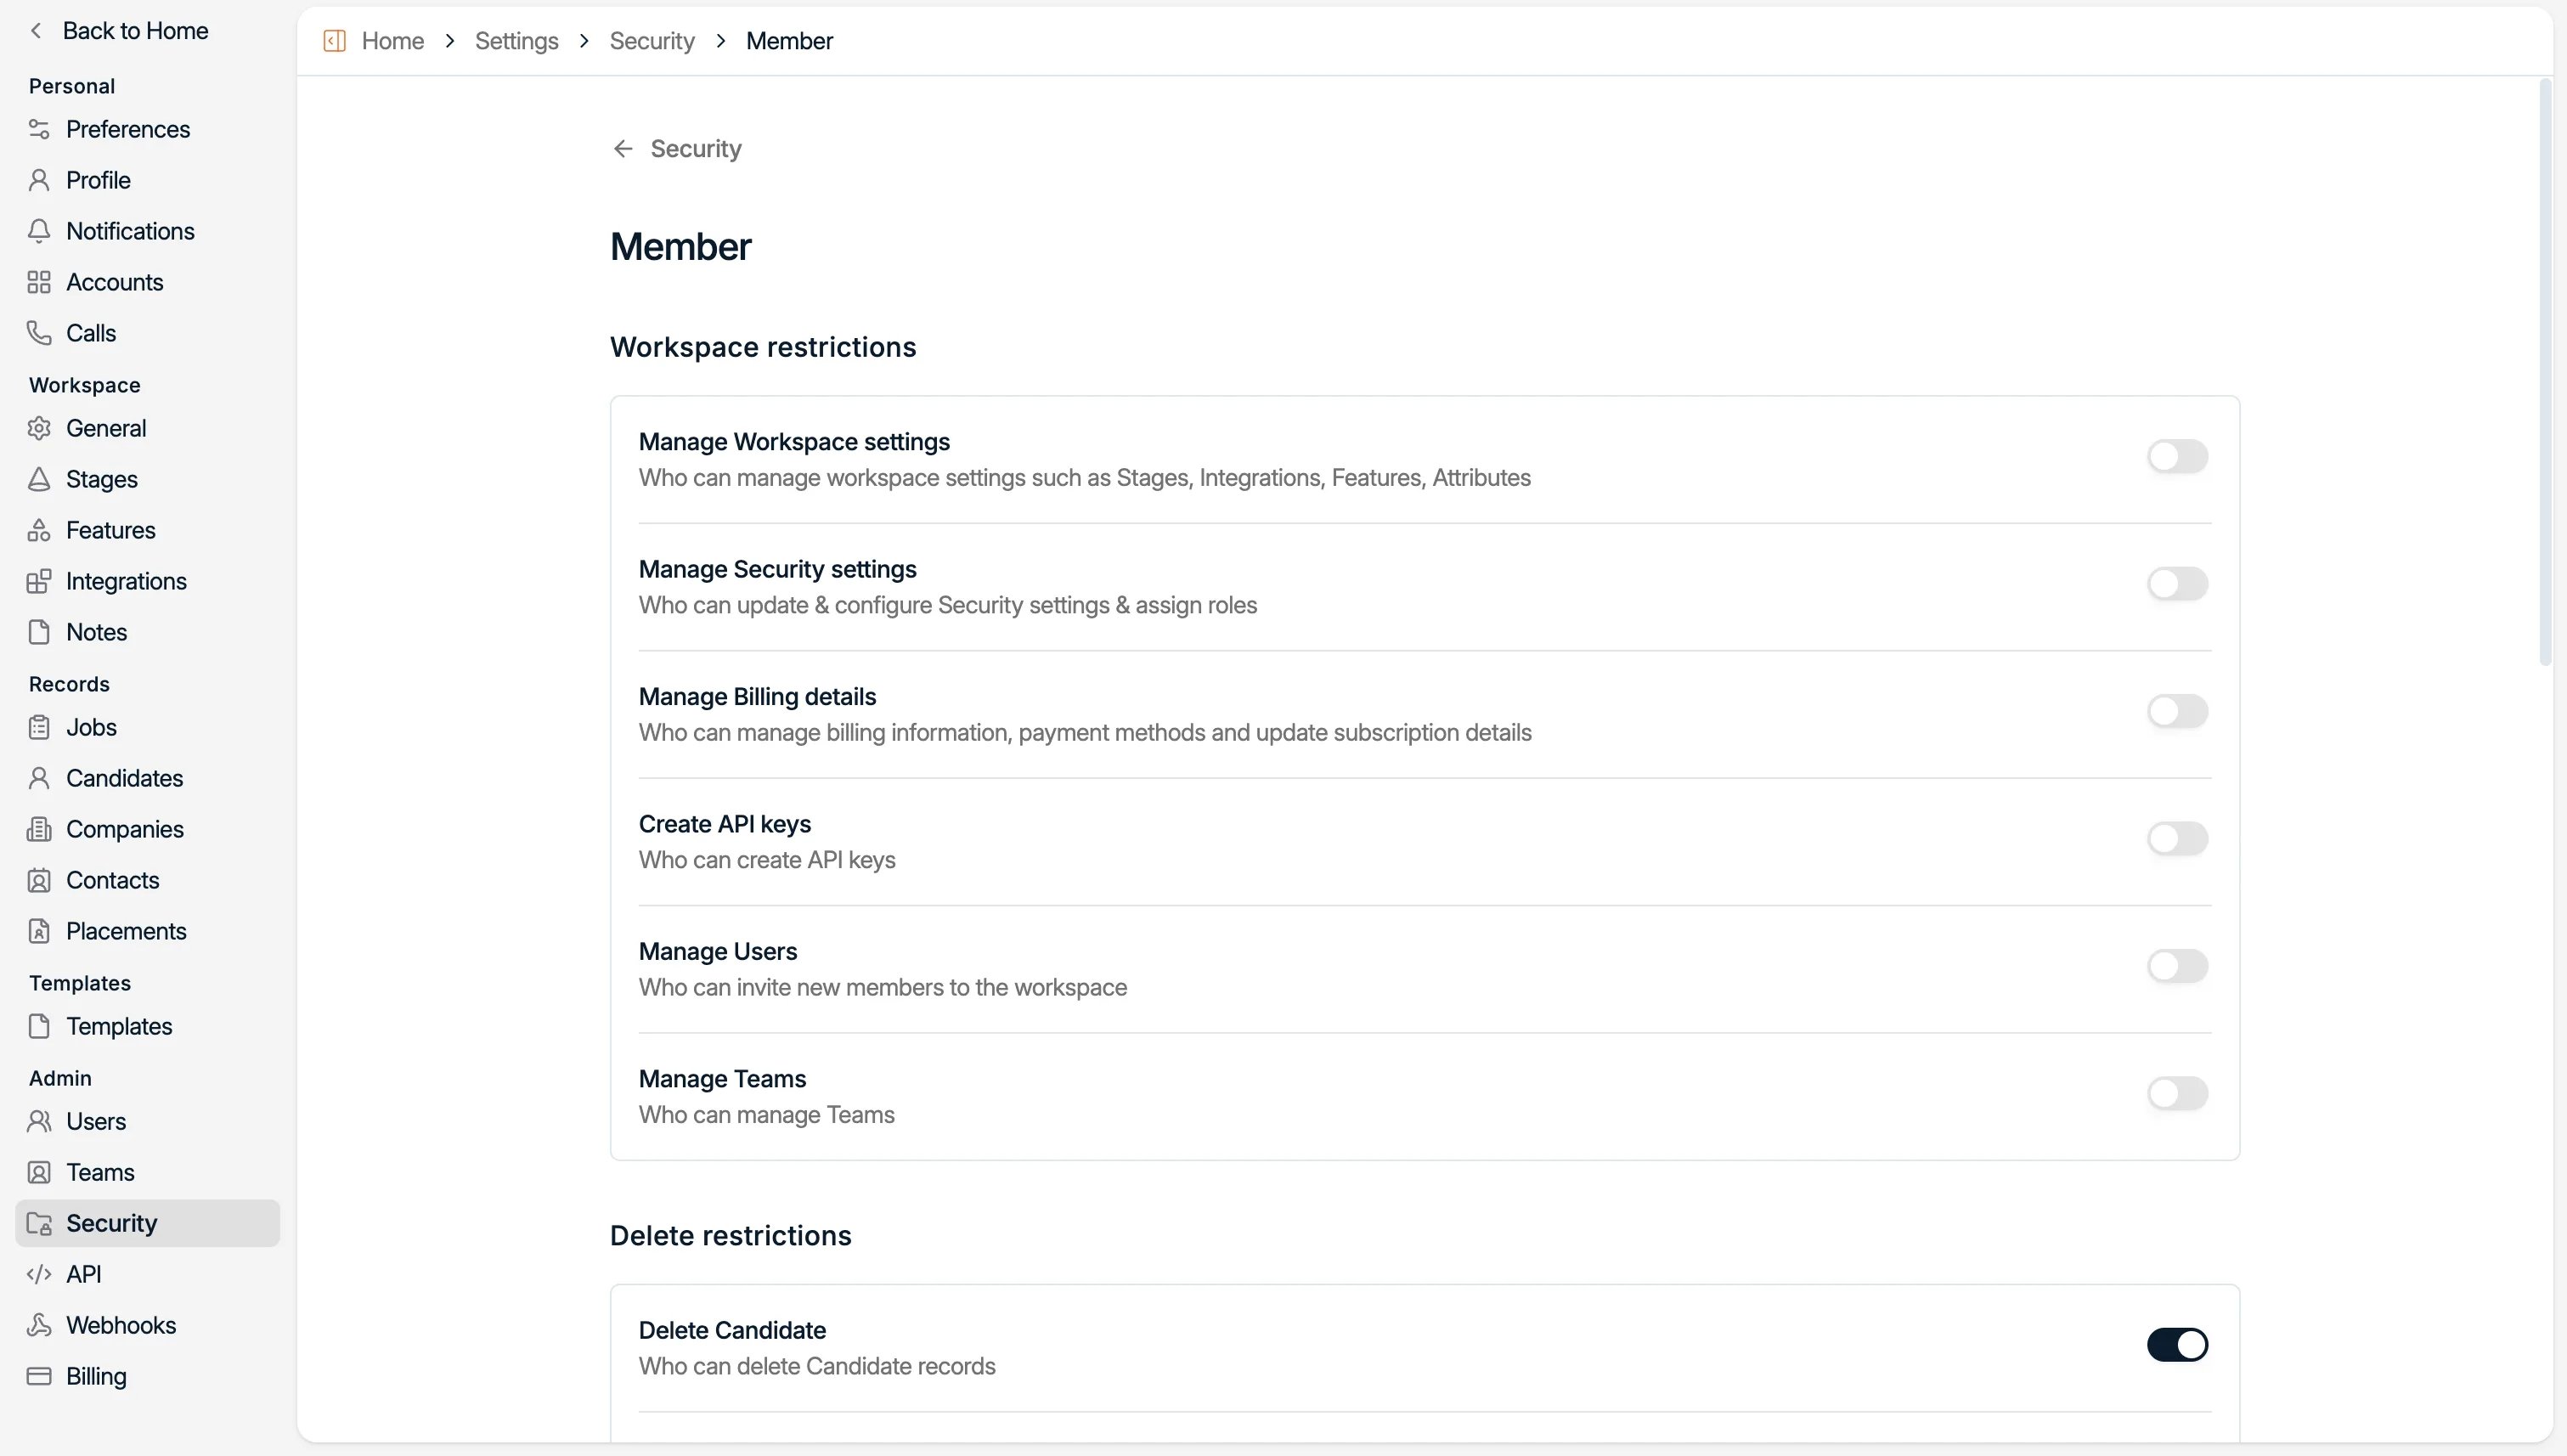
 For each role, use the toggles to turn on the features that role should have. For example,
you might give team leads access to workspace settings so they can create new fields,
while regular members cannot.
For each role, use the toggles to turn on the features that role should have. For example,
you might give team leads access to workspace settings so they can create new fields,
while regular members cannot.
 **Invite your users.** Once you have granted permissions to your roles, invite users with
the orange button under the **Users** tab, then assign them a role.
**Invite your users.** Once you have granted permissions to your roles, invite users with
the orange button under the **Users** tab, then assign them a role.
 Each row shows the member's name and address, their **status** (`accepted` once they have
signed in, `pending` while an invitation is outstanding), the **roles** they hold, and the
date they joined. Roles are edited straight from the row, and a member can hold more than
one, for example **Team lead** alongside **Admin**.
Removing a user deactivates them rather than deleting the account, so their historical
activity stays attributed to them.
**Create your teams and offices.** Group users into teams and offices so that dashboards,
filters, and reports can be read per team rather than only per person. Anywhere you can
filter by user, you can filter by team.
Roles, permissions, and workspace-wide MFA.
Offices and teams, and where you can filter by them.
### 2.11 Go further: API and webhooks
**API.** Create and manage API keys to securely access Spott data and build custom
integrations, workflows, or applications.
**Webhooks.** Configure webhook endpoints to receive real-time notifications when events
occur in Spott.
Available endpoints, usage examples, and the events you can subscribe to.
Each row shows the member's name and address, their **status** (`accepted` once they have
signed in, `pending` while an invitation is outstanding), the **roles** they hold, and the
date they joined. Roles are edited straight from the row, and a member can hold more than
one, for example **Team lead** alongside **Admin**.
Removing a user deactivates them rather than deleting the account, so their historical
activity stays attributed to them.
**Create your teams and offices.** Group users into teams and offices so that dashboards,
filters, and reports can be read per team rather than only per person. Anywhere you can
filter by user, you can filter by team.
Roles, permissions, and workspace-wide MFA.
Offices and teams, and where you can filter by them.
### 2.11 Go further: API and webhooks
**API.** Create and manage API keys to securely access Spott data and build custom
integrations, workflows, or applications.
**Webhooks.** Configure webhook endpoints to receive real-time notifications when events
occur in Spott.
Available endpoints, usage examples, and the events you can subscribe to.
## Now your turn
**Every user**
* [ ] Sign in and set your **preferences**
* [ ] Complete your **profile** and turn on MFA
* [ ] Tune your **notifications**
* [ ] Connect your **email and calendar**, and pick a sharing level
* [ ] Sync your **signature**
* [ ] Install the **browser extension**
* [ ] Set your **Note Taker** preference and create one **scheduling link**
**Admins**
* [ ] Set your **branding** and consent disclaimer
* [ ] Customise your **stages**, and set the CV sent and First interview markers
* [ ] Create your **labels**
* [ ] Add the **custom attributes** your business needs
* [ ] Turn on the **features** your team will use
* [ ] Upload your **Word CV template** and create one **placement form**
* [ ] Verify your **sending domain**
* [ ] Create your **roles**, invite your **users**, and set up your **teams**
Get your candidates, clients, and jobs into Spott.