> ## Documentation Index
> Fetch the complete documentation index at: https://docs.spott.io/llms.txt
> Use this file to discover all available pages before exploring further.
# Record and track placements
> Mark a candidate as placed, record the fee correctly, and track placement revenue and forecasts.
In this section you learn how to create a placement from a candidate's application, fill in
the right fee details, review placement performance, and update a placement when
circumstances change.
1. [Create a new placement](#1-create-a-new-placement)
2. [Review placements and forecasts](#2-review-placements-and-forecasts)
3. [Amend a placement](#3-amend-a-placement)
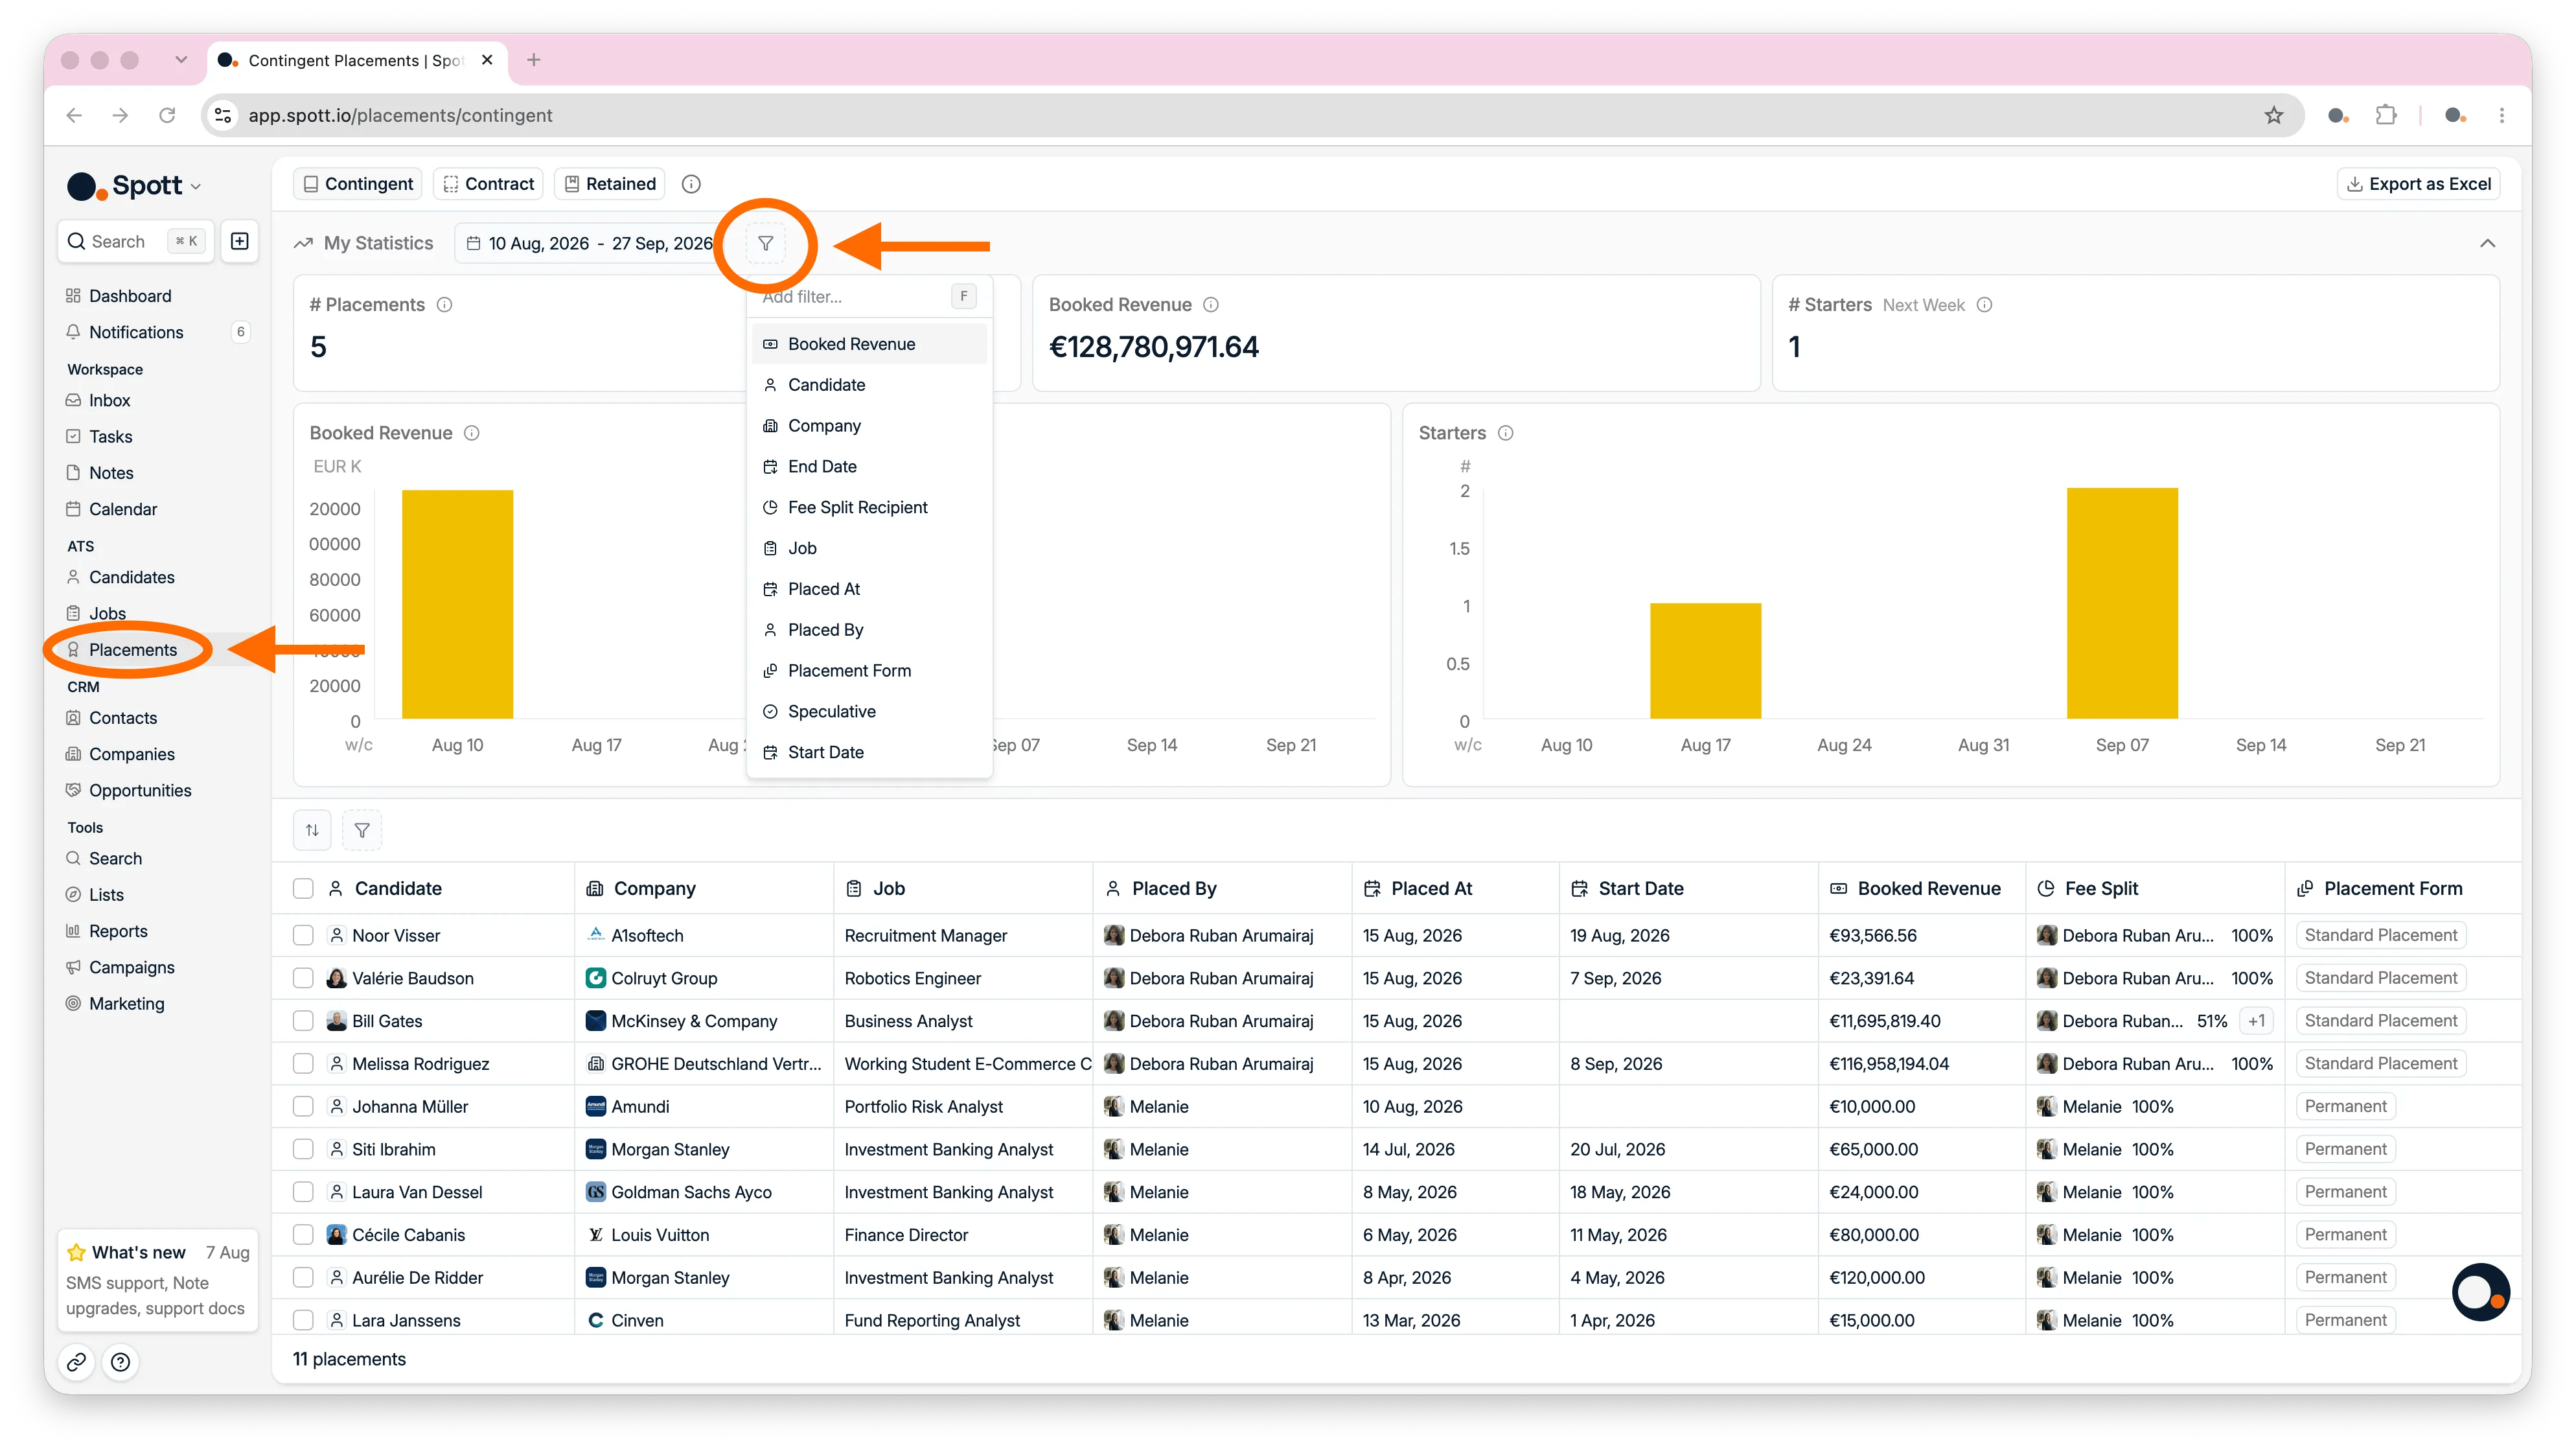
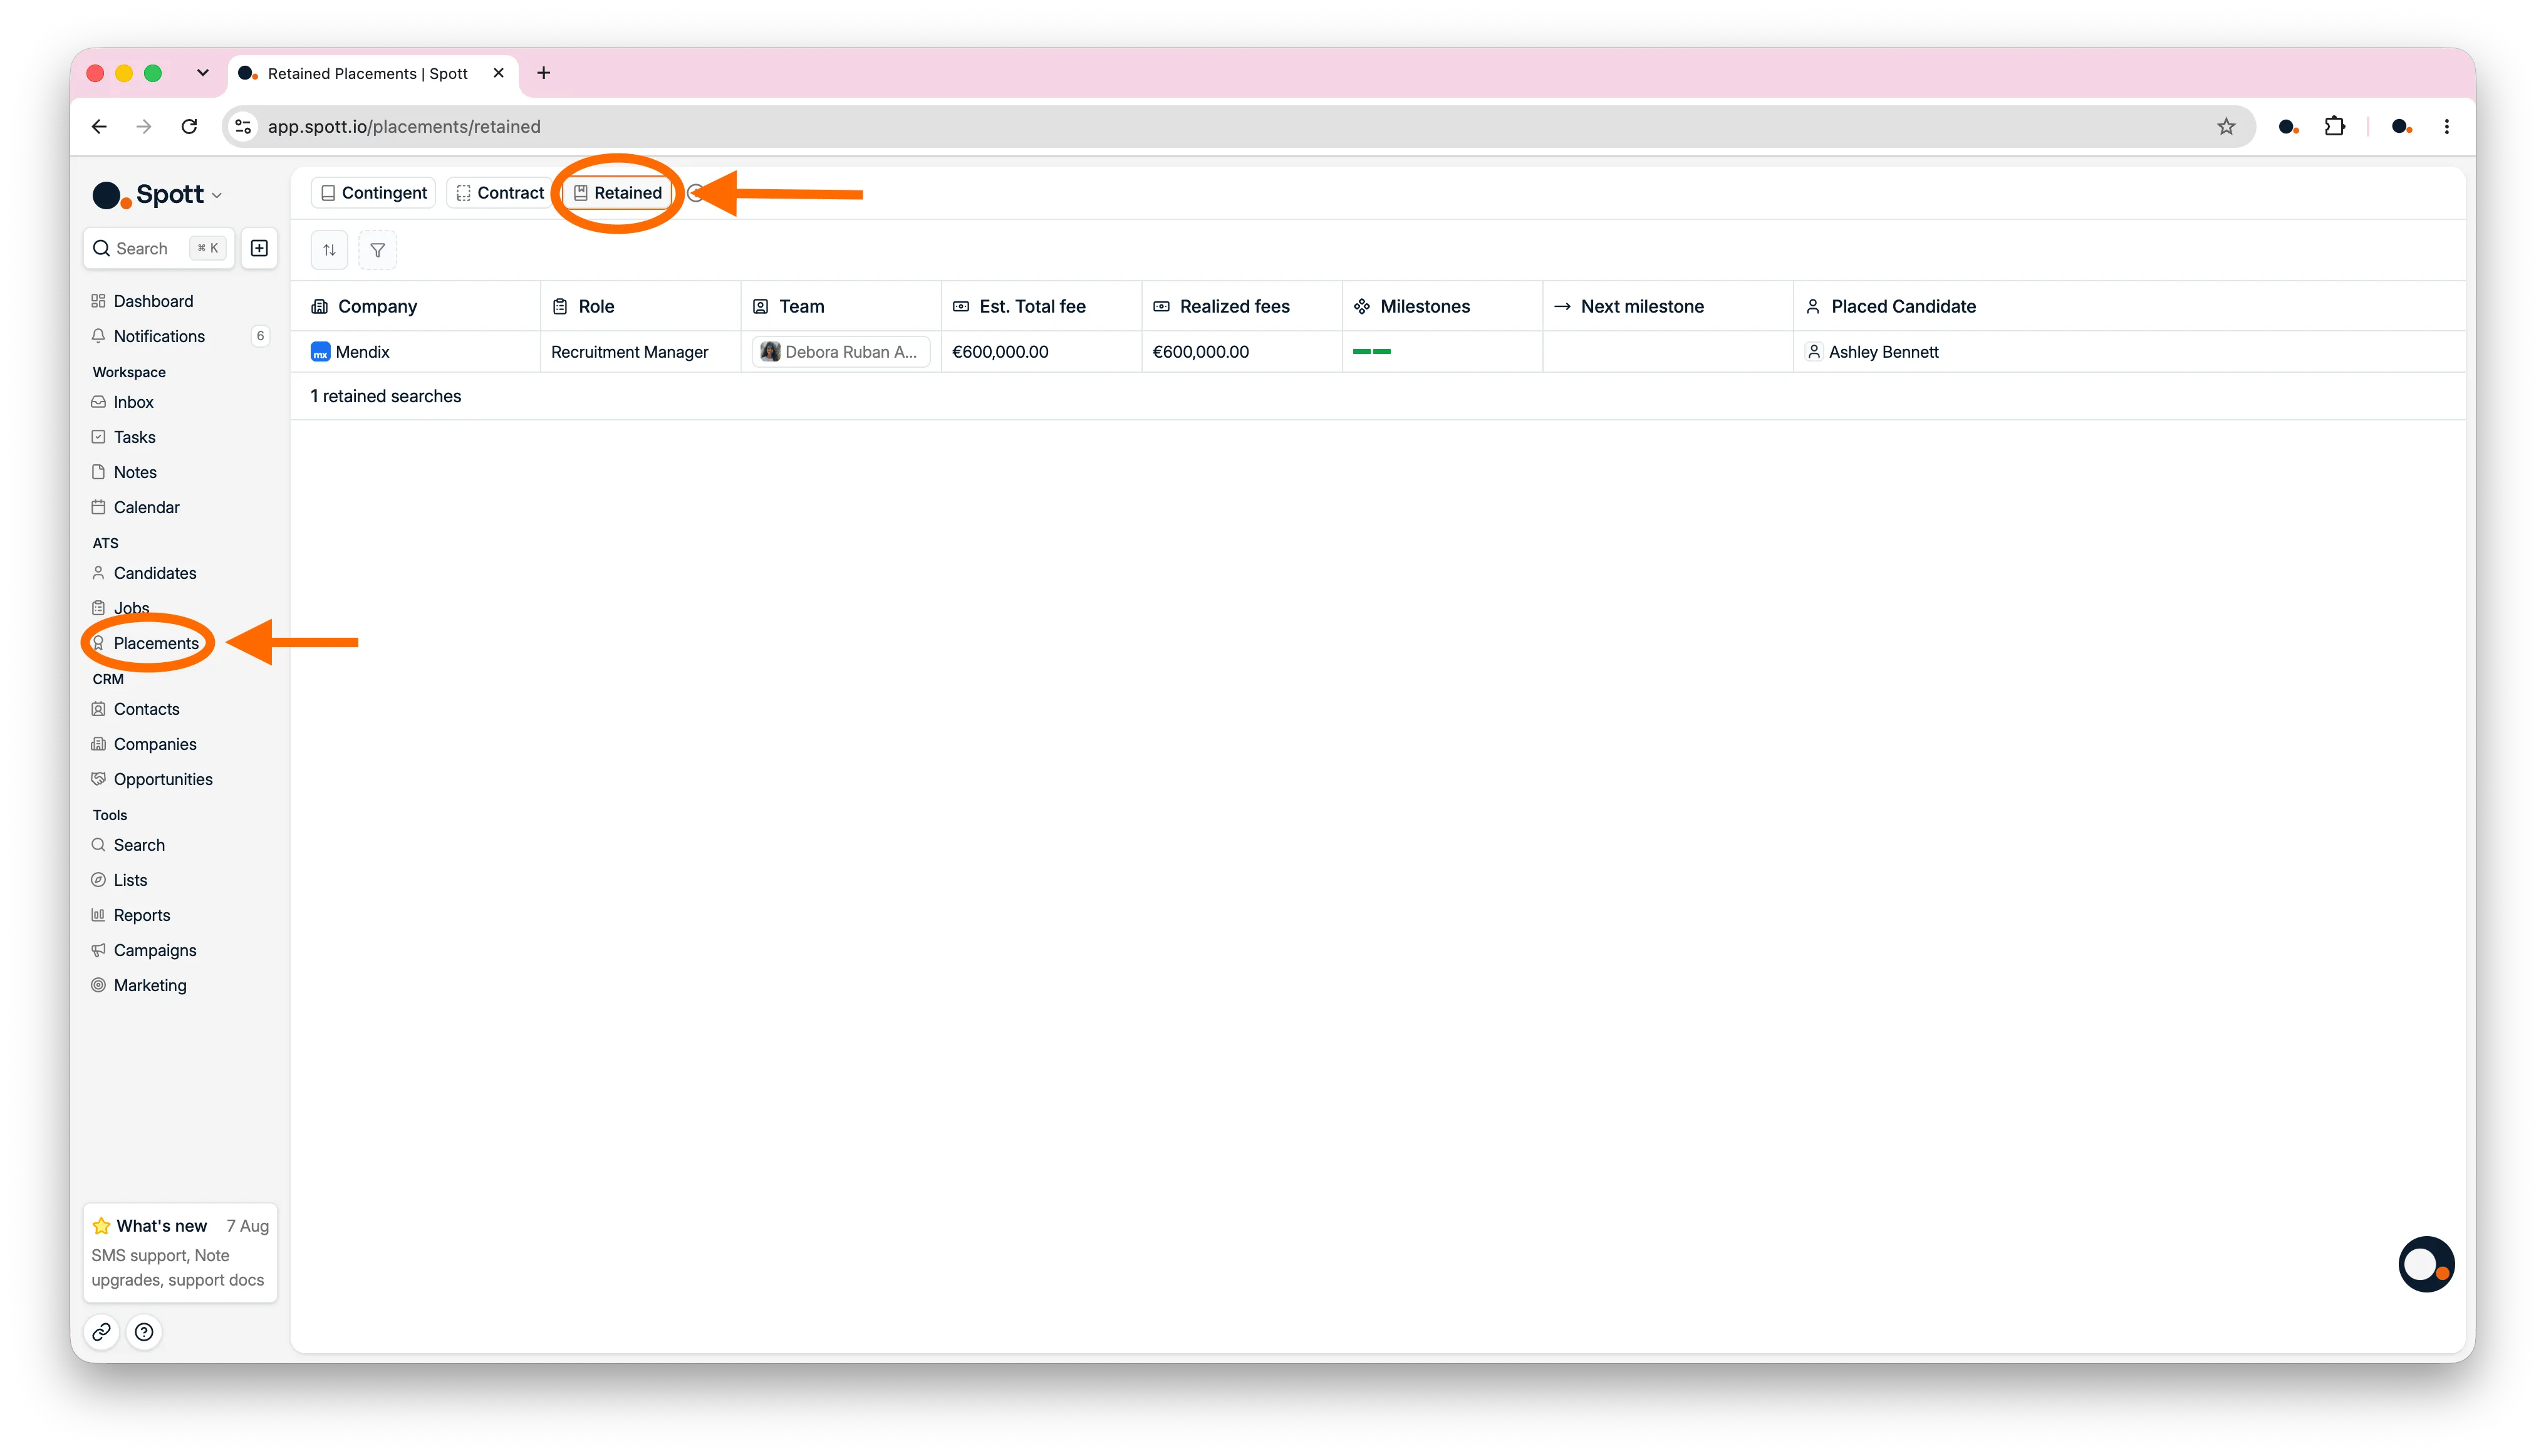
To open the Placements page, click **Placements** in the left-hand navigation bar, or press
`G`, then `P`.
## 1. Create a new placement
Create the placement from the candidate's application, so the job, candidate, client, and
fee information stay connected.
### 1.1 Mark the candidate as placed
From **Jobs**, open the job and select **Candidates** to see its
[pipeline](/docs/jobs/job-pipeline). On the
candidate's application card, click **Mark placed** in the right side panel, under **Quick
actions**.
Do not click the candidate's name. Use the icon in the top right of the card instead.
### 1.2 Record the placement
The placement type sets the fee model and the details Spott asks you to fill in:
* **Contingent:** a one-time fee for a successful placement, typically a permanent hire.
* **Retained:** phased payments across a search engagement, using either a percentage of
compensation or a flat fee divided across milestones.
* **Staffing:** the margin on contractor billing, for temporary or interim work.
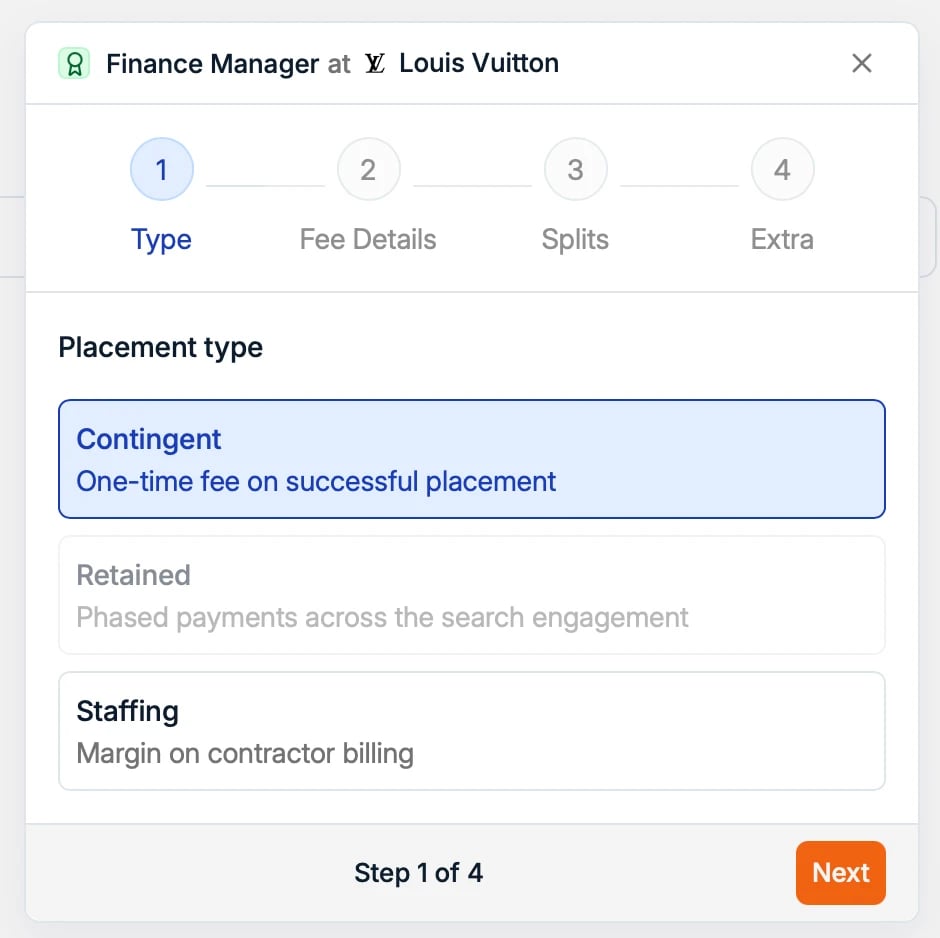 To mark a placement as **Retained**, the option has to be selected on the job itself.
After choosing the type, complete the remaining steps:
* **Fee details:** the dates and fee information for the placement type you picked.
* **Dates:** add the **Placed at**, **Start**, and **End** dates. Adding an end date to a
contingent placement returns the candidate to the available pool when the contract ends.
* **Contingent or Retained:** enter the fee as a percentage of compensation, or as a flat
amount.
* **Staffing:** add the working schedule, choose a daily or hourly **Unit**, and enter the
charge rate and pay rate so Spott can project the contract value and the margin.
* **Splits:** divide the fee among the users who contributed to the placement. If the split
was agreed earlier, record it on the job so it carries into the placement.
* **Extra:** the fields from the selected placement form, such as base salary, bonus,
equity, rate revisions, or contract extensions.
To mark a placement as **Retained**, the option has to be selected on the job itself.
After choosing the type, complete the remaining steps:
* **Fee details:** the dates and fee information for the placement type you picked.
* **Dates:** add the **Placed at**, **Start**, and **End** dates. Adding an end date to a
contingent placement returns the candidate to the available pool when the contract ends.
* **Contingent or Retained:** enter the fee as a percentage of compensation, or as a flat
amount.
* **Staffing:** add the working schedule, choose a daily or hourly **Unit**, and enter the
charge rate and pay rate so Spott can project the contract value and the margin.
* **Splits:** divide the fee among the users who contributed to the placement. If the split
was agreed earlier, record it on the job so it carries into the placement.
* **Extra:** the fields from the selected placement form, such as base salary, bonus,
equity, rate revisions, or contract extensions.
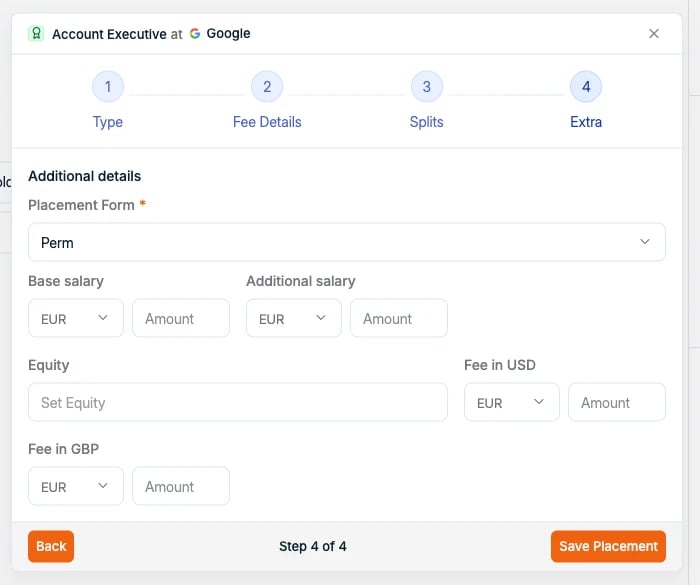 For interim staffing placements you can enter a fixed number of billed days, instead of
calculating them from a working schedule.
When the flow is complete, the application shows a **Placement** block with the company,
job, placement type, start date, fee splits, and total fee.
### 1.3 Create placement forms for the data you need
To control which fields appear in the **Extra** step, open
**Settings → [Templates](/docs/settings/templates)** and create a placement form for the
relevant placement type.
You can create several forms for the same type. Use separate forms when different
arrangements need different information, such as bonus and equity for a permanent hire, or
rate revisions for an interim contract.
## 2. Review placements and forecasts
The Placements tab gives you an overview of every placement in a table, with columns you can
toggle per placement type.
### 2.1 Review and filter the placements table
Open **Placements** to see every placement in a table. The columns show:
* **Company:** where the candidate was placed.
* **Vacancy:** the role the candidate filled.
* **Candidate:** the person who was placed.
* **Placed at:** when the placement was recorded.
* **Placed by:** the user responsible for the placement.
* **Start and end dates:** the placement or contract period.
* **Fee income:** the revenue generated by the placement.
* **Fee details and splits:** the gross or net fee, and how it is divided among users.
* **Placement form:** the template used to capture the placement.
Filter the table by details such as company, placed-by user, or date, then export the
filtered results to Excel. Exports include the custom values captured by placement forms.
For interim staffing placements you can enter a fixed number of billed days, instead of
calculating them from a working schedule.
When the flow is complete, the application shows a **Placement** block with the company,
job, placement type, start date, fee splits, and total fee.
### 1.3 Create placement forms for the data you need
To control which fields appear in the **Extra** step, open
**Settings → [Templates](/docs/settings/templates)** and create a placement form for the
relevant placement type.
You can create several forms for the same type. Use separate forms when different
arrangements need different information, such as bonus and equity for a permanent hire, or
rate revisions for an interim contract.
## 2. Review placements and forecasts
The Placements tab gives you an overview of every placement in a table, with columns you can
toggle per placement type.
### 2.1 Review and filter the placements table
Open **Placements** to see every placement in a table. The columns show:
* **Company:** where the candidate was placed.
* **Vacancy:** the role the candidate filled.
* **Candidate:** the person who was placed.
* **Placed at:** when the placement was recorded.
* **Placed by:** the user responsible for the placement.
* **Start and end dates:** the placement or contract period.
* **Fee income:** the revenue generated by the placement.
* **Fee details and splits:** the gross or net fee, and how it is divided among users.
* **Placement form:** the template used to capture the placement.
Filter the table by details such as company, placed-by user, or date, then export the
filtered results to Excel. Exports include the custom values captured by placement forms.
 Spott tracks placement fees, splits, and custom fields, but invoicing happens outside
Spott. Export the data to Excel, or send it to your finance system through the
[API](/docs/developers/api-overview).
### 2.2 Review staffing forecasts
For temporary and contract work, open the **Contract** dashboard to review gross profit
forecasts based on each placement's rates, units, and schedule.
Switch between weekly and monthly KPIs, or filter by staffing status, extensions, and
placements due to start or finish.
Spott tracks placement fees, splits, and custom fields, but invoicing happens outside
Spott. Export the data to Excel, or send it to your finance system through the
[API](/docs/developers/api-overview).
### 2.2 Review staffing forecasts
For temporary and contract work, open the **Contract** dashboard to review gross profit
forecasts based on each placement's rates, units, and schedule.
Switch between weekly and monthly KPIs, or filter by staffing status, extensions, and
placements due to start or finish.
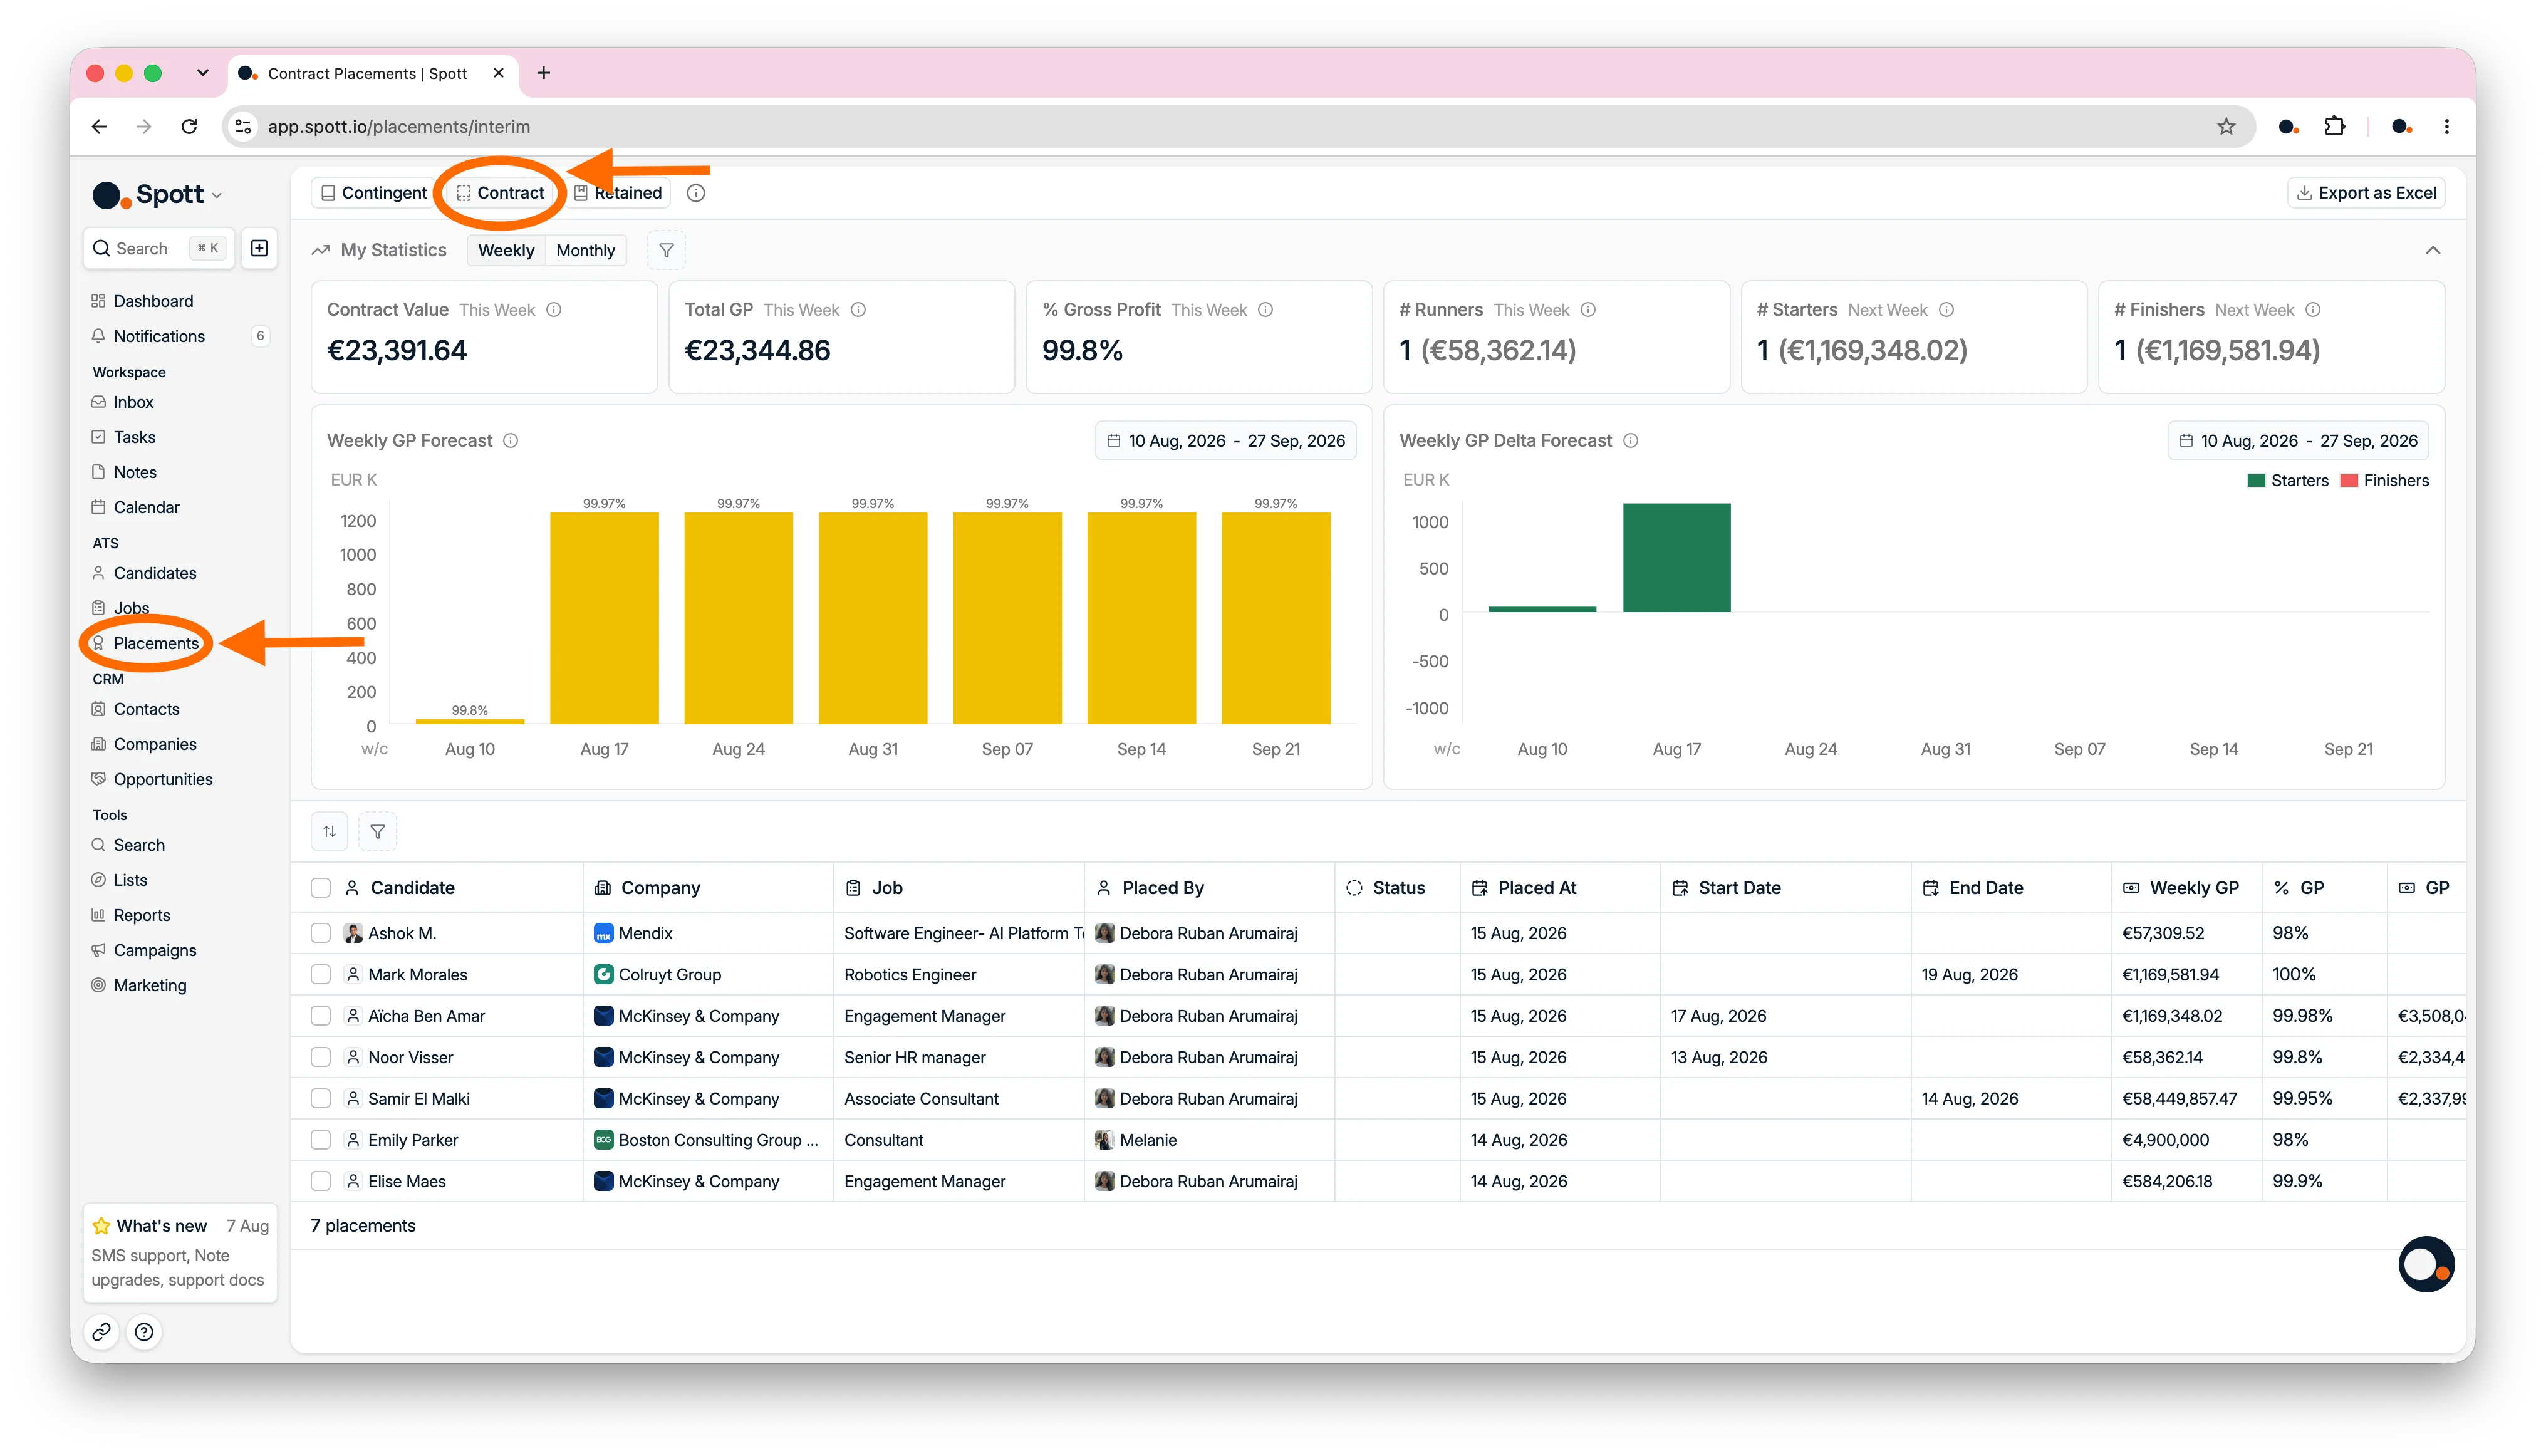 The staffing dashboard and the placements table are separate. Filtering one does not
filter the other, although both can be exported.
### 2.3 Track retained milestones
Open the **Retained** tab to track progress and revenue for retained searches. Each row
shows:
* **Company, role, and team:** the search, and the people working on it.
* **Estimated total fee:** what the full search is worth if it completes.
* **Realized fees:** what has already been billed.
* **Milestones:** how many agreed payment stages are complete.
* **Next milestone:** the next amount likely to become invoiceable.
* **Placed candidate:** the person who filled the role, once the search is complete.
Before logging a retained placement, configure the milestones, the negotiated fee, and the
estimated salary on the job's **[Overview](/docs/jobs/job-details)** tab. These details are required, because the
placement milestones come from the job.
The staffing dashboard and the placements table are separate. Filtering one does not
filter the other, although both can be exported.
### 2.3 Track retained milestones
Open the **Retained** tab to track progress and revenue for retained searches. Each row
shows:
* **Company, role, and team:** the search, and the people working on it.
* **Estimated total fee:** what the full search is worth if it completes.
* **Realized fees:** what has already been billed.
* **Milestones:** how many agreed payment stages are complete.
* **Next milestone:** the next amount likely to become invoiceable.
* **Placed candidate:** the person who filled the role, once the search is complete.
Before logging a retained placement, configure the milestones, the negotiated fee, and the
estimated salary on the job's **[Overview](/docs/jobs/job-details)** tab. These details are required, because the
placement milestones come from the job.
 ## 3. Amend a placement
Open an existing placement when you need to correct its details, attach documents, extend a
contract, or record a permanent conversion.
### 3.1 Edit or delete a placement
In the placements table, click **Placed by** in the placement's row, or the empty space next
to any field in that row, to open its details. From there you can:
* **Edit the placement:** correct dates, fees, fields, or the placement type.
* **Delete the placement:** remove a placement that is no longer relevant.
* **Attach files:** keep documents such as a signed agreement on the placement record.
### 3.2 Extend or convert a contract placement
Open the contract placement's **Quick actions** panel and choose the action that matches the
outcome:
* **Extend placement:** use this when the existing contract continues.
* **Convert to contingent placement:** use this when the contractor becomes a permanent
hire. Spott keeps the history on one record and replaces the contract rates with a
one-time contingent fee.
Do not create a second placement when a contractor becomes permanent. Convert the existing
placement, so its history and fees stay together.
Fee details, retained milestones, custom forms, staffing forecasts, and exports.
Build the forms that decide what the Extra step asks for.
Where a placement starts, on the candidate's application card.
Negotiated fee, estimated salary, and the milestones a retained placement inherits.
## 3. Amend a placement
Open an existing placement when you need to correct its details, attach documents, extend a
contract, or record a permanent conversion.
### 3.1 Edit or delete a placement
In the placements table, click **Placed by** in the placement's row, or the empty space next
to any field in that row, to open its details. From there you can:
* **Edit the placement:** correct dates, fees, fields, or the placement type.
* **Delete the placement:** remove a placement that is no longer relevant.
* **Attach files:** keep documents such as a signed agreement on the placement record.
### 3.2 Extend or convert a contract placement
Open the contract placement's **Quick actions** panel and choose the action that matches the
outcome:
* **Extend placement:** use this when the existing contract continues.
* **Convert to contingent placement:** use this when the contractor becomes a permanent
hire. Spott keeps the history on one record and replaces the contract rates with a
one-time contingent fee.
Do not create a second placement when a contractor becomes permanent. Convert the existing
placement, so its history and fees stay together.
Fee details, retained milestones, custom forms, staffing forecasts, and exports.
Build the forms that decide what the Extra step asks for.
Where a placement starts, on the candidate's application card.
Negotiated fee, estimated salary, and the milestones a retained placement inherits.
## Now your turn
* [ ] **Mark a candidate as placed** on one of your jobs
* [ ] Pick the **placement type** and fill in the fee details
* [ ] Review the placement in the **Placements overview**
Your day at a glance, with targets.