> ## Documentation Index
> Fetch the complete documentation index at: https://docs.spott.io/llms.txt
> Use this file to discover all available pages before exploring further.
# Manage candidates
> Get candidates into Spott, find them again, keep their record current, and put them in front of a client.
In this section you learn how to get new candidates into Spott, how to find them again in
your database and build views you can come back to, how to read and maintain a candidate
profile so everything about a person stays in one place, and how to reach out and put
someone forward for a job.
1. [Source the candidates you need](#1-source-the-candidates-you-need)
2. [Find the candidates you need](#2-find-the-candidates-you-need)
3. [Find your way around a candidate profile](#3-find-your-way-around-a-candidate-profile)
4. [Get the full picture on one candidate](#4-get-the-full-picture-on-one-candidate)
5. [Keep a profile up to date](#5-keep-a-profile-up-to-date)
6. [Get in touch](#6-get-in-touch)
7. [Put a candidate forward for a job](#7-put-a-candidate-forward-for-a-job)
From the left-hand navigation bar, select **Candidates** to view your full database.
Spott → Dashboard → Candidates
### 1.1 Add candidates manually
Add one candidate at a time by entering their details directly. Best for one-off
additions where you want full control over the record.
Candidates → Add candidates → Add manually
### 1.2 Add candidates via CV upload
Upload CVs in bulk and let Spott pull out the candidate details for you, with no manual
entry required.
Candidates → Add candidate → Upload → Select files
You can upload **up to 1,000 CVs at once**. Above 20 CVs there is no preview step.
Duplicate records are flagged in red, and you decide whether to create them anyway.
How Spott detects duplicates, and how to merge two records into one.
### 1.3 Add candidates by forwarding CVs
Already have CVs landing in your inbox? Forward them to Spott and skip the
download-and-upload step entirely. The attachment does not have to be a PDF, Word
documents are parsed too.
Forward to [cv@spott.io](mailto:cv@spott.io)
Unlike a drag-and-drop upload, there is no screen where you check the parsed fields before
the record is created, so an occasional detail can be missed. Spott replies by email when
something goes wrong, for instance when the mail arrived without an attachment.
The replies you can get back, and how to fix each one.
### 1.4 Add candidates from a CSV file
Another way to bring new candidates into Spott is to import a CSV file. This is the route
for a list you already hold as a spreadsheet, or for an export out of the system you are
leaving behind.
Field mapping, limits, and what import can and cannot update.
### 1.5 Import LinkedIn profiles
Import leads or candidate profiles from LinkedIn, Sales Navigator, or Recruiter into your
Spott database using the browser extension. You import one profile at a time, with the side
panel open on the profile you are looking at. Saving people to a Recruiter project does not
carry them across on its own.
Install it, connect it, and see what it can import. Chrome and Edge only.
Every route in, in reference form, including what each one fills in for you.
## 2. Find the candidates you need
The **Candidates** page is your database. You can record, update, and access candidate
information there, and take action on a candidate in one click, without opening their
profile first.
### 2.1 Search and filter the candidate database
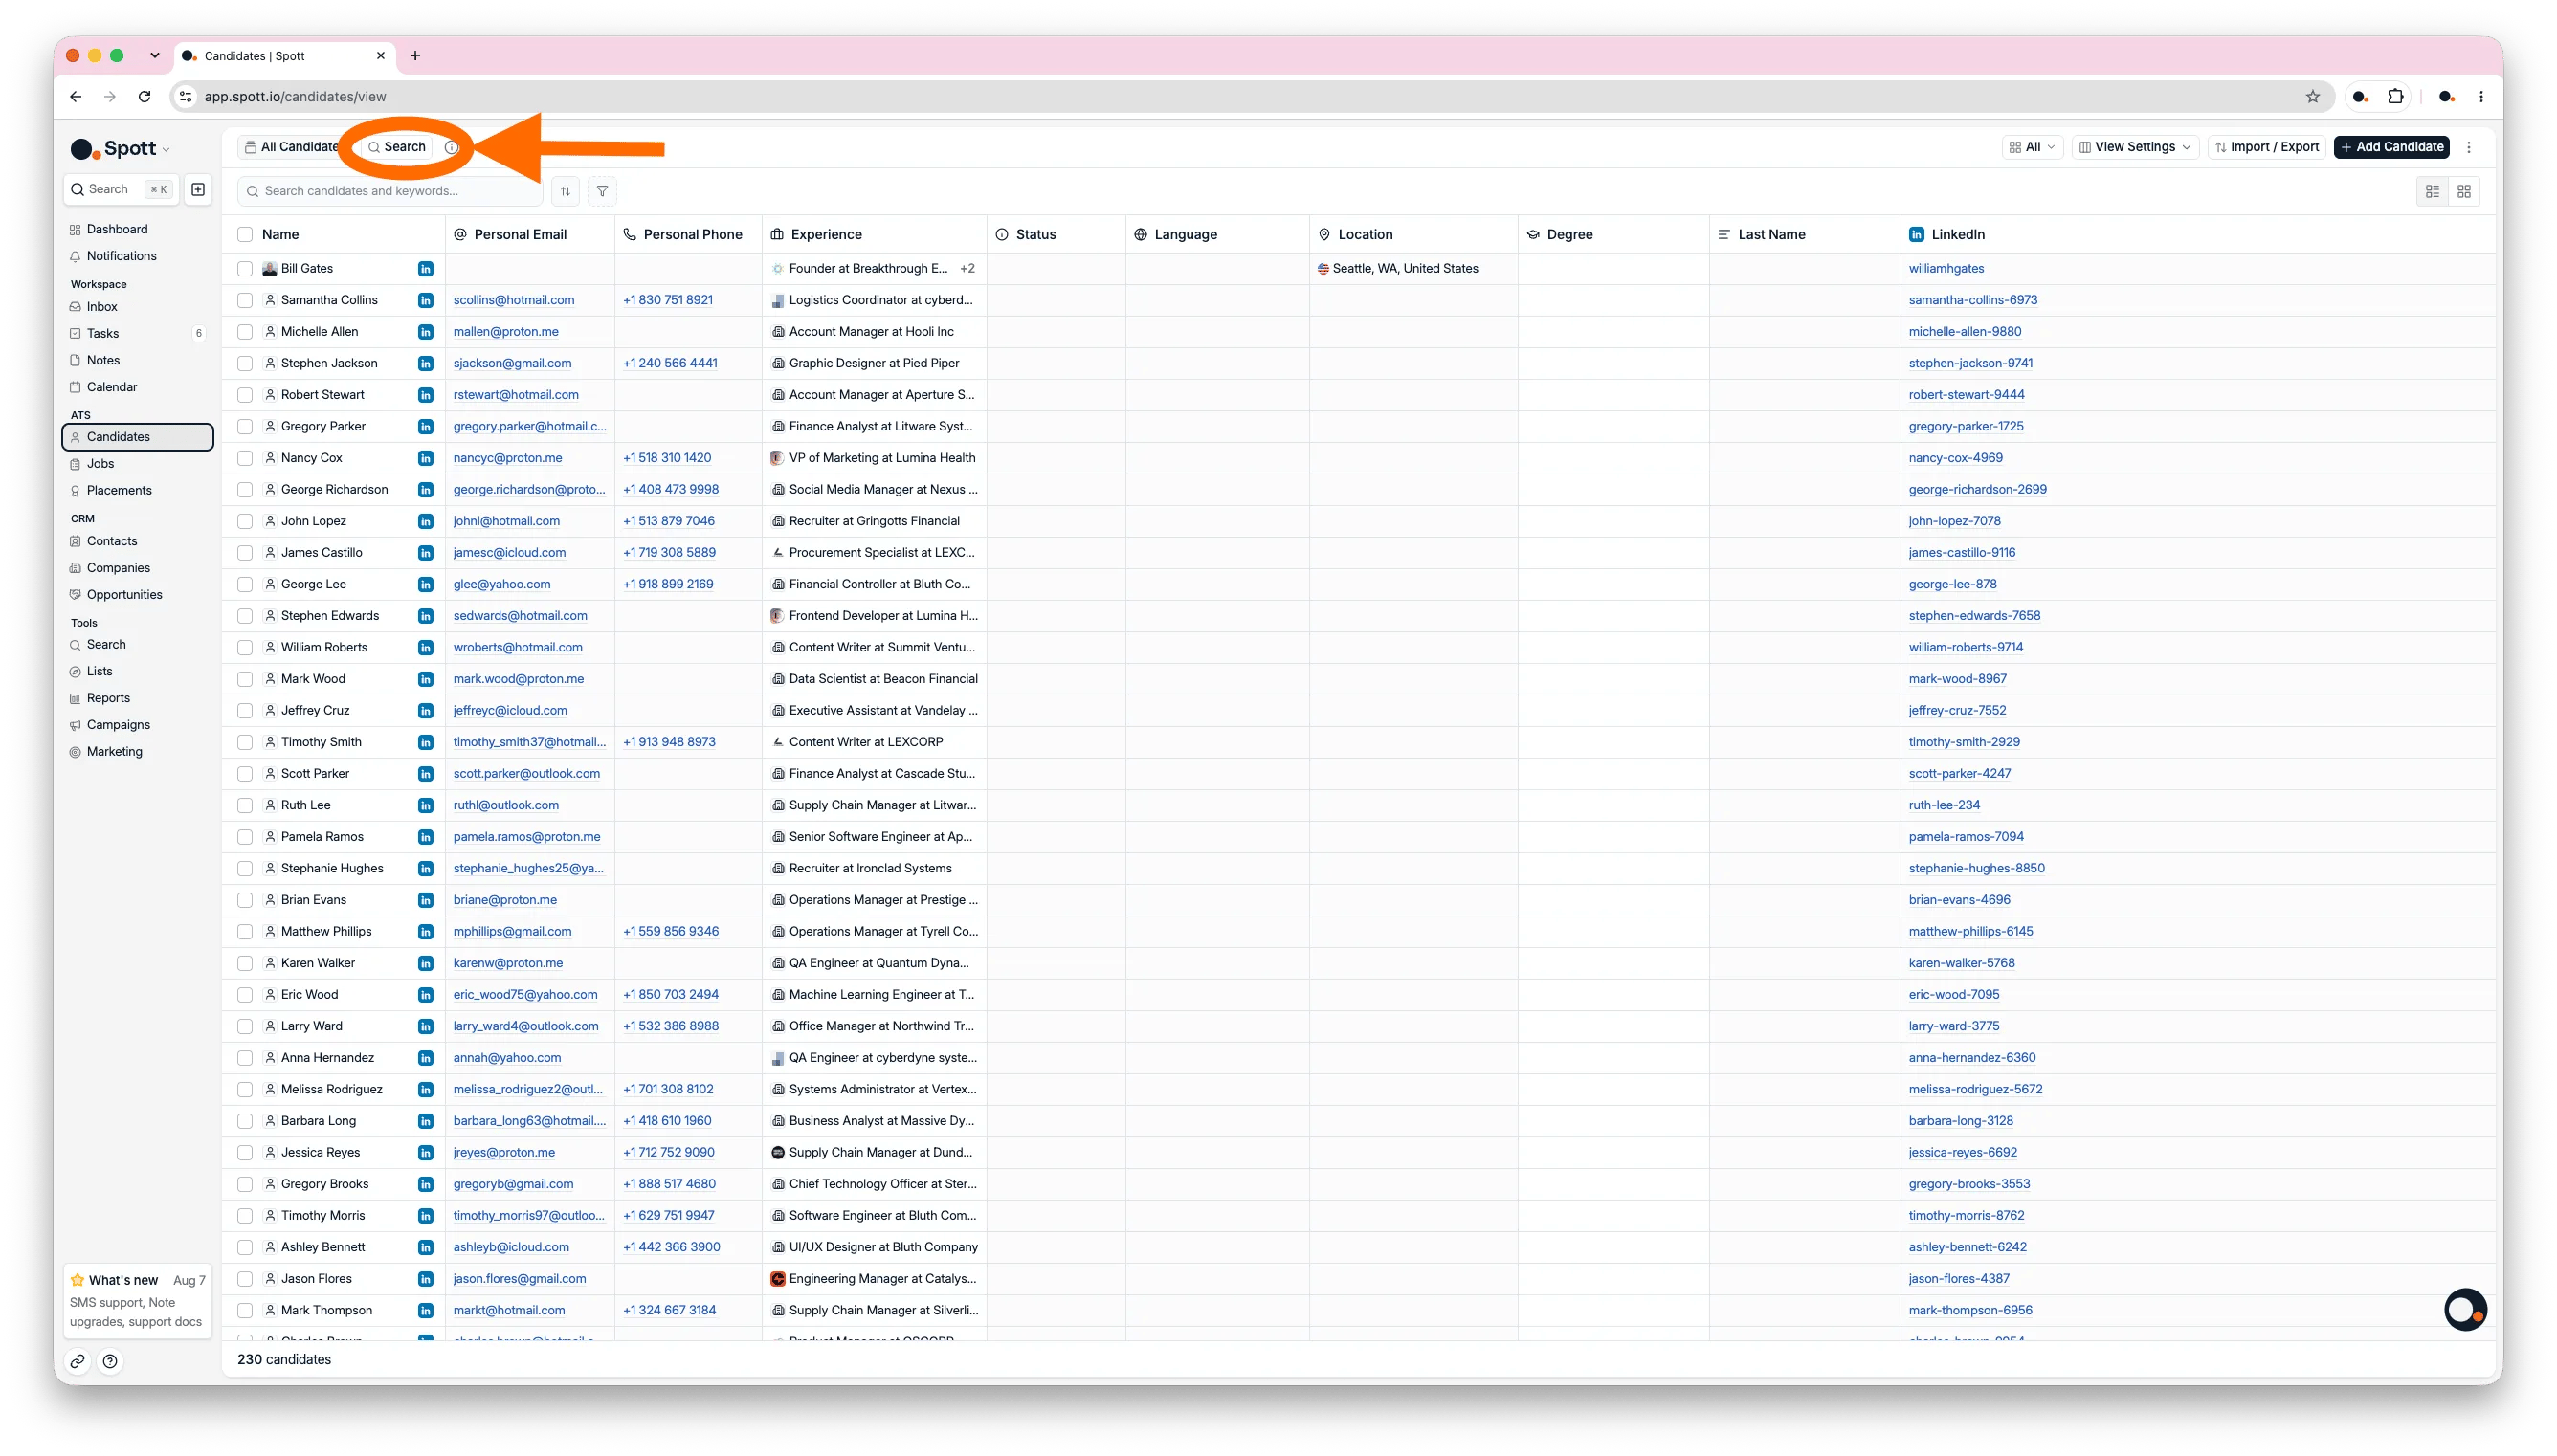
The **search bar** at the top left of the candidate table takes names and keywords, and
supports full Boolean queries with **AND**, **OR**, **NOT**, and parentheses. To look
someone up by email address or phone number, use global search (`⌘K` / `Ctrl+K`) instead.
The **Filters** button opens grouped filters: job titles, experience level, company
history, location, education, compensation, and your own custom fields. Filters combine
with AND/OR logic, or into filter groups for more complex queries.
If you would rather not work through the menus, describe your ideal profile in your own
words and Spott turns the description into filters for you.
### 2.2 Save your table setup as a view
A **view** stores a whole table setup: its filters, sorting, which columns are visible,
their order, and their widths. Frequently used filter combinations can also be saved as
**preset filters** and reapplied in one click. Applying filters does not save them, so
press **Save view** once the table looks the way you want it.
A **view** is dynamic: it re-runs its filters every time you open it. A **list** is
static until you add or remove records yourself. Use views for "everyone matching these
criteria", lists for "this specific set of people".
### 2.3 Run a deeper search from the Search tab
When filters are not enough, the **Search** tab runs an AI-ranked search across candidate
profiles, notes, and CV attachments. Describe the profile you are after or point it at an
existing job description, and Spott proposes pre-filters and ranking criteria for you to
review before it runs.
 Structured filters, Boolean queries, deep search, and AI search.
Save filters as a view, and configure columns.
## 3. Find your way around a candidate profile
Everything Spott knows about a person lives on one profile, so it pays to know the layout
before you start working in it. Open the **Candidates** page in the left menu and click a
candidate's name. The header shows their name, role, company, and contact details, and the
profile below it is organized into three tabs:
* **Overview**: all information about the person.
* **Candidate**: their applications, placements, and matching.
* **Inbox**: the full message history, across all channels.
### 3.1 Take action from the profile header
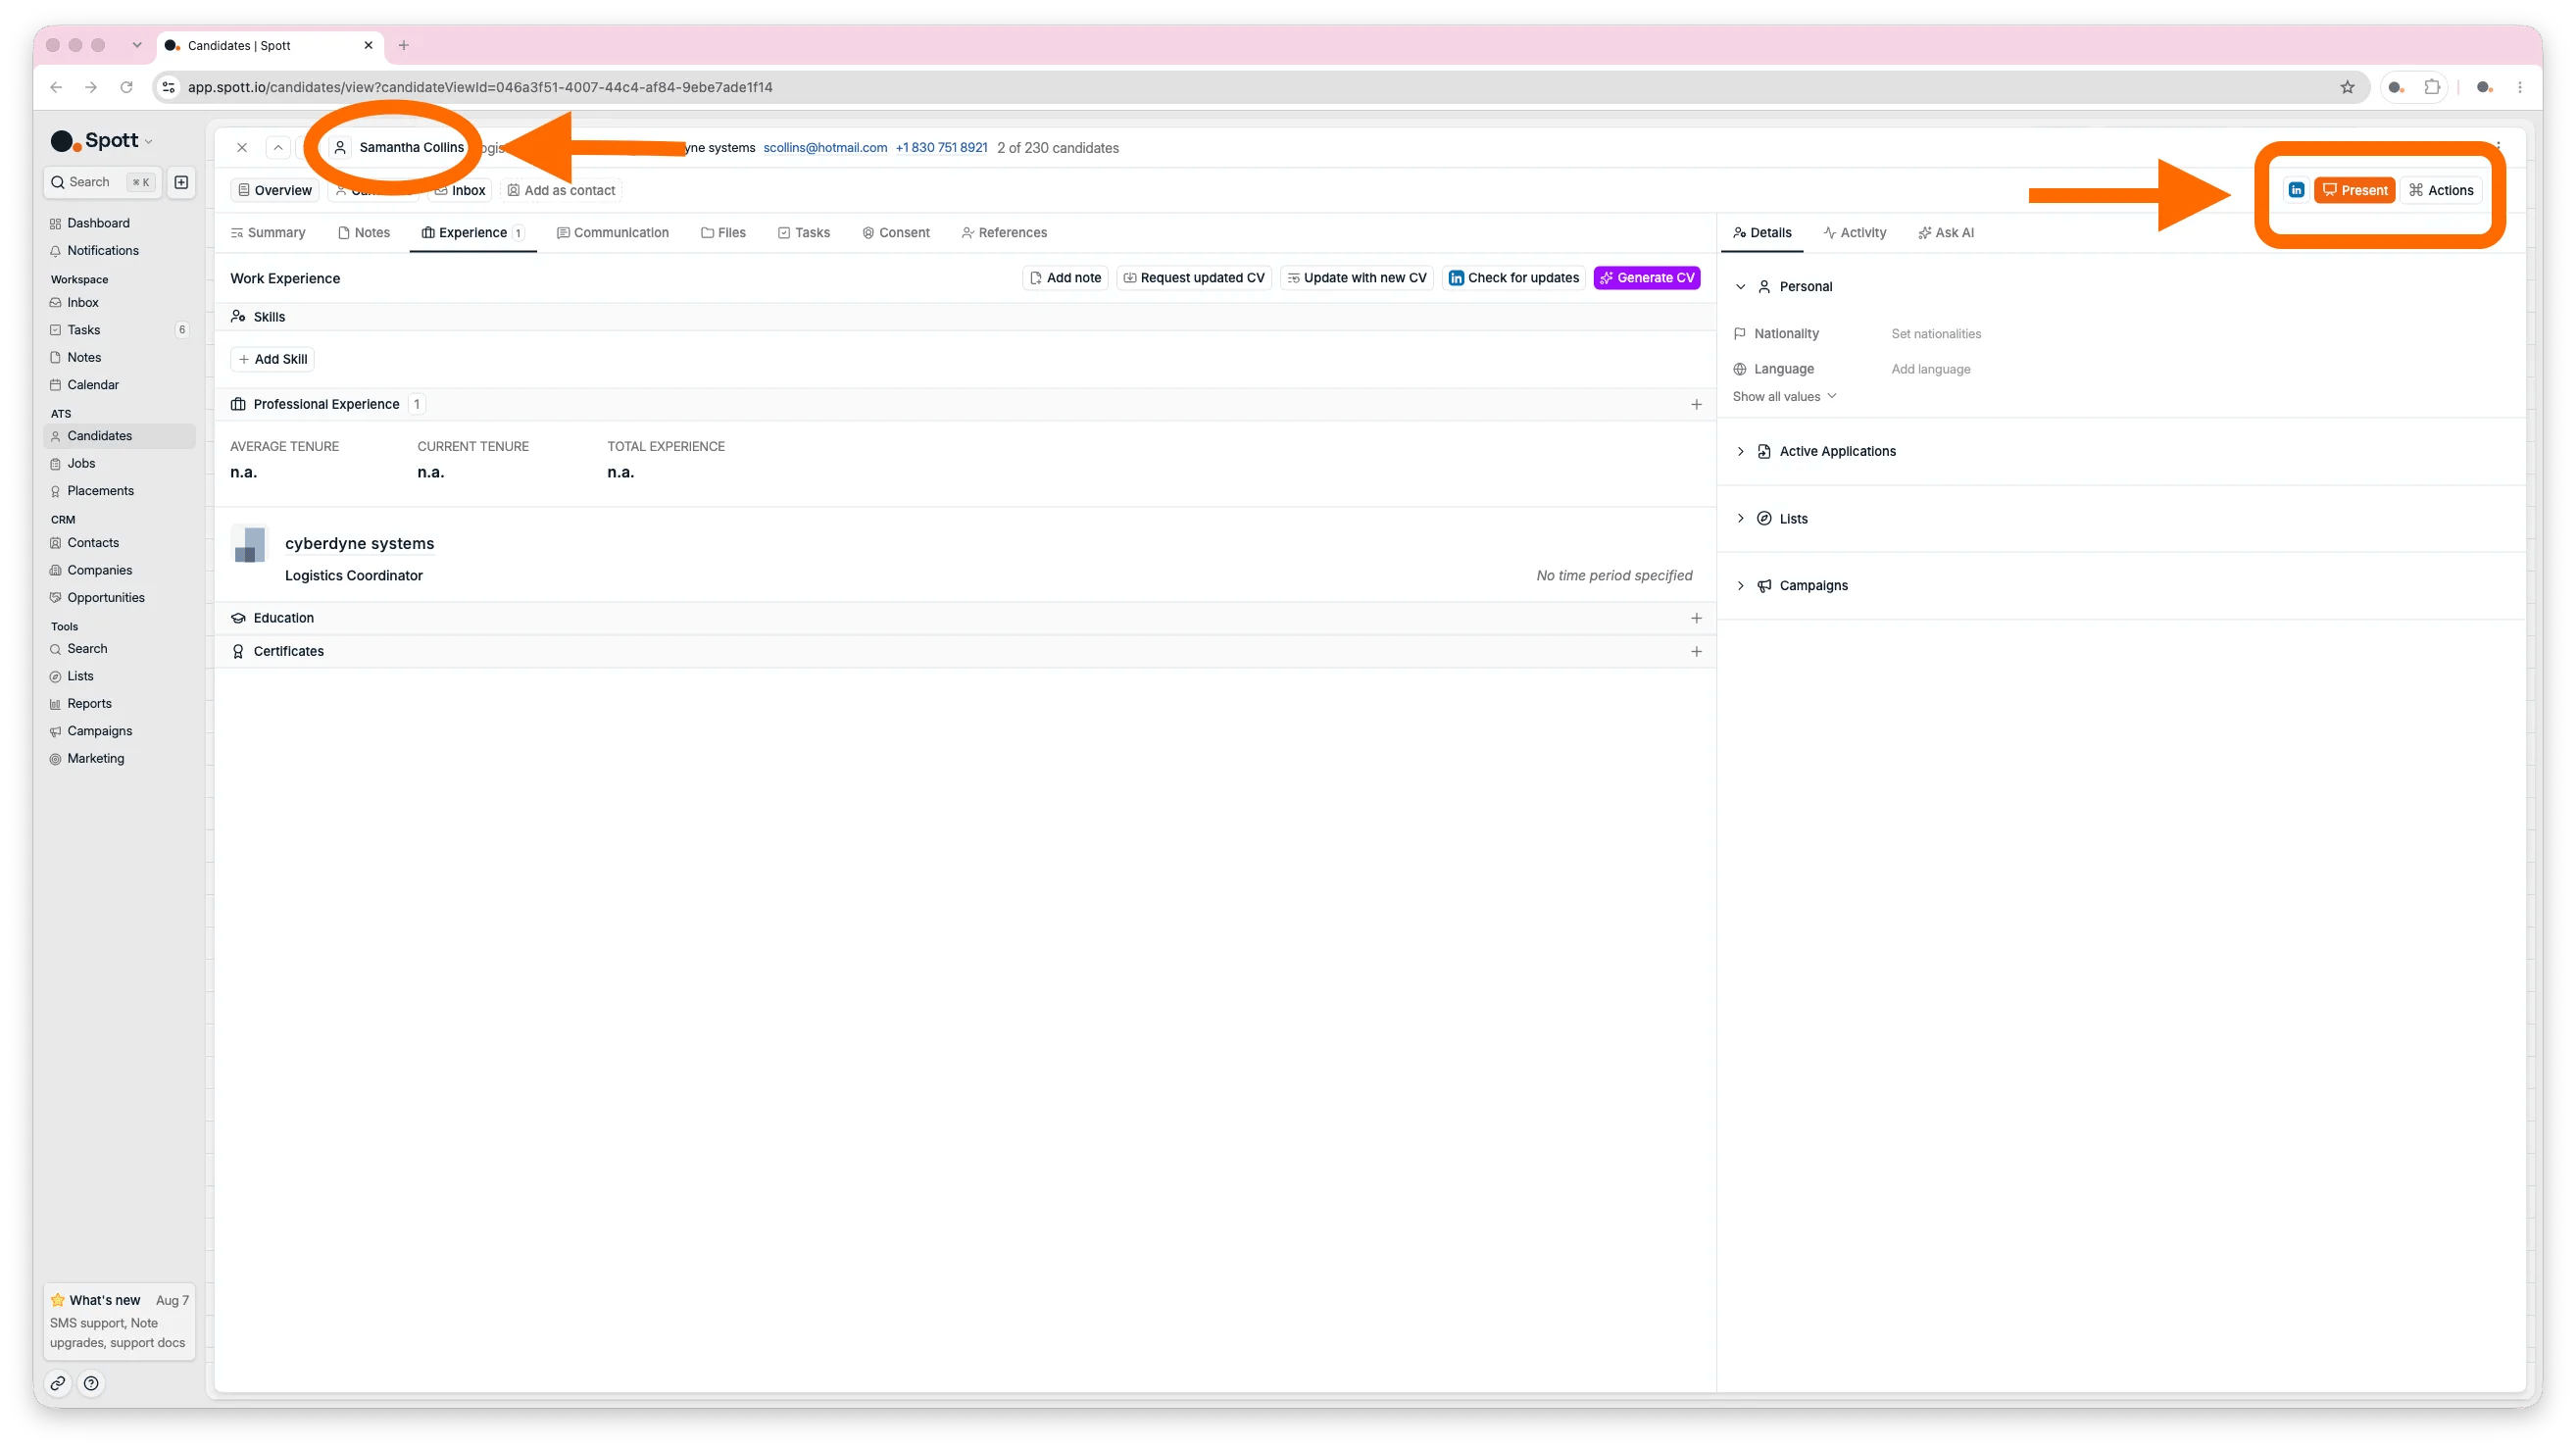
The top right corner of the profile holds the candidate's **LinkedIn profile**, the
**Present** button for sharing them with a client, and the **Actions** menu. From Actions
you can send an email, send a calendar invite, add the candidate to a job, add them to a
list, add a task, add a note, enroll them in a campaign, or merge two people.
Structured filters, Boolean queries, deep search, and AI search.
Save filters as a view, and configure columns.
## 3. Find your way around a candidate profile
Everything Spott knows about a person lives on one profile, so it pays to know the layout
before you start working in it. Open the **Candidates** page in the left menu and click a
candidate's name. The header shows their name, role, company, and contact details, and the
profile below it is organized into three tabs:
* **Overview**: all information about the person.
* **Candidate**: their applications, placements, and matching.
* **Inbox**: the full message history, across all channels.
### 3.1 Take action from the profile header
The top right corner of the profile holds the candidate's **LinkedIn profile**, the
**Present** button for sharing them with a client, and the **Actions** menu. From Actions
you can send an email, send a calendar invite, add the candidate to a job, add them to a
list, add a task, add a note, enroll them in a campaign, or merge two people.
 ### 3.2 Use the side panel
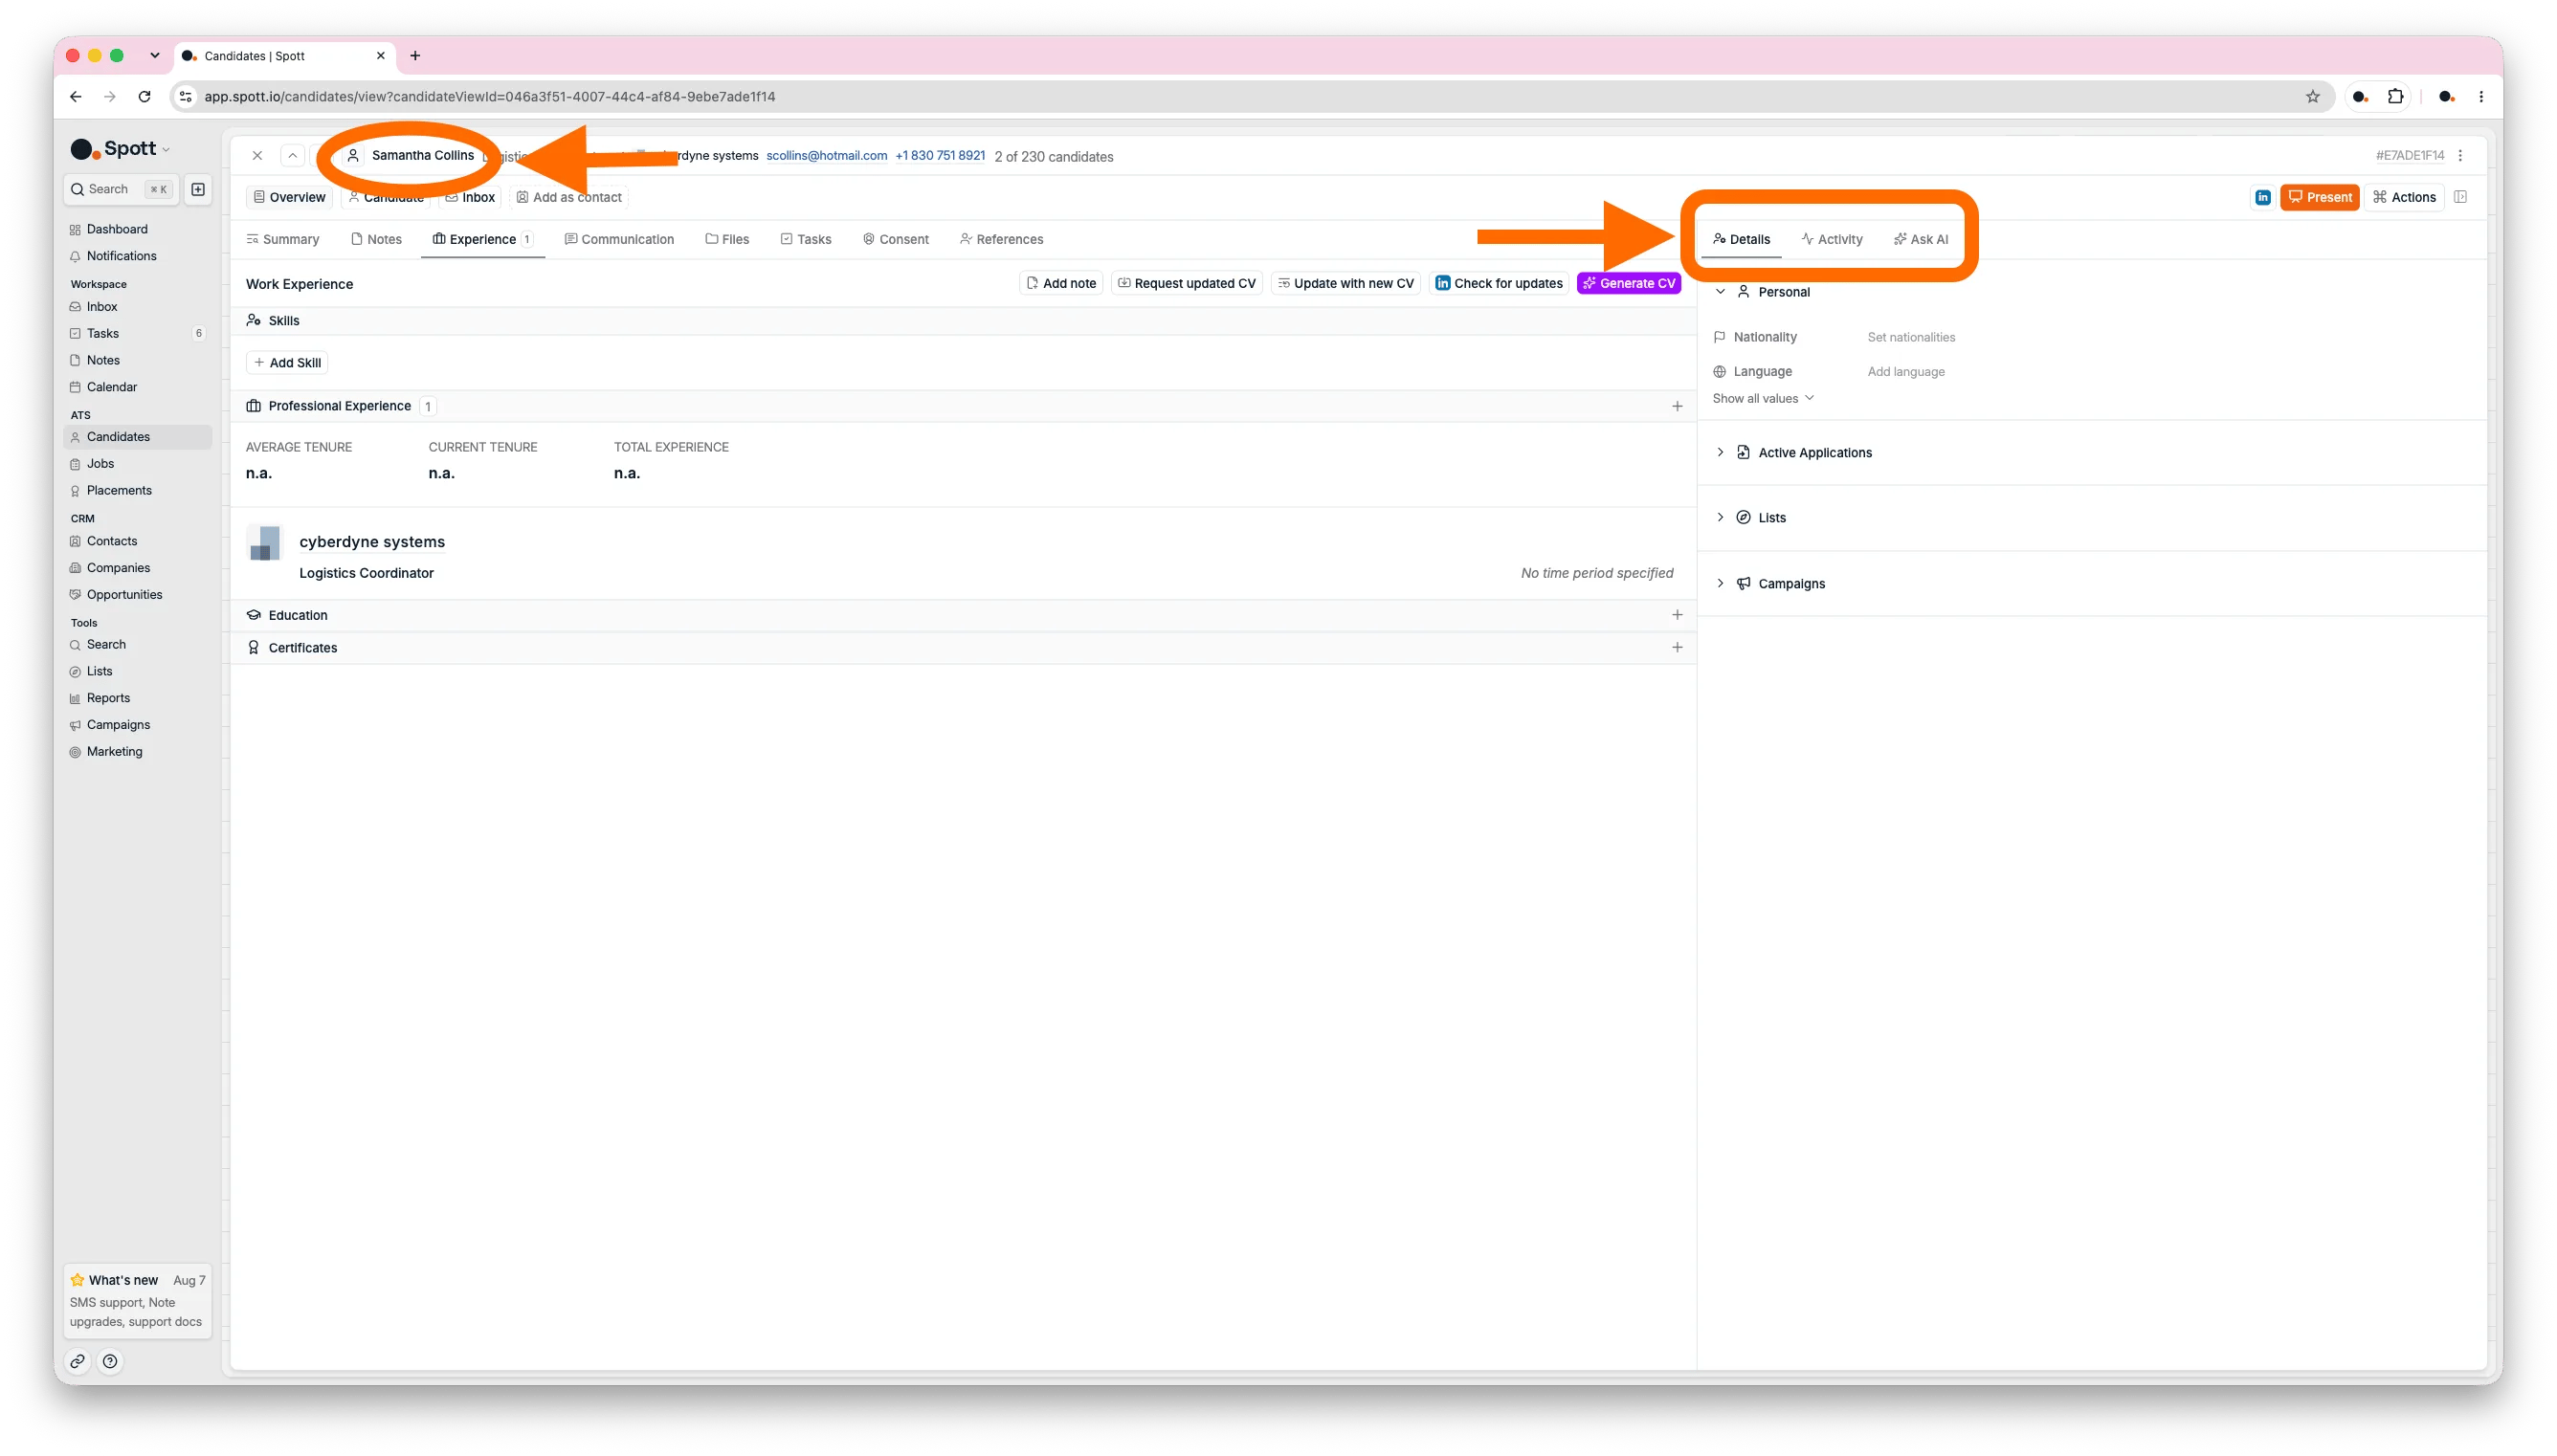
The **Overview** tab has a row of subtabs on the left and a side panel on the right. That
panel holds **Details**, **Activity**, and **Ask AI**, the three things you reach for most
often while reading a profile.
Every person exists only **once** in Spott. Someone can be a candidate, a client contact,
or both, and their notes and history stay on the same record even when they change
companies or roles. The **Add as contact** button adds the contact role to the same
person. It does not create a copy.
### 3.2 Use the side panel
The **Overview** tab has a row of subtabs on the left and a side panel on the right. That
panel holds **Details**, **Activity**, and **Ask AI**, the three things you reach for most
often while reading a profile.
Every person exists only **once** in Spott. Someone can be a candidate, a client contact,
or both, and their notes and history stay on the same record even when they change
companies or roles. The **Add as contact** button adds the contact role to the same
person. It does not create a copy.
 Every tab on the record, explained.
Follow a candidate through the stages of a job.
## 4. Get the full picture on one candidate
Before you call someone or put them in front of a client, this is where you catch up on
them: what Spott has picked up automatically, what your colleagues have logged, and
anything you want to ask.
### 4.1 Review the AI summary and details
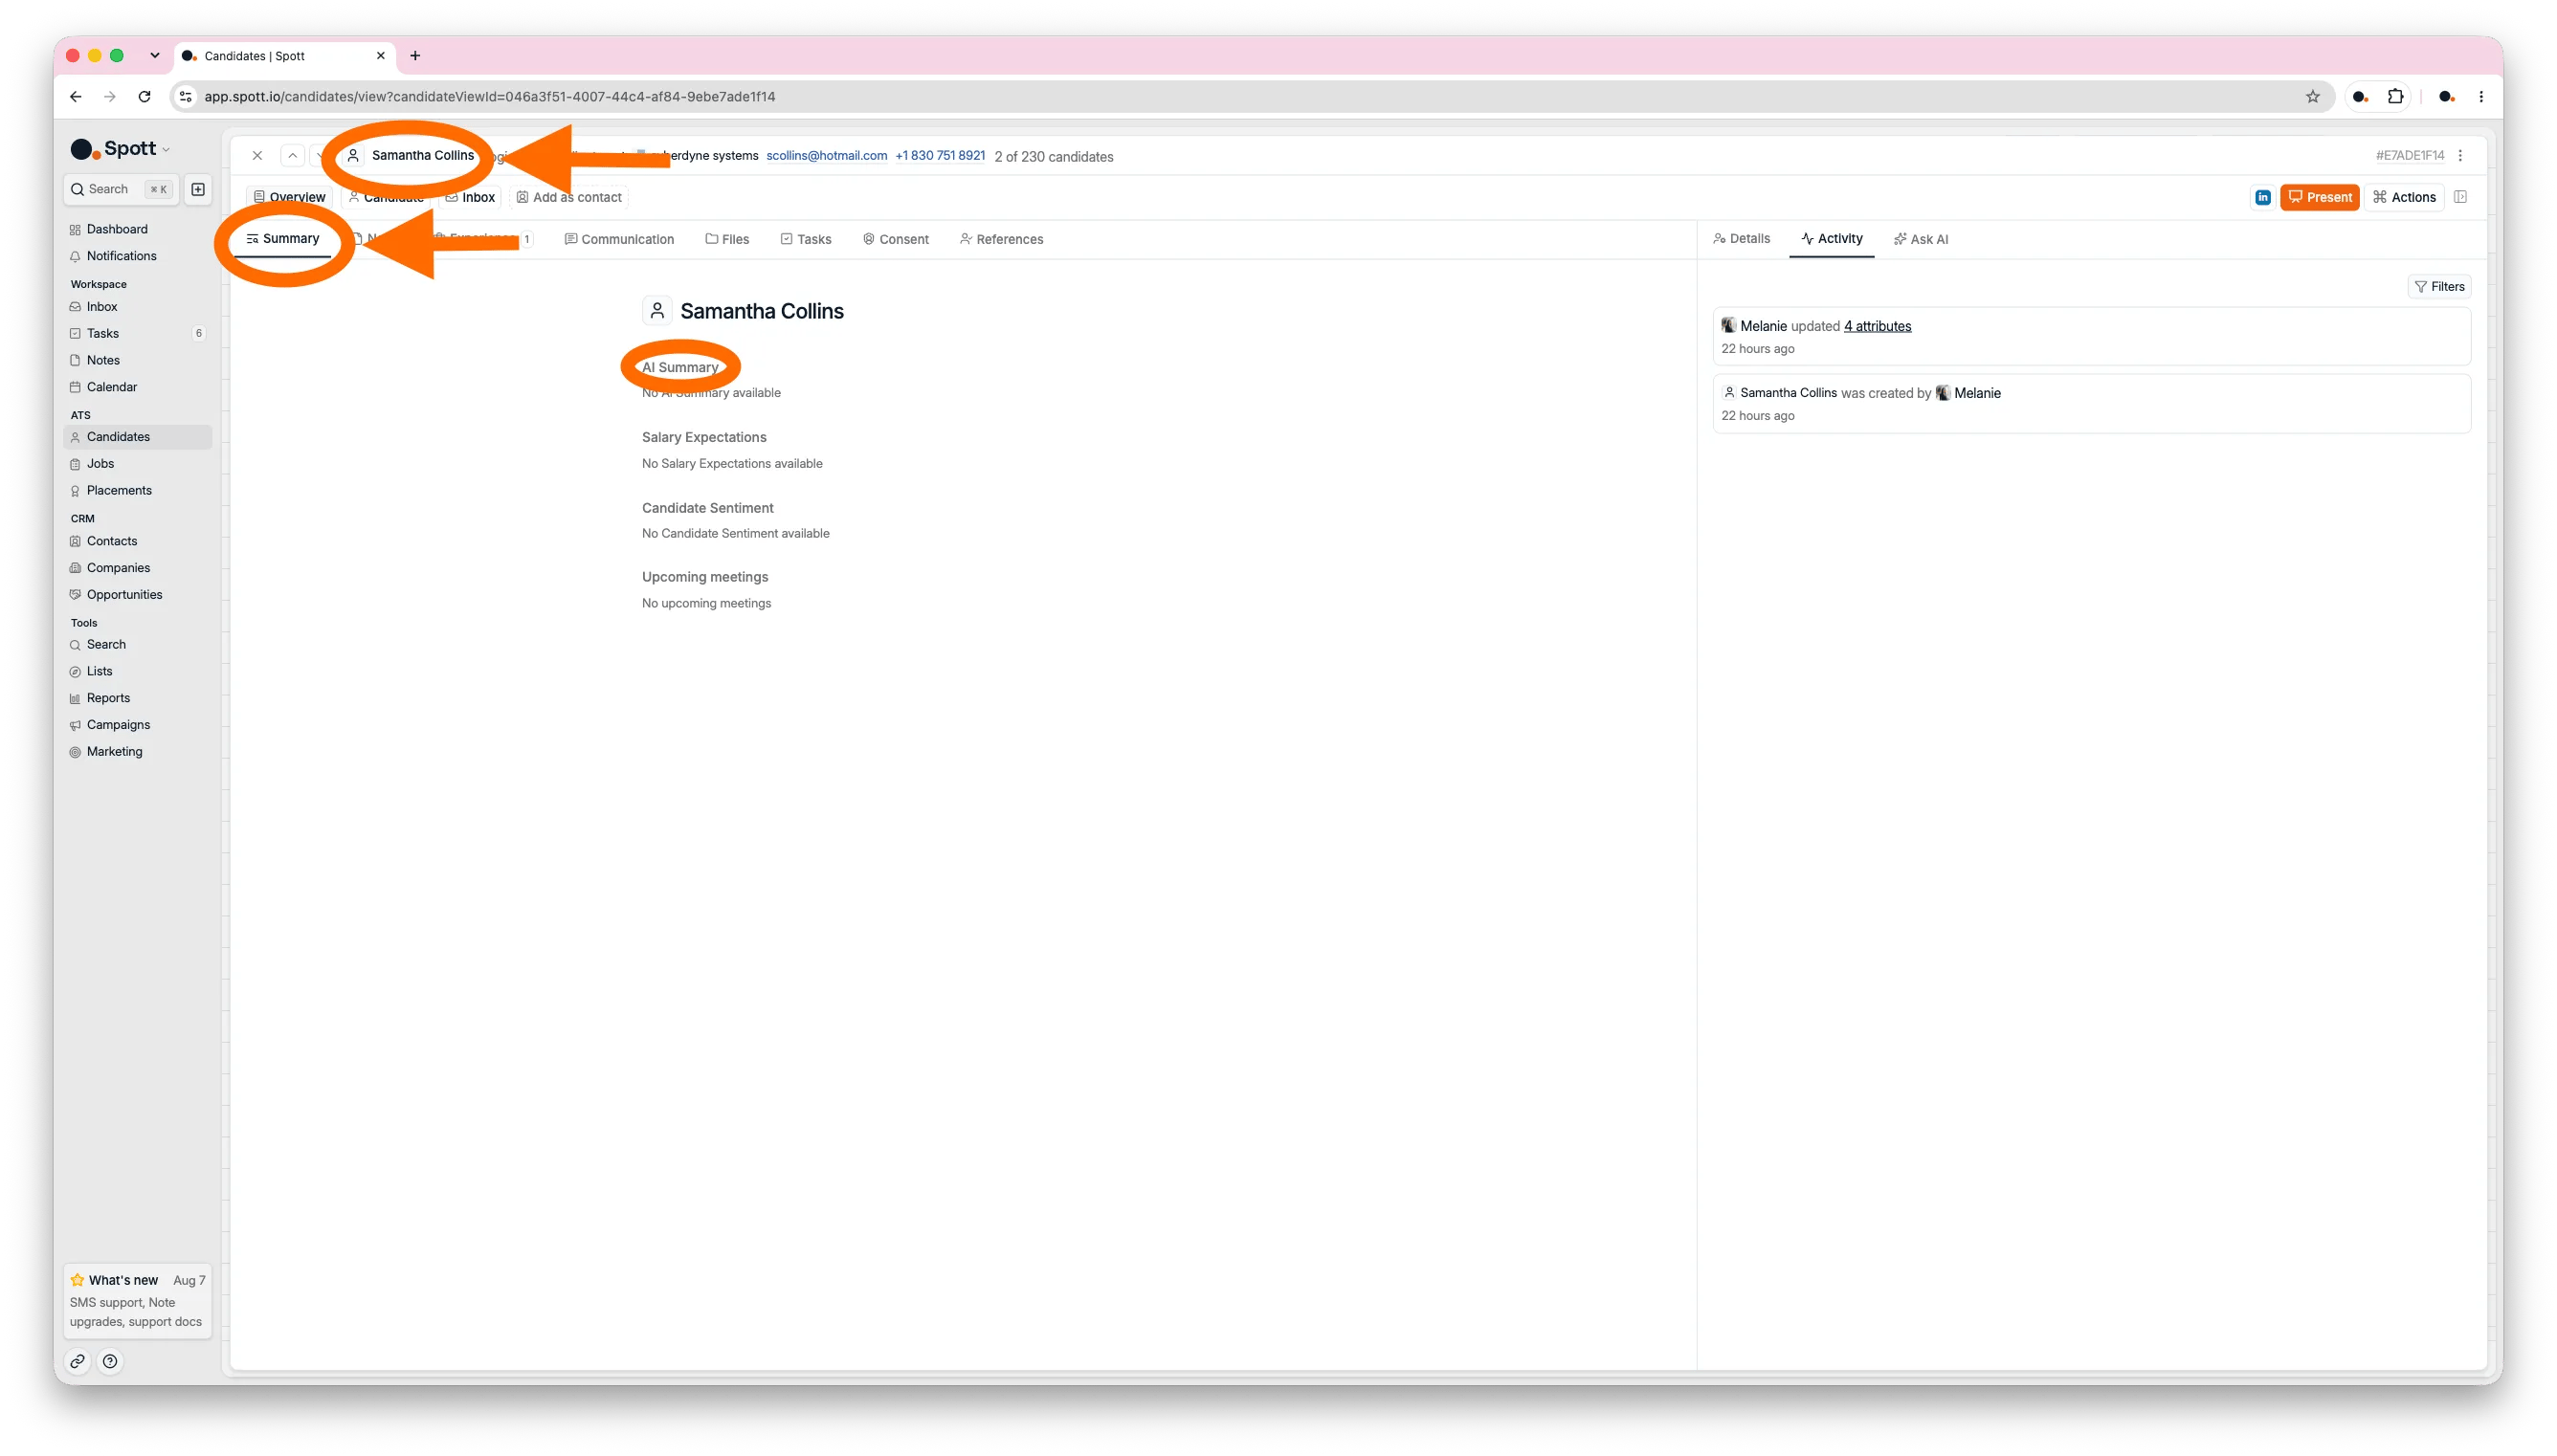
The **Summary** subtab is your starting point. Based on the whole profile it shows a short
**AI summary** of the candidate, their **salary expectations**, **candidate sentiment**
drawn from recent conversations, **upcoming meetings**, plus **suggested field updates**
and **suggested tasks** picked up from recent calls, meetings, and notes. Hover a
suggestion to see why it was made, then accept it or dismiss it.
The right-hand **Details** panel holds the candidate's fields: contact details, location,
languages, availability, salary expectation, and any custom fields your workspace uses.
Click **Show all values** to see every field. The applications the candidate is currently
in sit on the **Candidate** tab.
Every tab on the record, explained.
Follow a candidate through the stages of a job.
## 4. Get the full picture on one candidate
Before you call someone or put them in front of a client, this is where you catch up on
them: what Spott has picked up automatically, what your colleagues have logged, and
anything you want to ask.
### 4.1 Review the AI summary and details
The **Summary** subtab is your starting point. Based on the whole profile it shows a short
**AI summary** of the candidate, their **salary expectations**, **candidate sentiment**
drawn from recent conversations, **upcoming meetings**, plus **suggested field updates**
and **suggested tasks** picked up from recent calls, meetings, and notes. Hover a
suggestion to see why it was made, then accept it or dismiss it.
The right-hand **Details** panel holds the candidate's fields: contact details, location,
languages, availability, salary expectation, and any custom fields your workspace uses.
Click **Show all values** to see every field. The applications the candidate is currently
in sit on the **Candidate** tab.
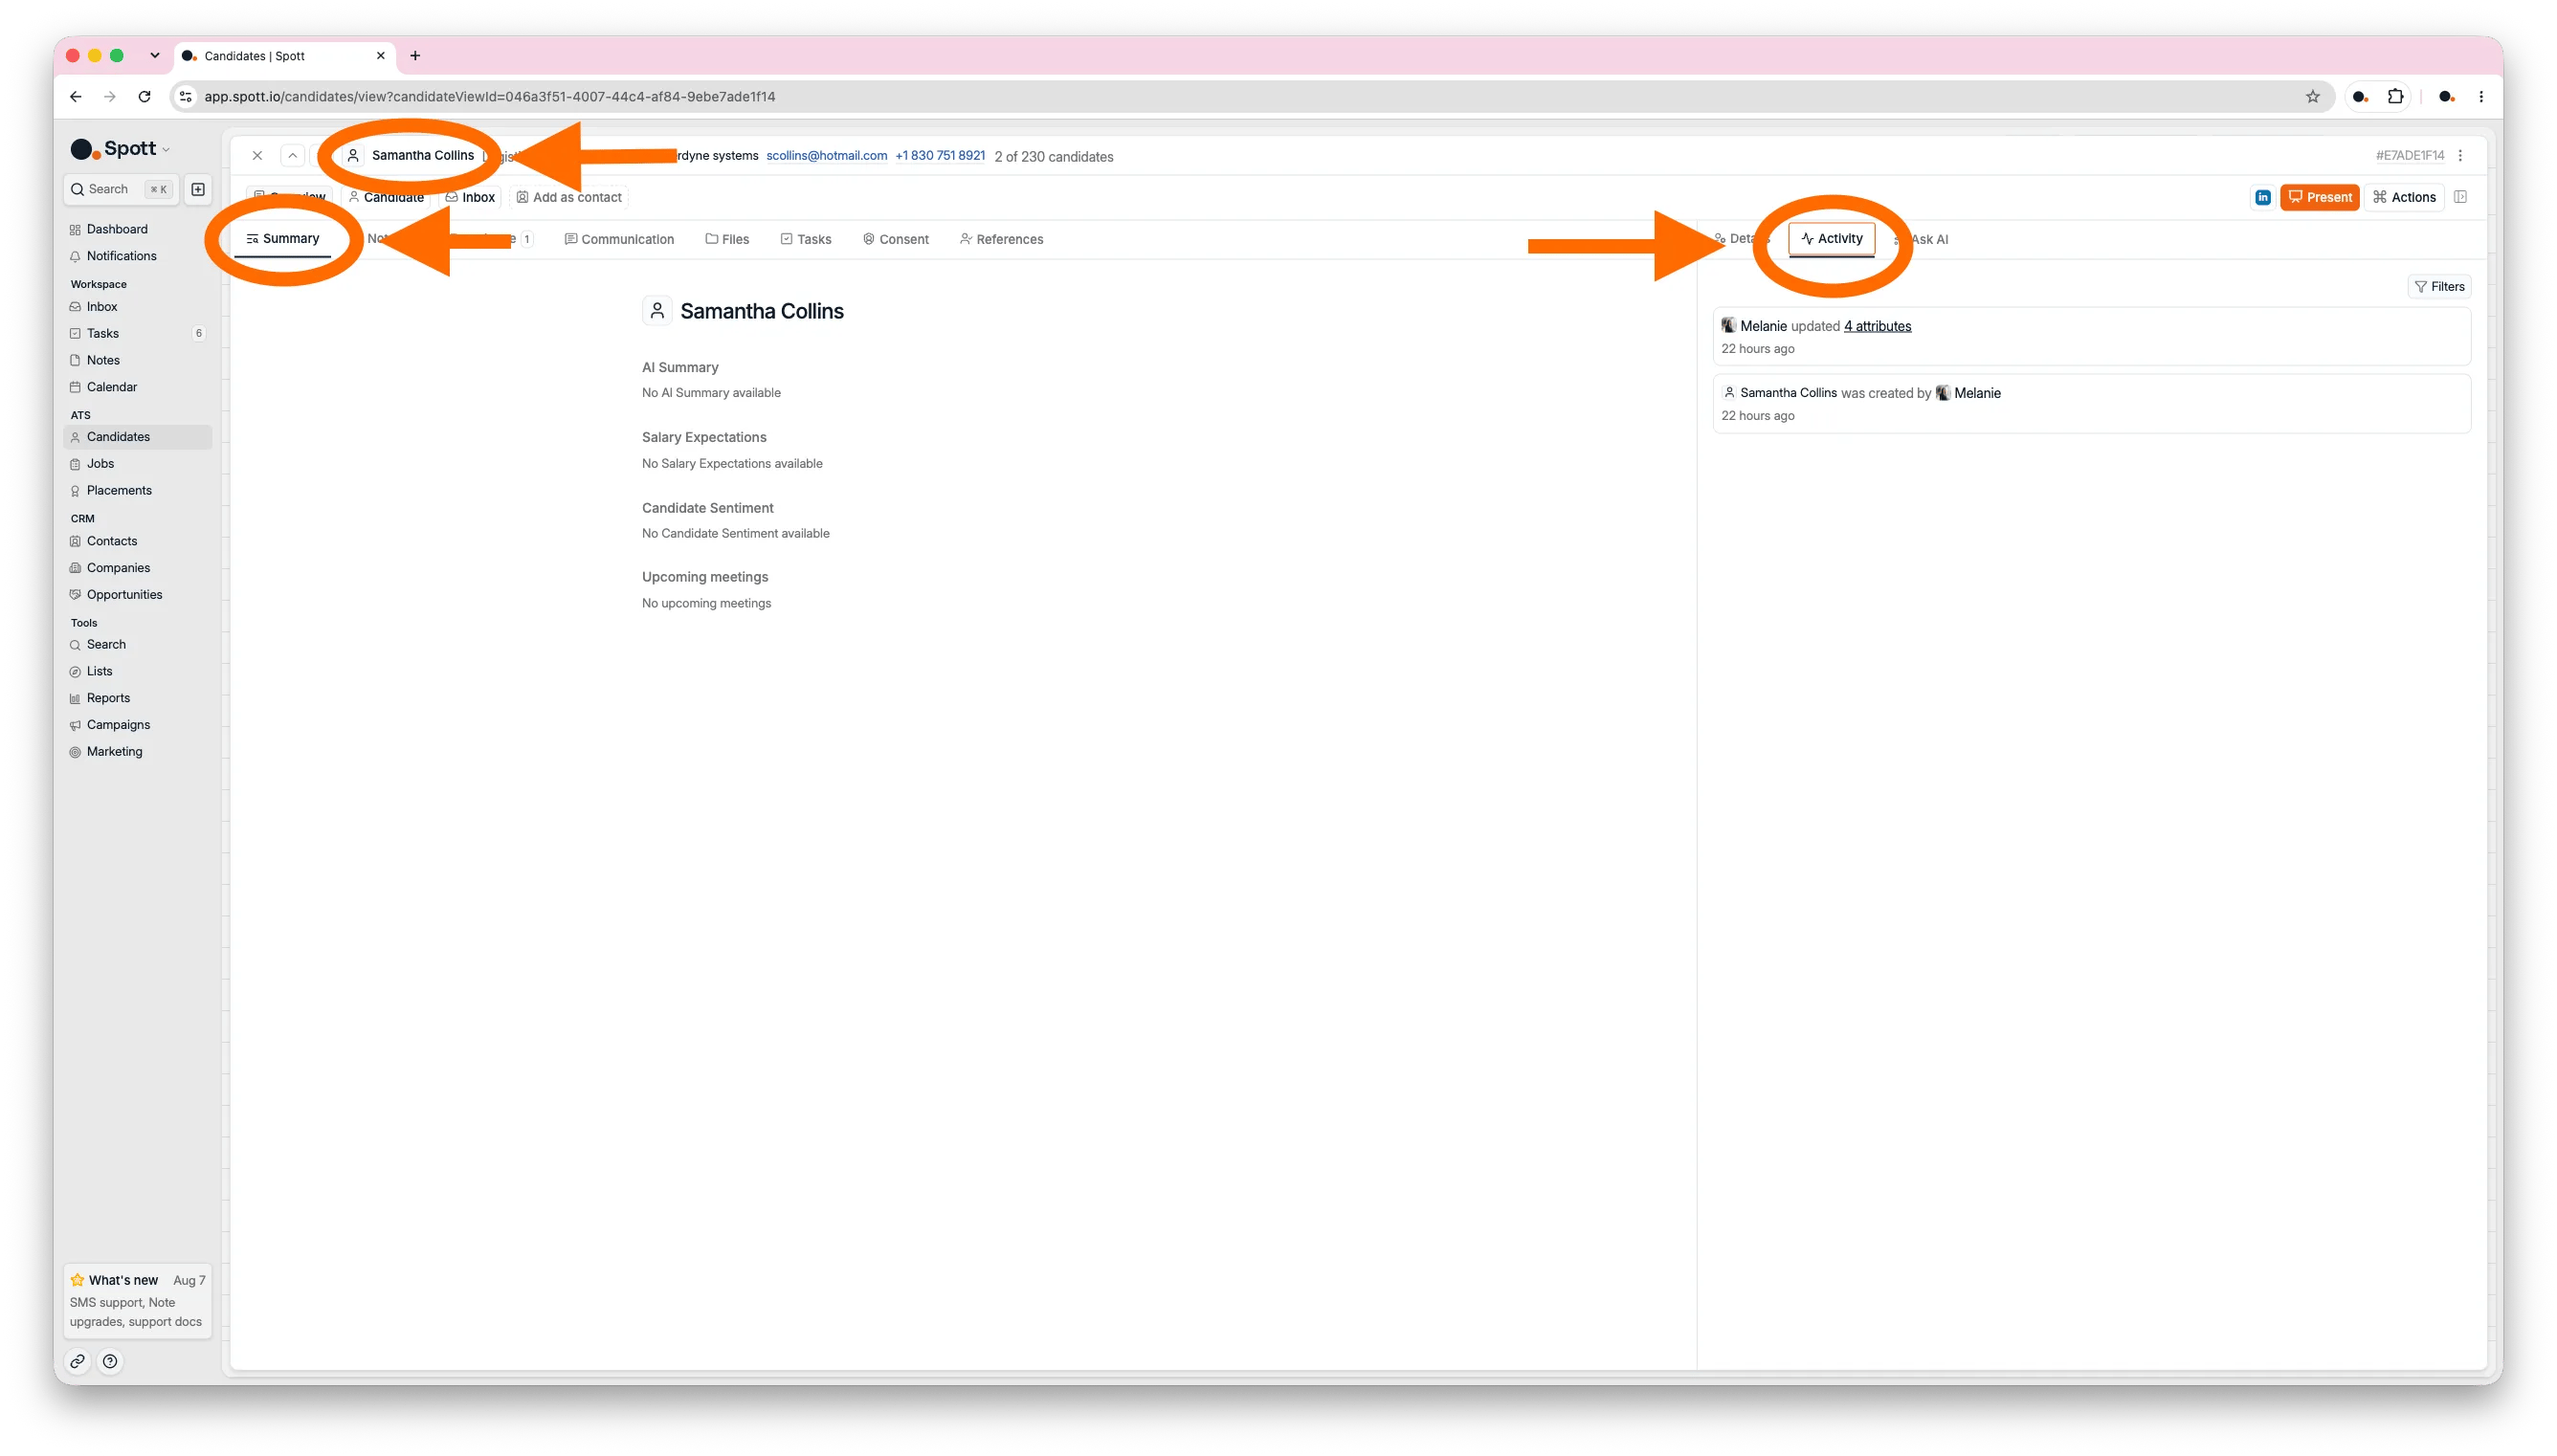
 ### 4.2 Review the activity timeline
**Activity** in the side panel is a timeline of everything that happened on the record, and
who did it: attribute **updates**, **notes**, **tasks**, **meetings**, **emails &
messages**, **calls**, **applications** including stage moves, and **contacts**. Use the
**Filters** button at the top of the timeline to show only the event types you care about.
### 4.2 Review the activity timeline
**Activity** in the side panel is a timeline of everything that happened on the record, and
who did it: attribute **updates**, **notes**, **tasks**, **meetings**, **emails &
messages**, **calls**, **applications** including stage moves, and **contacts**. Use the
**Filters** button at the top of the timeline to show only the event types you care about.
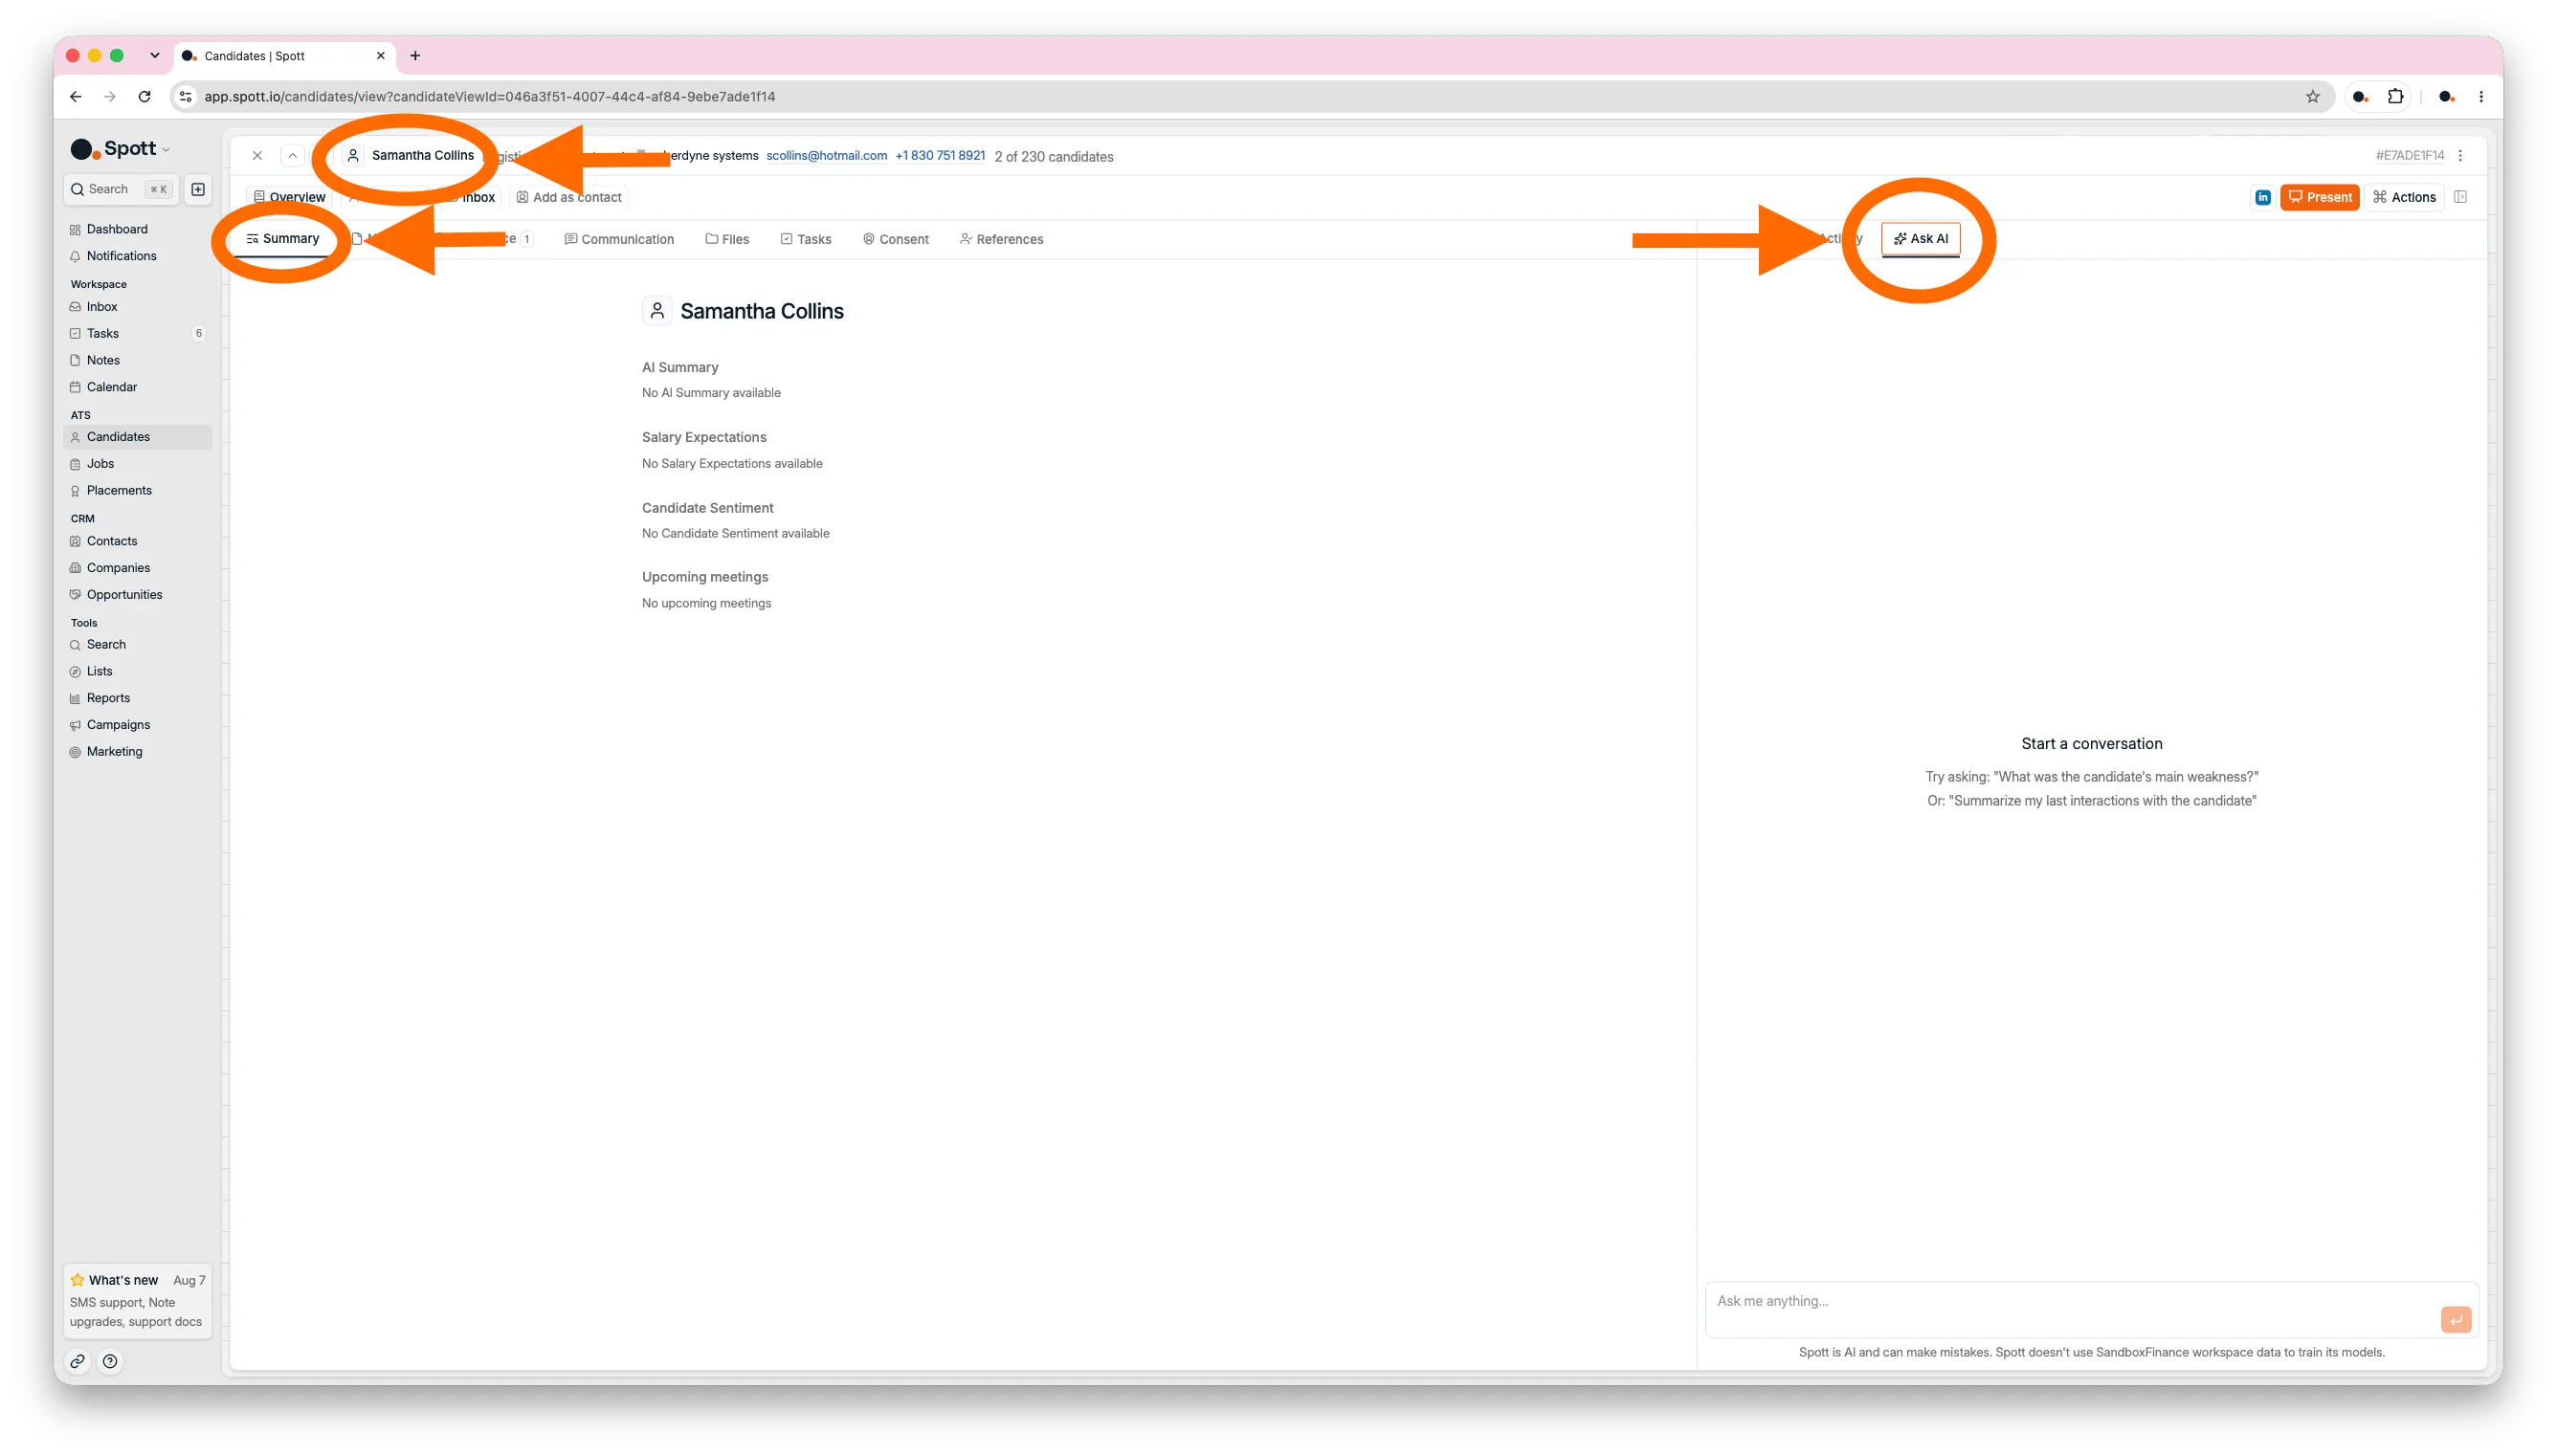
 ### 4.3 Ask AI about the candidate
**Ask AI** is a personal agent that knows the whole profile: details, experience, notes,
emails, and applications. Ask it things like "Summarize the situation with this candidate",
"Give me an application overview", or "What should I do next with this candidate?".
### 4.3 Ask AI about the candidate
**Ask AI** is a personal agent that knows the whole profile: details, experience, notes,
emails, and applications. Ask it things like "Summarize the situation with this candidate",
"Give me an application overview", or "What should I do next with this candidate?".
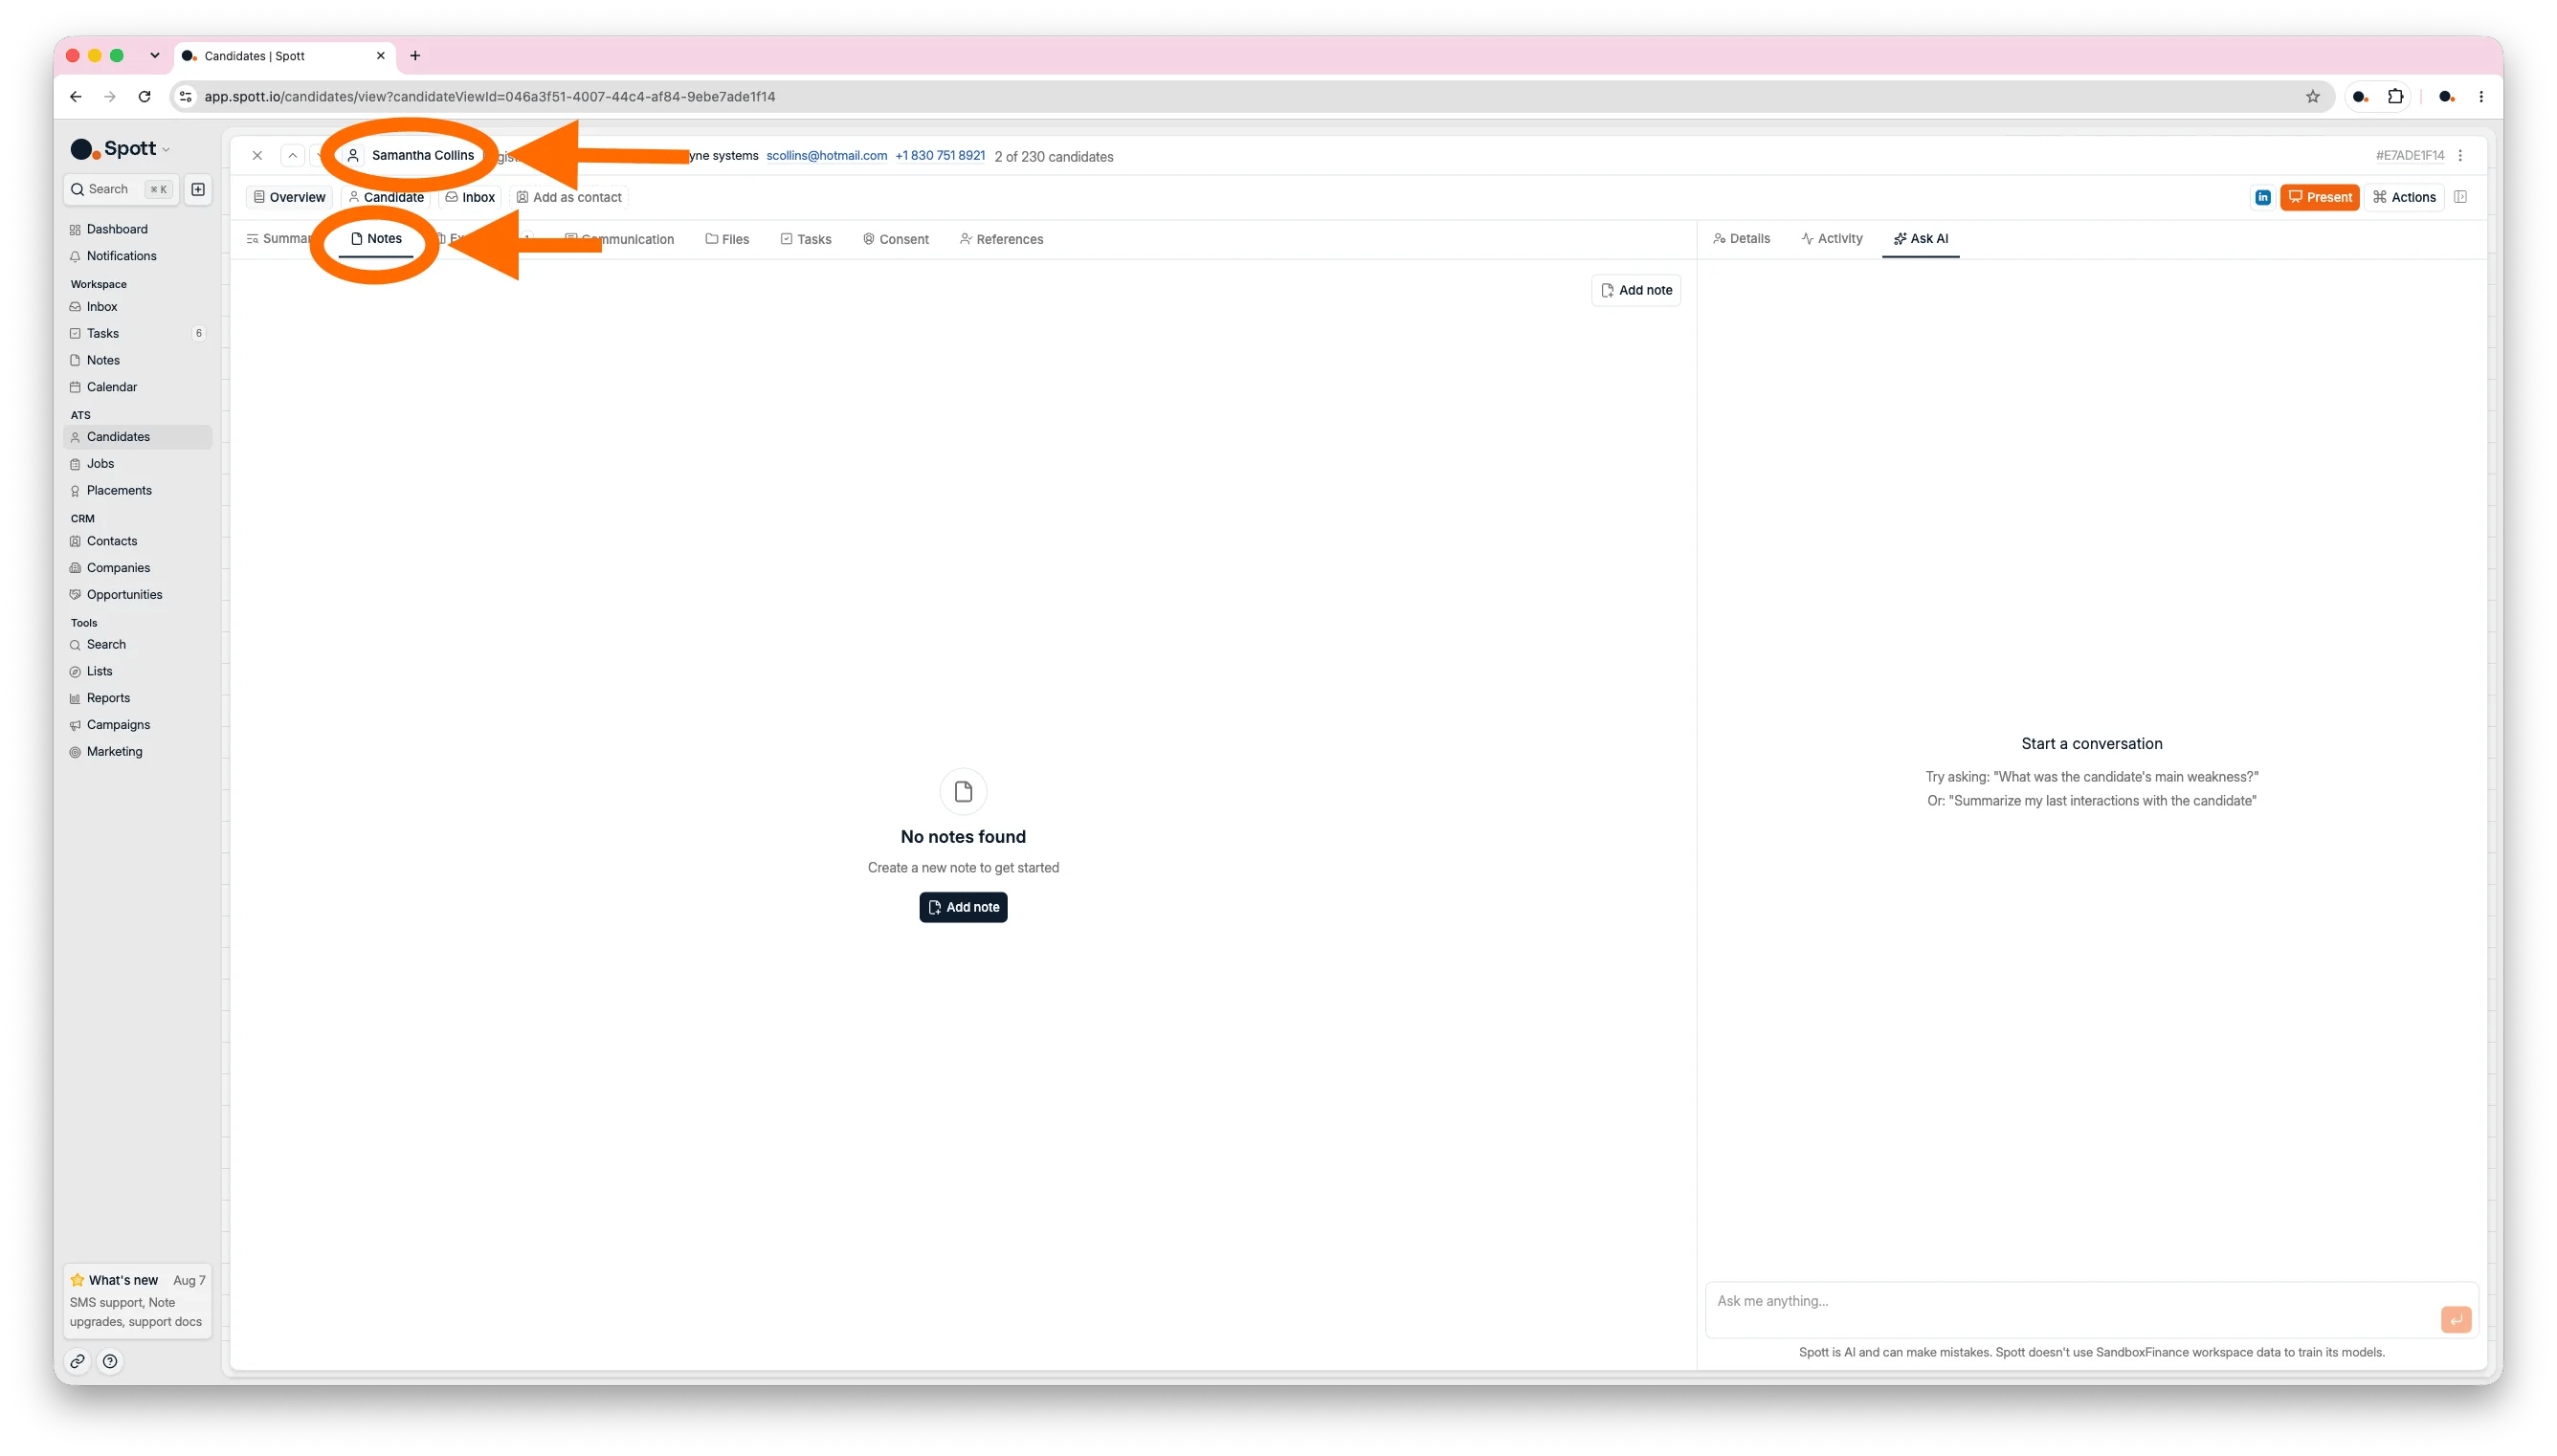
 ### 4.4 Read and add notes
All notes linked to the candidate appear on their profile, and they double as context for
the AI features. You can create notes manually at any time, and notes and emails can be
**docked** into a floating window that stays on screen while you move around the rest of
the profile, which is handy for taking notes while reading a CV.
With the **Note Taker** enabled, every meeting with the candidate produces a note
automatically, with a direct link to the recording and the full transcript.
### 4.4 Read and add notes
All notes linked to the candidate appear on their profile, and they double as context for
the AI features. You can create notes manually at any time, and notes and emails can be
**docked** into a floating window that stays on screen while you move around the rest of
the profile, which is handy for taking notes while reading a CV.
With the **Note Taker** enabled, every meeting with the candidate produces a note
automatically, with a direct link to the recording and the full transcript.
 Create your own fields, reorder them, and choose which ones show by default.
Let Spott join a meeting and write the note for you.
## 5. Keep a profile up to date
A profile is only as useful as it is current. These are the tabs you work in to keep a
candidate's history, documents, and permissions accurate. This walkthrough covers the
files, tasks, consent, and references subtabs, plus the Communication subtab that section 5
picks up.
### 5.1 Update experience and CV information
The **Experience** subtab shows the candidate's skills, work experience, and education with
tenure statistics, built from their CV, LinkedIn updates, and other files. You can also
enter or adjust anything manually. When the candidate has a CV on file, switch on the
**Latest CV** toggle at the top left to read the CV document itself instead of the parsed
profile, without leaving the record.
The company names in the work experience are clickable. Clicking one opens a preview of
that employer with its description, industry, headcount over time, funding rounds, and the
employees you already have in Spott. From that preview, **Add as company** turns the
employer into a client record, which is handy when a candidate's current employer turns out
to be a prospect.
The buttons at the top of the tab keep the profile fresh: **Add note**, **Request updated
CV** to send the candidate a link to upload their latest one, **Update with new CV** to
upload a newer one yourself, **Check for updates** to refresh the profile from LinkedIn,
and **Generate CV** to create a formatted CV in your agency's template.
**Update with new CV** compares the new document against the existing profile and applies
only what changed, so the corrections you made by hand are not overwritten.
### 5.2 Manage files
The **Files** subtab holds everything attached to the candidate, starting with their CV.
Click the three dots next to a CV to generate a formatted version, so every CV you share
with a client follows the same template.
### 5.3 Track candidate tasks
The **Tasks** subtab holds the follow-up actions for this candidate. Assign them to
yourself or a teammate, set due dates, and track completion.
### 5.4 Record consent
The **Consent** subtab tracks the candidate's **consents**, meaning GDPR and other
compliance requirements with type, source, and validity period, and their **marketing
opt-outs**, so they can be excluded from marketing emails. The subtab appears once consent
tracking is enabled for your workspace.
### 5.5 Add references
The **References** subtab is where you log references for the candidate and add comments
per reference.
Refresh a record from a new CV or from LinkedIn.
Record consent and track expiry dates.
## 6. Get in touch
Everything you send a candidate happens from their profile, so the conversation and the
record stay in one place and your colleagues can see the history.
### 6.1 Message from the candidate profile
The **Communication** subtab holds your full message history with the candidate across
**email**, **linked emails**, **WhatsApp**, and **SMS**, with the channels listed down the
left and split into your workspace ones and your personal ones. You can reply from here
without leaving the profile. Synchronisation runs both ways: messages sent outside Spott
show up here too, and vice versa. For the full-screen version, open the **Inbox** tab.
WhatsApp threads stay private to each user, so a colleague's WhatsApp conversations are not
visible to the rest of the team.
### 6.2 Find a missing email or phone number
When a candidate's contact details are incomplete, enrichment looks them up for you across
multiple data providers in turn. Open the profile, click the empty email or phone field,
and use the purple **Enrich** button that appears.
The Candidates table does the same in bulk: select up to 1,000 people with the checkboxes,
then use the **Enrich** menu to target personal emails, work emails, phone numbers, LinkedIn
URLs, or a full profile update. Enrichment is switched on per workspace under
**Settings → Features**.
Credits are only deducted on a successful lookup, and the cost varies: a work email costs
1 credit, a personal email 3, a phone number 10, a LinkedIn URL 1, and a profile update
5\. Check the record for details you already have before running it.
Find work emails and phone numbers, and what it costs.
The full-screen view of every conversation, across all channels.
## 7. Put a candidate forward for a job
This is where the profile turns into a placement: find the jobs a candidate fits, then get
them in front of the client.
### 7.1 Match a candidate to a job
From the profile you can **find jobs that match the candidate**, find **similar
candidates** to widen a shortlist, **present the candidate**, and take many other actions.
### 7.2 Present candidates to a client
The **Present** button in the top right sends the candidate to your client contacts for a
role, with their CV or a generated report attached. You can present to several contacts at
once, either from a contact list or with the bulk email option inside the Present dialog.
From a multi-candidate selection, **Generate Shortlist** produces one client-ready document
covering the whole group: a cover page plus the individual profiles, grouped by company.
Choose the job, the template, the language, and whether to anonymize the candidates. It runs
in the background, and the Word document is ready to download when it finishes.
Send candidates to a client, individually or in bulk.
Follow a candidate through the stages of a job.
Create your own fields, reorder them, and choose which ones show by default.
Let Spott join a meeting and write the note for you.
## 5. Keep a profile up to date
A profile is only as useful as it is current. These are the tabs you work in to keep a
candidate's history, documents, and permissions accurate. This walkthrough covers the
files, tasks, consent, and references subtabs, plus the Communication subtab that section 5
picks up.
### 5.1 Update experience and CV information
The **Experience** subtab shows the candidate's skills, work experience, and education with
tenure statistics, built from their CV, LinkedIn updates, and other files. You can also
enter or adjust anything manually. When the candidate has a CV on file, switch on the
**Latest CV** toggle at the top left to read the CV document itself instead of the parsed
profile, without leaving the record.
The company names in the work experience are clickable. Clicking one opens a preview of
that employer with its description, industry, headcount over time, funding rounds, and the
employees you already have in Spott. From that preview, **Add as company** turns the
employer into a client record, which is handy when a candidate's current employer turns out
to be a prospect.
The buttons at the top of the tab keep the profile fresh: **Add note**, **Request updated
CV** to send the candidate a link to upload their latest one, **Update with new CV** to
upload a newer one yourself, **Check for updates** to refresh the profile from LinkedIn,
and **Generate CV** to create a formatted CV in your agency's template.
**Update with new CV** compares the new document against the existing profile and applies
only what changed, so the corrections you made by hand are not overwritten.
### 5.2 Manage files
The **Files** subtab holds everything attached to the candidate, starting with their CV.
Click the three dots next to a CV to generate a formatted version, so every CV you share
with a client follows the same template.
### 5.3 Track candidate tasks
The **Tasks** subtab holds the follow-up actions for this candidate. Assign them to
yourself or a teammate, set due dates, and track completion.
### 5.4 Record consent
The **Consent** subtab tracks the candidate's **consents**, meaning GDPR and other
compliance requirements with type, source, and validity period, and their **marketing
opt-outs**, so they can be excluded from marketing emails. The subtab appears once consent
tracking is enabled for your workspace.
### 5.5 Add references
The **References** subtab is where you log references for the candidate and add comments
per reference.
Refresh a record from a new CV or from LinkedIn.
Record consent and track expiry dates.
## 6. Get in touch
Everything you send a candidate happens from their profile, so the conversation and the
record stay in one place and your colleagues can see the history.
### 6.1 Message from the candidate profile
The **Communication** subtab holds your full message history with the candidate across
**email**, **linked emails**, **WhatsApp**, and **SMS**, with the channels listed down the
left and split into your workspace ones and your personal ones. You can reply from here
without leaving the profile. Synchronisation runs both ways: messages sent outside Spott
show up here too, and vice versa. For the full-screen version, open the **Inbox** tab.
WhatsApp threads stay private to each user, so a colleague's WhatsApp conversations are not
visible to the rest of the team.
### 6.2 Find a missing email or phone number
When a candidate's contact details are incomplete, enrichment looks them up for you across
multiple data providers in turn. Open the profile, click the empty email or phone field,
and use the purple **Enrich** button that appears.
The Candidates table does the same in bulk: select up to 1,000 people with the checkboxes,
then use the **Enrich** menu to target personal emails, work emails, phone numbers, LinkedIn
URLs, or a full profile update. Enrichment is switched on per workspace under
**Settings → Features**.
Credits are only deducted on a successful lookup, and the cost varies: a work email costs
1 credit, a personal email 3, a phone number 10, a LinkedIn URL 1, and a profile update
5\. Check the record for details you already have before running it.
Find work emails and phone numbers, and what it costs.
The full-screen view of every conversation, across all channels.
## 7. Put a candidate forward for a job
This is where the profile turns into a placement: find the jobs a candidate fits, then get
them in front of the client.
### 7.1 Match a candidate to a job
From the profile you can **find jobs that match the candidate**, find **similar
candidates** to widen a shortlist, **present the candidate**, and take many other actions.
### 7.2 Present candidates to a client
The **Present** button in the top right sends the candidate to your client contacts for a
role, with their CV or a generated report attached. You can present to several contacts at
once, either from a contact list or with the bulk email option inside the Present dialog.
From a multi-candidate selection, **Generate Shortlist** produces one client-ready document
covering the whole group: a cover page plus the individual profiles, grouped by company.
Choose the job, the template, the language, and whether to anonymize the candidates. It runs
in the background, and the Word document is ready to download when it finishes.
Send candidates to a client, individually or in bulk.
Follow a candidate through the stages of a job.
## Now your turn
* [ ] Add candidates **manually**
* [ ] Add candidates via **CV upload**
* [ ] Add candidates by **forwarding CVs through email**
* [ ] Add candidates from a **CSV file**
* [ ] Import **LinkedIn profiles** into Spott
* [ ] Create **one candidate view** using two filters
* [ ] Open a candidate and switch between the **Overview**, **Candidate**, and **Inbox** tabs
* [ ] **Ask AI** a question about a candidate
* [ ] Create **one task**, tag a company, and assign it to a colleague
* [ ] Send **one email** from the candidate profile
* [ ] Find **one phone number or email** using AI enrichment
* [ ] **Present a job** to a candidate using AI
* [ ] Enroll a candidate in a campaign with a **manual LinkedIn step**, then open the task
it creates and send the message yourself from LinkedIn
That last one catches people out. Spott never sends or syncs LinkedIn messages. A manual
LinkedIn step writes the message for you and creates a task, and completing the task does
not send anything: you still send it from LinkedIn yourself.
Create a job and run candidates through its pipeline.