> ## Documentation Index
> Fetch the complete documentation index at: https://docs.spott.io/llms.txt
> Use this file to discover all available pages before exploring further.
# Inbox and calendar
> Keep conversations in context, schedule meetings, and let candidates or clients book time with you.
In this section you learn how to connect and use the unified inbox, create reusable message
templates, control email visibility, schedule and manage meetings, and share Scheduler
booking links.
1. [Use the unified inbox](#1-use-the-unified-inbox)
2. [Use your calendar](#2-use-your-calendar)
To open your conversations, click **Inbox** under **Workspace** in the left-hand navigation
bar. To manage meetings, click **Calendar** in the same section.
## 1. Use the unified inbox
The inbox brings your connected communication channels into one place and keeps each
conversation attached to the right person in Spott.
### 1.1 Connect your account and let the first sync finish
Before using the inbox, open **Settings → Accounts** and confirm that your Microsoft
Outlook or Google account is connected.
If **Inbox** does not appear in the left-hand navigation, the unified inbox still has to be
turned on for your workspace under **Settings → Features**.
The first mailbox and calendar sync can take up to 12 hours. New messages keep arriving
while Spott imports the older history, so an incomplete history during that window does
not mean the connection failed.
### 1.2 Find, read, and reply to conversations
Open **Inbox** to review communication from the channels connected to your account:
* **Email:** messages from your connected Gmail or Outlook account.
* **WhatsApp:** conversations from your connected WhatsApp account.
* **SMS:** messages sent through an SMS-capable number on your VoIP account.
Use the tabs at the top of the page to move between **Inbox** for active conversations and
their full thread history, **Outbox** for messages that are scheduled or waiting to send,
and **Message templates** for reusable email content.
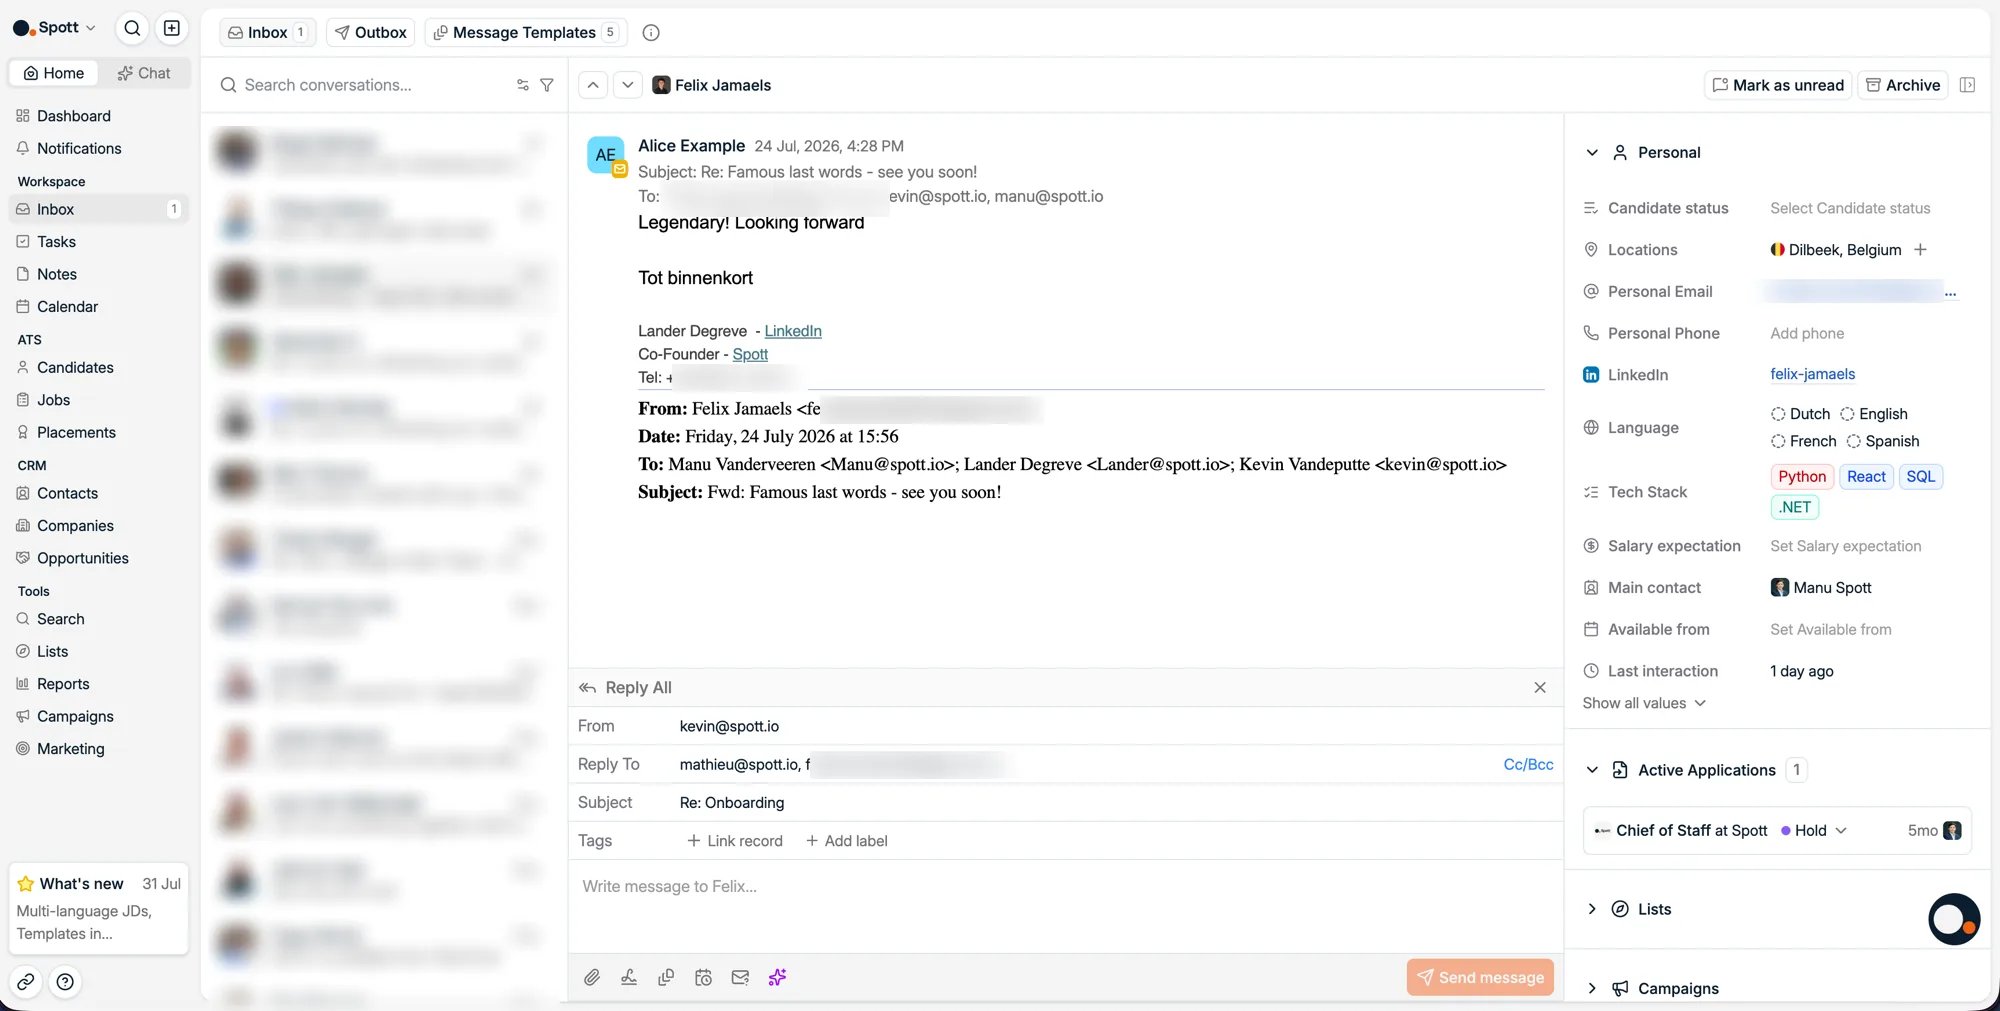 Select a conversation in the left column to open its history. Use filters such as **Awaiting
a reply** to focus on the conversations that still need action.
From an open thread, click **Reply** or **Reply all**. In the composer you can attach files
or add your signature, link the conversation to a Spott record and add labels, start from a
message template, insert a Scheduler booking link, and ask AI to draft a candidate or job
pitch.
Replies are sent through the connected Gmail, Outlook, or WhatsApp integration and stored
in Spott. Candidate conversations also appear on the candidate profile's **Communication**
subtab.
The inbox only syncs messages with people who already exist in Spott as a candidate or a
contact. If a sender's email address is not attached to a person in your workspace, add
that person before expecting the conversation to appear.
### 1.3 Create and use a message template
The templates here are for email. Presentation and job description templates are a separate
set, managed under **Settings → Templates**.
Open **Inbox**, select **Message templates**, and click **New email template**. Choose
whether the template is **Personal** or shared with the **Workspace**, then fill in:
* **Template title:** the internal name you use to find the template.
* **Subject line:** the subject recipients see.
* **Email body:** the reusable message content.
* **Attachments:** files that should go out with the message.
Type `{` in the editor to add variables such as the recipient's name, the job name, or the
company name. Variables fill in automatically when the matching information exists in Spott.
You can also add **AI generated content**, choose whether it draws from the recipient,
candidate, contact, company, or job, and give Spott an instruction for the passage it should
write.
Templates save automatically as you type, there is no Save button. Once created, personal
and workspace templates are available through **Start from template** in the inbox, and can
also be used in campaigns.
Give templates clear, specific titles, such as "Candidate intro, software engineer", so
you and your team can pick the right one quickly.
### 1.4 Choose what colleagues can see
To set your default email and calendar visibility, open **Settings → Accounts**, then
**Default email and calendar sharing**. Choose:
* **Metadata only:** colleagues see participants and timestamps, but not the subject or the
body.
* **Subject line and metadata:** colleagues also see the subject line.
* **Full access:** colleagues see the body, subject, attachments, participants, and
timestamps.
This is a personal setting, so every user picks their own sharing level. WhatsApp
conversations always stay private to the connected user.
Channels, filters, replies, syncing, and record linking.
Personal and workspace templates, variables, and AI-generated content.
## 2. Use your calendar
The calendar keeps meetings in sync with Outlook or Google and gives you one place to
schedule, update, and review events.
### 2.1 Review your calendar
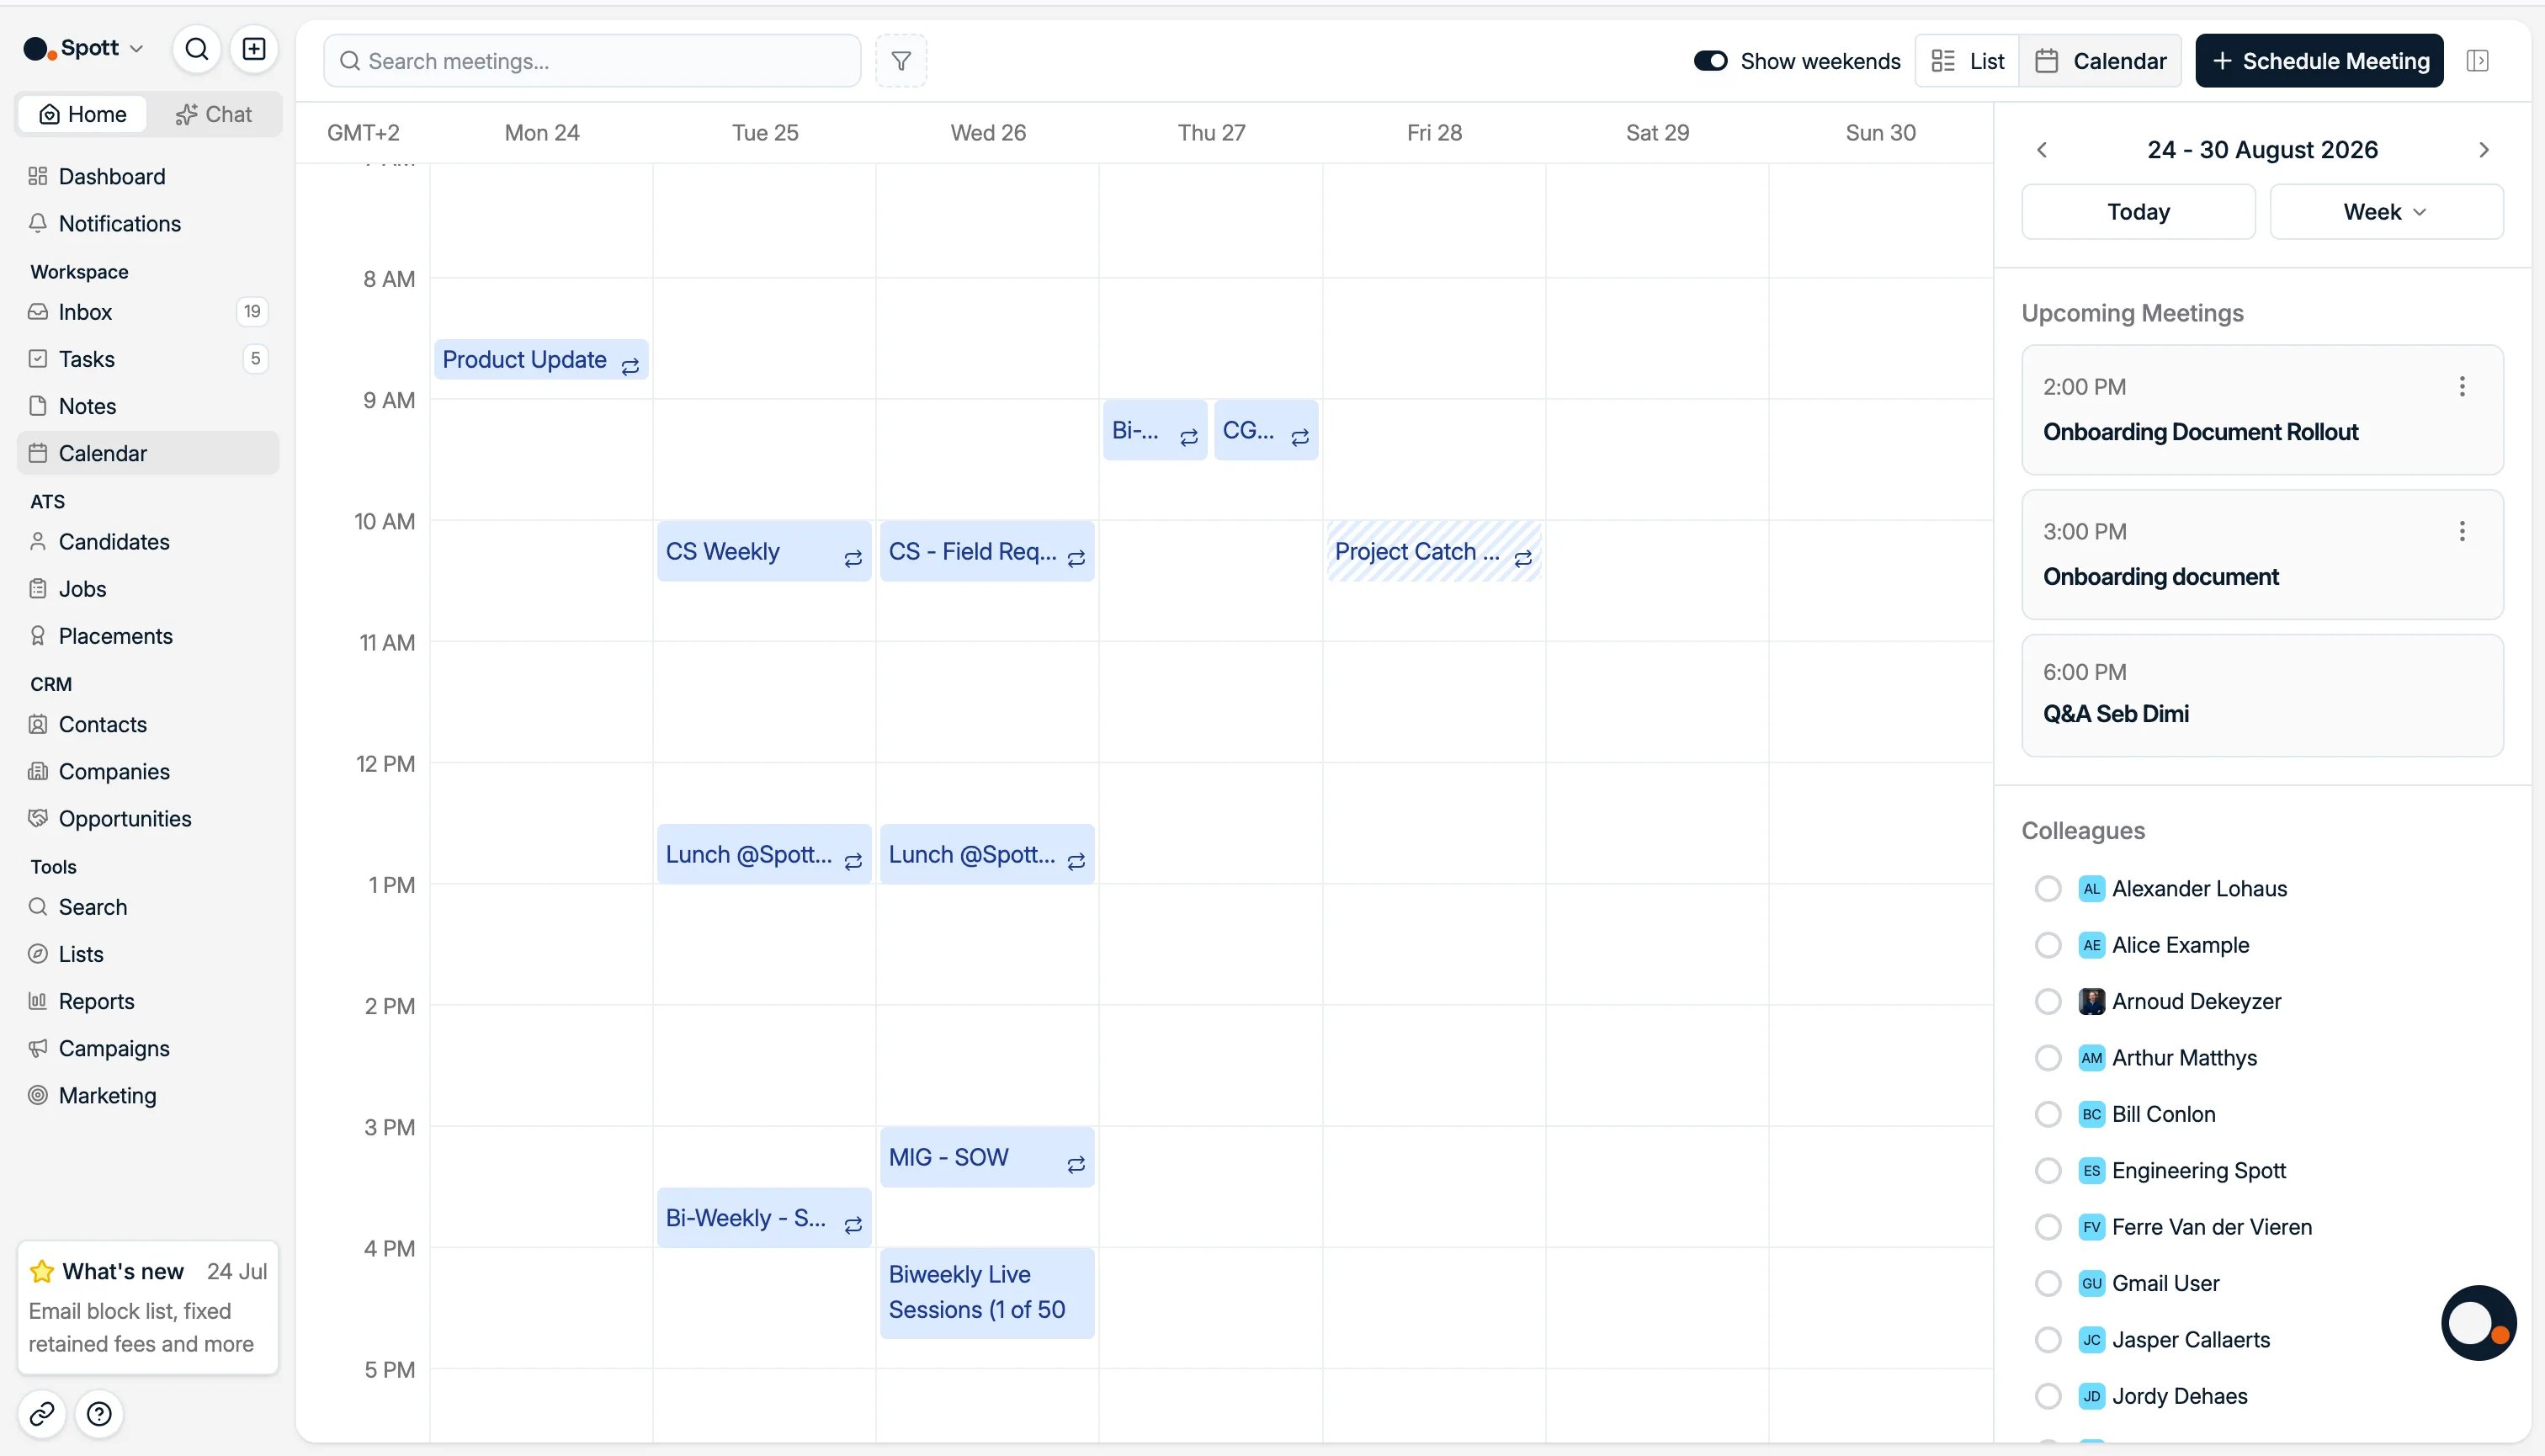
Open **Calendar** from the left-hand navigation bar. You can switch between list and
calendar views, review **Upcoming meetings**, and show teammates' calendars beside your own
when you are coordinating availability.
Your Outlook or Google account has to be connected under **Settings → Accounts**. After the
initial sync, calendar changes appear in Spott in near real time.
Select a conversation in the left column to open its history. Use filters such as **Awaiting
a reply** to focus on the conversations that still need action.
From an open thread, click **Reply** or **Reply all**. In the composer you can attach files
or add your signature, link the conversation to a Spott record and add labels, start from a
message template, insert a Scheduler booking link, and ask AI to draft a candidate or job
pitch.
Replies are sent through the connected Gmail, Outlook, or WhatsApp integration and stored
in Spott. Candidate conversations also appear on the candidate profile's **Communication**
subtab.
The inbox only syncs messages with people who already exist in Spott as a candidate or a
contact. If a sender's email address is not attached to a person in your workspace, add
that person before expecting the conversation to appear.
### 1.3 Create and use a message template
The templates here are for email. Presentation and job description templates are a separate
set, managed under **Settings → Templates**.
Open **Inbox**, select **Message templates**, and click **New email template**. Choose
whether the template is **Personal** or shared with the **Workspace**, then fill in:
* **Template title:** the internal name you use to find the template.
* **Subject line:** the subject recipients see.
* **Email body:** the reusable message content.
* **Attachments:** files that should go out with the message.
Type `{` in the editor to add variables such as the recipient's name, the job name, or the
company name. Variables fill in automatically when the matching information exists in Spott.
You can also add **AI generated content**, choose whether it draws from the recipient,
candidate, contact, company, or job, and give Spott an instruction for the passage it should
write.
Templates save automatically as you type, there is no Save button. Once created, personal
and workspace templates are available through **Start from template** in the inbox, and can
also be used in campaigns.
Give templates clear, specific titles, such as "Candidate intro, software engineer", so
you and your team can pick the right one quickly.
### 1.4 Choose what colleagues can see
To set your default email and calendar visibility, open **Settings → Accounts**, then
**Default email and calendar sharing**. Choose:
* **Metadata only:** colleagues see participants and timestamps, but not the subject or the
body.
* **Subject line and metadata:** colleagues also see the subject line.
* **Full access:** colleagues see the body, subject, attachments, participants, and
timestamps.
This is a personal setting, so every user picks their own sharing level. WhatsApp
conversations always stay private to the connected user.
Channels, filters, replies, syncing, and record linking.
Personal and workspace templates, variables, and AI-generated content.
## 2. Use your calendar
The calendar keeps meetings in sync with Outlook or Google and gives you one place to
schedule, update, and review events.
### 2.1 Review your calendar
Open **Calendar** from the left-hand navigation bar. You can switch between list and
calendar views, review **Upcoming meetings**, and show teammates' calendars beside your own
when you are coordinating availability.
Your Outlook or Google account has to be connected under **Settings → Accounts**. After the
initial sync, calendar changes appear in Spott in near real time.
 ### 2.2 Schedule a meeting
From the calendar, click **Schedule meeting** in the top right corner. You can also
double-click a time slot, or click and drag across the time you want to reserve.
Fill in the meeting details before sending the invite:
* **Recipients:** everyone who should attend.
* **Subject and body:** what the meeting is about.
* **Date and time:** the schedule, the recurrence, or the **All day** option.
* **Location:** a physical location, or switch on **Online meeting**.
* **Show as free:** keep the time available instead of marking it busy.
* **Hide attendee list:** stop recipients from seeing one another.
* **Dial in [Note Taker](/docs/notes/note-taker):** let Spott record and summarise the
online meeting.
### 2.2 Schedule a meeting
From the calendar, click **Schedule meeting** in the top right corner. You can also
double-click a time slot, or click and drag across the time you want to reserve.
Fill in the meeting details before sending the invite:
* **Recipients:** everyone who should attend.
* **Subject and body:** what the meeting is about.
* **Date and time:** the schedule, the recurrence, or the **All day** option.
* **Location:** a physical location, or switch on **Online meeting**.
* **Show as free:** keep the time available instead of marking it busy.
* **Hide attendee list:** stop recipients from seeing one another.
* **Dial in [Note Taker](/docs/notes/note-taker):** let Spott record and summarise the
online meeting.
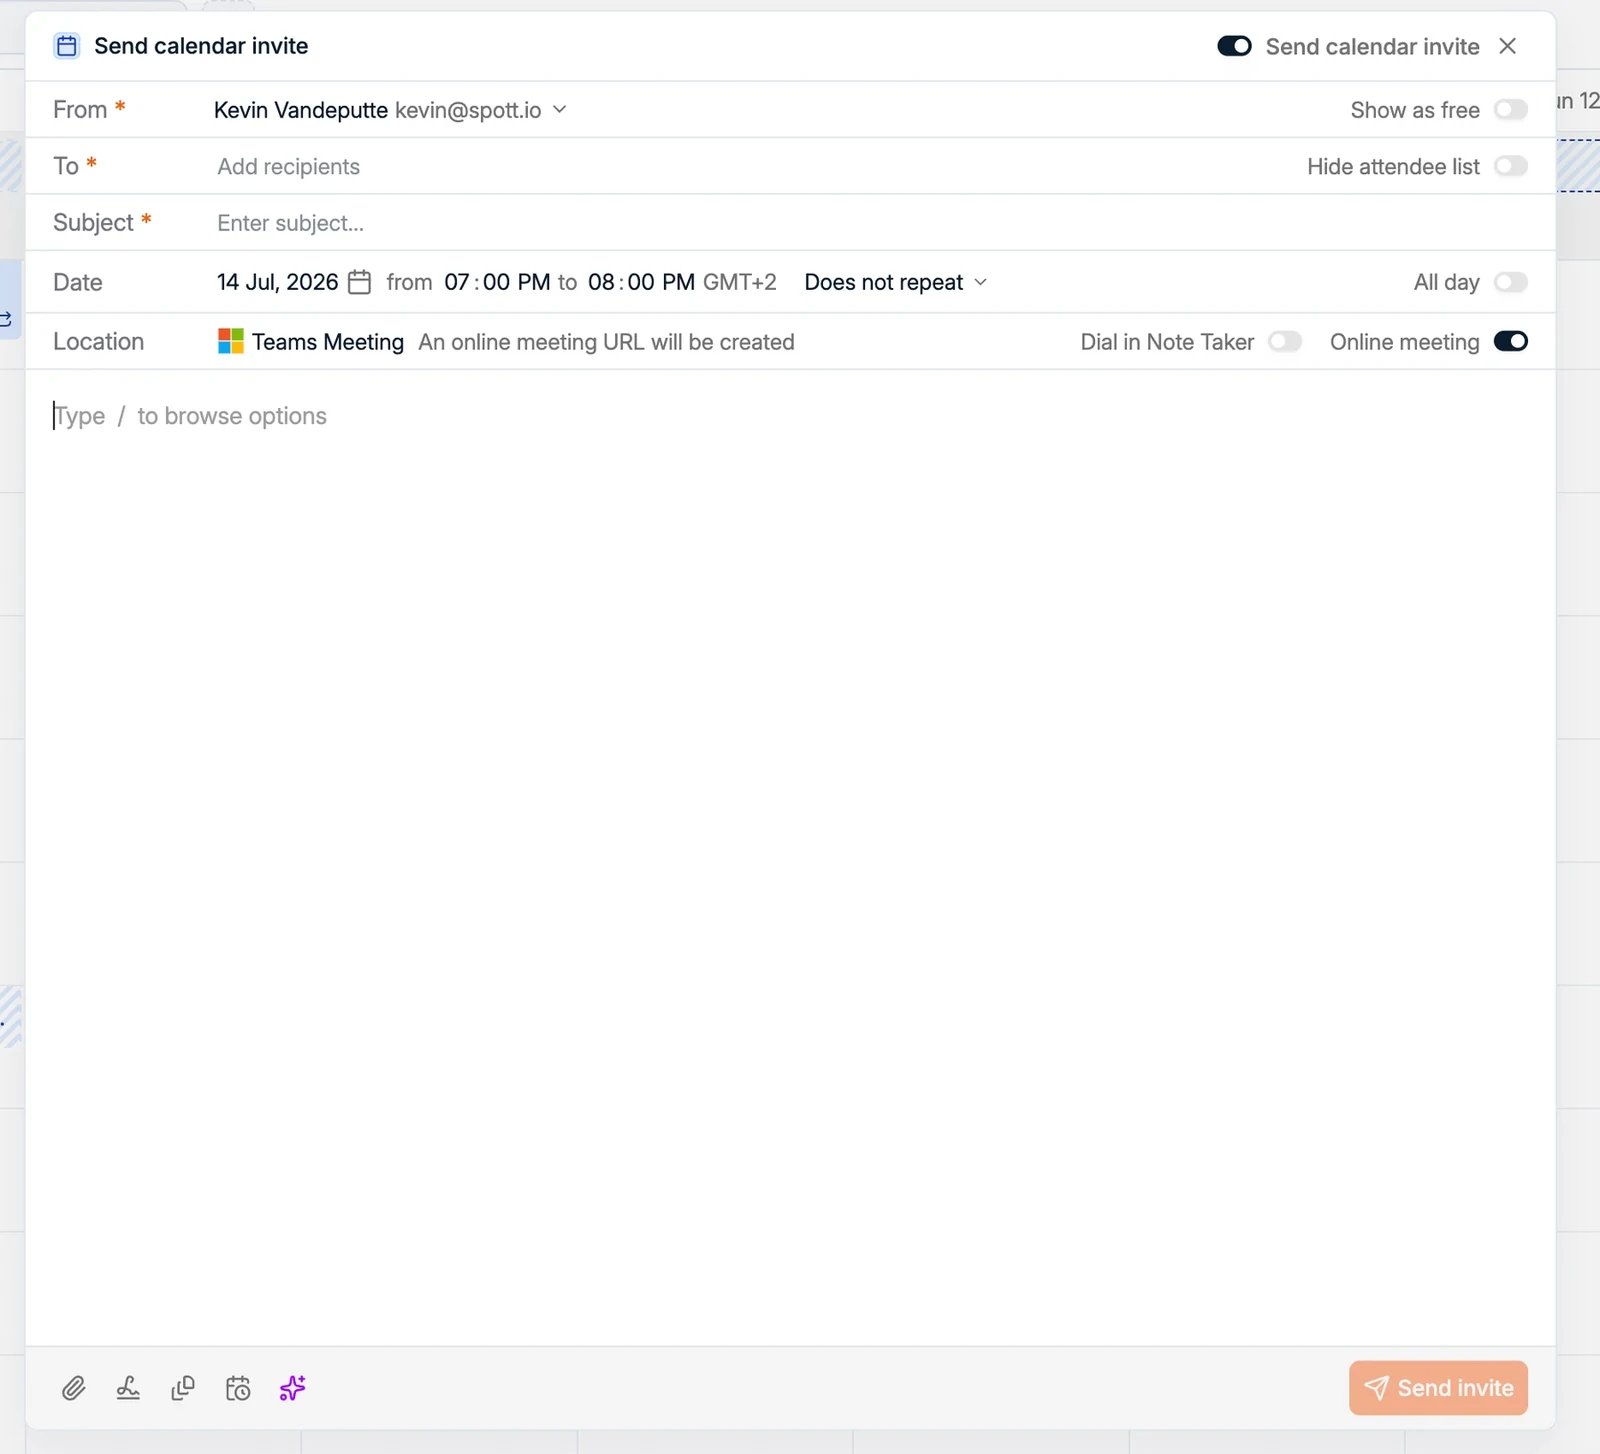 Keep **Send calendar invite** switched on when attendees should receive an invitation. If
the meeting is remote, switch on **Online meeting** so Spott creates a Microsoft Teams or
Google Meet link from your primary connected account.
Spott does not generate Zoom links. The Note Taker can still join a Zoom meeting when it
is invited to an existing Zoom link.
### 2.3 Update or cancel a meeting
Click a calendar event to open its details. From there you can:
* **Toggle Note Taker:** turn recording and summarisation on or off for this meeting.
* **Reschedule:** change the date or time and send the update to attendees.
* **Cancel event:** cancel the meeting and notify attendees.
* **Transcript:** open the transcript and summary after a recorded meeting.
For a step-by-step video on manually letting the Note Taker join a meeting, click
[here](https://www.tella.tv/video/vid_cmrxa2xjb004r0aj8g3w5dd5k/view).
### 2.4 Let others book time with Scheduler
To create a booking link, open **Settings → Calls**, and open **Scheduler**. Switch on
**Enable Spott calendar scheduler**, then click **Create scheduling link**.
Configure each link for the kind of meeting it represents:
* **Meeting duration and slot interval:** the meeting length and the available start times.
* **Maximum days in future:** how far ahead someone can book.
* **Minimum booking notice:** how much notice you need before a meeting.
* **Minimum booking buffer:** the gap to leave before and after existing meetings.
* **Weekly availability:** the bookable times for each day.
You can create several links with different rules, and enable or disable each one
separately.
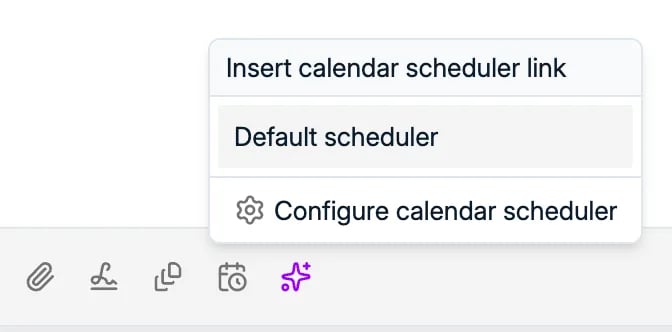
Copy a link to share it directly, or insert it while writing an email with **Insert calendar
scheduler link**. Anyone opening the link only sees times allowed by your connected calendar
and by that link's booking rules.
Keep **Send calendar invite** switched on when attendees should receive an invitation. If
the meeting is remote, switch on **Online meeting** so Spott creates a Microsoft Teams or
Google Meet link from your primary connected account.
Spott does not generate Zoom links. The Note Taker can still join a Zoom meeting when it
is invited to an existing Zoom link.
### 2.3 Update or cancel a meeting
Click a calendar event to open its details. From there you can:
* **Toggle Note Taker:** turn recording and summarisation on or off for this meeting.
* **Reschedule:** change the date or time and send the update to attendees.
* **Cancel event:** cancel the meeting and notify attendees.
* **Transcript:** open the transcript and summary after a recorded meeting.
For a step-by-step video on manually letting the Note Taker join a meeting, click
[here](https://www.tella.tv/video/vid_cmrxa2xjb004r0aj8g3w5dd5k/view).
### 2.4 Let others book time with Scheduler
To create a booking link, open **Settings → Calls**, and open **Scheduler**. Switch on
**Enable Spott calendar scheduler**, then click **Create scheduling link**.
Configure each link for the kind of meeting it represents:
* **Meeting duration and slot interval:** the meeting length and the available start times.
* **Maximum days in future:** how far ahead someone can book.
* **Minimum booking notice:** how much notice you need before a meeting.
* **Minimum booking buffer:** the gap to leave before and after existing meetings.
* **Weekly availability:** the bookable times for each day.
You can create several links with different rules, and enable or disable each one
separately.
Copy a link to share it directly, or insert it while writing an email with **Insert calendar
scheduler link**. Anyone opening the link only sees times allowed by your connected calendar
and by that link's booking rules.
 Bookings appear in your calendar and link to the relevant records in Spott.
Events marked **Busy** or **Out of office** block Scheduler availability. Events marked
**Free** or **Tentative** do not. Outlook creates Teams links and Google creates Meet
links, based on your primary connected account.
Availability, meeting types, booking rules, and sharing links.
Invites, meeting links, attendees, and event updates.
Bookings appear in your calendar and link to the relevant records in Spott.
Events marked **Busy** or **Out of office** block Scheduler availability. Events marked
**Free** or **Tentative** do not. Outlook creates Teams links and Google creates Meet
links, based on your primary connected account.
Availability, meeting types, booking rules, and sharing links.
Invites, meeting links, attendees, and event updates.
## Now your turn
* [ ] Connect your mailbox and check that conversations land on the right records
* [ ] Create one **email template**, personal or workspace
* [ ] Set your **email sharing level**
* [ ] **Schedule a meeting** from the calendar
* [ ] Create a **scheduling link** and insert it into an email
Use reminders and shared context to keep your desk moving.